Normal view

There are new articles available, click to refresh the page.
Today — 11 February 2026Ultimate SAP MM Guides by SAP Logistics Expert

2 Minutes Guide to Create your First Material in S4 HANA

Home » MM

In this post we will first check the configuration in details required for material master creation in S4 HANA. We will keep configuration minimum possible & use of SAP standard wherever possible.

1. Material Master related configuration

Below are the main configuration required to create material master

1.1 Material Type

Grouping of similar attribute materials . For example -Raw materials, Semi-finished products, or finished products.

Material type determines

  • If the material is intended for a specific purpose such as a configurable material or process material.
  • Material number is assigned internally or externally.
  • The number range of the material number.
  • Which screens appear and in what sequence
  • Procurement of the material -manufactured in-house or procured externally, or both

We will use below SAP standard material type

  • ERSA Spare Parts
  • FERT Finished Product
  • HALB Semifinished Product
  • HAWA Trading Goods
  • LEER Empties
  • LEIH Returnable packaging
  • ROH Raw materials
  • VERP Packaging
  • HAWA Trading Goods

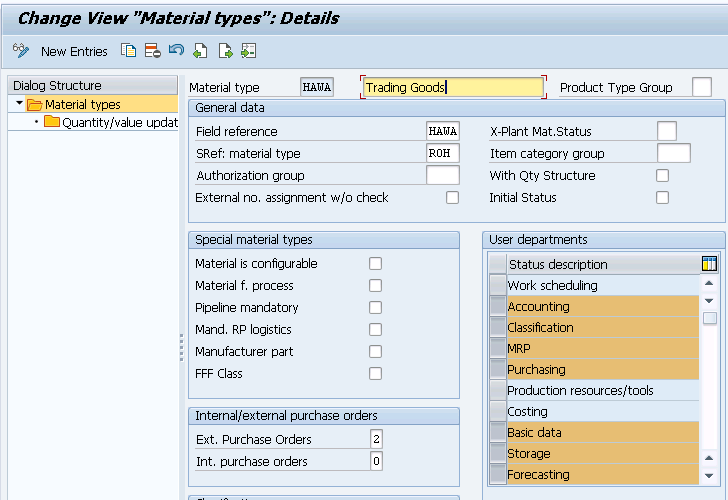
Below is the configuration for let,s say example – Trading Goods (HAWA)

Transaction code – OMS2

Picture : Material Type Configuration

Now click on “Quantity/value updating” & select “QTY Update” & ” Value Update” for your all material type in all your plants (Valuation Area)

So we have selected for our valuation areas PA10, PA20 & PP10

Picture : Qty/value update

1.2 Define Number Ranges for Each Material Type

Here we define the type of number assignment and the number range intervals for material master records. When creating a material master record it is must to assign it a unique number. There are two ways of doing this

1.2.1 Internal number assignment

In this case, a number within the number range interval allowed is assigned by the SAP system. Currently, the maximum length allowed for an internal number is 18.

1.2.2 External number assignment

Here, the user assigns a number within the number range interval allowed. You can define the intervals for external number assignment numerically and alphanumerically. For integration purposes, SAP, currently, allows only the number range length of 18 characters.

Transaction Type ; MMNR

Picture : Number Range Assignment to Material Type

Now let,s create our first material

2. Create your First material in S4 HANA

Here we will create different materials to be used for our car business

2.1 Creation of “Trading Material” -Mat Type “HAWA”

Time needed: 5 minutes

How to Create your first Material in SAP S4 HANA

  1. Go to MM01 and enter below on the Create Material (initial screen)

    Material Code – PA0101-01
    Material Type -HAWA
    Industry Sector – M Mechanical Engineering
    Press enter

  2. Select the views to be created (Presented from the material type config OMS2)
    Enter organization structure in which material is to be created

    Plant -PA10 (PPIC Chicago Plant)
    Sales Org -PA10 (IC Car Sales Organization)
    Distribution Channel – PA (Car Dealers)
    Press enter

    Material Creation-1

  3. On Sales : Sales Org. 2 view

    Enter General Item Category – NORM
    Enter Item Category Group – NORM
    Acct Assmt Grp Mat. – PA (Products)

    Material Master-4

    Gen Item Category for 3rd party subcon party : for third party subcontracting process, we use general item category as BADS


    Through this item category BADS , system determines Item category “RADS” for 3rd Party Subcontracting

    Item Category Determination for 3rd Party Subcontracting

  4. On “Basic Data 1” view

    Enter Description – “First PA01 Material for Car Dealership”
    Enter BUOM – PC
    Enter Division – SR (Spare Parts)
    Enter Material Group – PA10 (IC Car Parts Light)
    Gross Weight – 20 KG
    Net Weight – 18 KG

    Material Master-2

    Material “Packaging Level”

    1 “CARTON” of Material “66” = 6 “PC”
    1 “PALLET” of Material “66” = 8 “CARTON”
    1 “PALLET” of Material “66” = 48 “PC”

  5. On Sales : Sales Org. 1 view

    Enter Delivering Plant -PA10
    Enter Tax Classification -1 (Taxable)

    Tax1

  6. On Sales : General/Plant view

    Enter Availability Check -KP (No Check) – We will configure this and then activate this for another Material
    Enter Batch Management -Selected
    Enter Transportation Group – PA10 (Normal Transport)
    Enter Loading Group -PA10 (Manual Load)

    Material Master-5

  7. On MRP 2 view

    Enter “Storage loc. for EP” as -PP1A -Std. SLOC, This will be defaulted in PO and flows to the subsequent Inbound Delivery, which decides the goods receiving point for the deliveries.

    We assign goods receiving points to the inbound deliveries based on the plant and storage locations.

    Please check the below post for more information

    Optimize SAP LE Organization Structure: Best Practices & Configuration in 6 Steps – Assign Goods Receiving Points for Inbound Deliveries

    Please note that if we want this material to be handled in EWM, then we need to select a Storage location, connected with EWM warehouse in the field “Storage loc. for EP”.

    MM-6

  8. On MRP 4 view

    Click on “Production Versions” button under sub screen “BOM Explosion/ Dependent Requirements”

    Input production version here . It is required for BOM determination in subcon PO. Please see below post to see the details
    BOM

  9. On Plant Data / Stor. 1 view

    Enter Storage Condition as P1 (IM Managed stock) – Based on this we can configure different picking SLOC , based on if SLOC is IM managed, WM managed or EWM managed.

    MM-8

  10. On Accounting 1 View

    Enter Valuation Class as 3100 -Trading Goods.
    ML Active checkbox should be already selected and greyed out. If this is not selected then stop here and check ML activation through below given link to the corresponding post
    Enter price control “V” and price as 13 USD

    MM-9

  11. Save the material and you have created your first material successfully !

HINT

On Step 9 “ML Active” checkbox should be already selected and greyed out. If this is not selected then stop here and check ML activation through the link given below.

How to activate Material Ledger in S4HANA in 5 Easy Steps

2.2 Creation of “Packaging Materials” -Mat Type “VERP”

As per definition provided by SAP- “Packaging materials are intended to enclose or hold together the materials that are to be packed. In other words, the material that is to be packed can be packed into or onto the packaging material. The packaging material can be a load carrier. The most important packaging materials include crates, boxes, containers, wire baskets, and pallets”

Picture 13 : Different Type of Packaging Material (Courtesy SAP Help)

We will create two packaging material

  • Packaging Material CARTONSTD -CARTON WITH SSCC GENERATION
  • Packing Material PALLETSTD – PALLET WITH SSCC GENERATION

a) Packaging Material CARTONSTD -CARTON WITH SSCC GENERATION

TCode – MM01, Select Material type as “VERP” – Packaging Material

Picture 14 : Creation of Standard Carton Packaging Material

Packaging material type Standard Carton “SCAR” assigned to packaging material “CARTONSTD”

Picture 15 : Packaging Material type assignment to packaging material

b) Packaging Material PALLETSTD – PALLET WITH SSCC GENERATION

T-Code – MM01, Select Material type as “VERP” – Packaging Material

Picture 16 : Creation of Packaging material & assignment of Packaging Material Type

Note : Please see the below post to see the packaging material type “SCAR” & “SPAL” configuration in detail

Unlock SAP Efficiency: Master Handling Units Now! – Create the Packaging Materials

3. Extension of Material to Other Plants

There are business cases where we need to extend the materials to other plants.

3.1 Extension to intra-company Plant – Business Case

In order to work with stock transfer/stock transport order , it is mandatory to extend the material in both the plants. This means the material should be available in both receiving & sending plants

We need to extend our materials to our other plants in order to be able to do Stock Transfers & STOs

System will throw an error while transferring the stock or creating the STO , if the material is not extended to receiving plant

Picture: Stock Transfer Error

3.2 Extension to intra-company Plant

As per our organization structure We have two plants PA10 & PA20 assigned to PA10 company code as shown in below picture

Picture : Our Car Business Org. Structure

First we will extend our material to PA20 plant which is assigned to same company code (PA10) as PA10 plant

To extend the material Start MM01

  • Enter material as “66”
  • Enter “Copy from.. Material as “66”

Press Enter

System will copy Material type and industry sector from master record as shown in the below screenshot

Picture : Material Extensions

Select all the views

Picture ” Select All the Views

press enter and system will present source & destination organization levels as shown in the below screenshot

Fill the details as shown in the below screenshot

Picture : source & destination organization levels

Note : Sales Organization PA10 serves for both the plants PA10 & PA20.

Please click HERE for details of assignment of plant to sales organizations.

Press enter and system will automatically select extendable screens one by one.

You will be presented “Classification” screen.

Since we have not configuration yet so just come out from this screen by pressing the “Next Screen” button.

You will be presented the “Sales : sales org. 1” screen

Enter Delivering Plant “PA20-PPIC Boston Part”

Picture : Sales : sales org. 1 screen

Press enter and you will be presented “Sales : sales org. 2” screen

Picture : “Sales : sales org. 2” screen

We are not changing anything on the above screen so just press enter and system will present “Sales : General/Plant” screen

Picture : “Sales : General/Plant” screen

We are not changing anything on the above screen so just press enter and system will present “Intl Trade : Export” screen

Picture : “Intl Trade : Export” screen

We are not changing anything on the above screen so just press enter and system will present “Sales text” screen

Picture : “Sales text” screen

We are not changing anything on the above screen so click on “Purchasing” screen

Picture : “Purchasing” screen

We are not changing anything on the above screen so just press enter and system will present “Intl Trade : Import” screen.

Picture : “Intl Trade : Import” screen.

We are not changing anything on the above screen so just press enter and system will present “Purchase order text” screen

We are not changing anything on the “Purchase order text” screen, so click on “MRP 1” screen

Picture : “MRP 1” screen

We are not changing anything on the above screen so just press enter and system will present “MRP 2” screen

Picture : “MRP 2” screen

We are not changing anything on the above screen so just press enter and system will present “MRP 3” screen

Picture : “MRP 3” screen

We are not changing anything on the above screen so just press enter and system will present “MRP 4” screen

Picture : “MRP 4” screen
  • We are not changing anything on the above screen so just press enter and system will present “Advance Planning” screen .
  • We are not changing anything on the “Advance Planning” screen, so just press enter and system will present “Forecasting” screen

Enter Forecast Model as “N-No forecast/external model”

Picture : “Forecasting” screen

We are not changing anything on the above screen so just press enter and system will present “Plant data / Stor. 1” screen

Picture : “Plant data / Stor. 1” screen

We are not changing anything on the above screen so just press enter and system will present “Plant data / Stor. 2” screen

Picture : “Plant data / Stor. 2” screen

We are not changing anything on the above screen, so just press enter and system will present “Quality Management” screen

We are not changing anything on the “Quality Management” screen, so just press enter and system will present “Accounting 1” screen

Picture : “Accounting 1” screen
In the above screen Price is showing as 15.69 USD per price for this material in PA10 Plant
Let,s assume that this material costs 20 USD in PA20 plant due to cost of living difference , overheads etc.
Picture : Price update in plant “PA20”

After changing the price, press enter and system will present “Accounting 2” screen

We are not changing anything on the “Accounting 2” screen, so just press enter and system will ask to save.

Picture : Material Creation is about to complete

Material is now extended to PA20 Plant.

Picture : Material is now extended to PA20 Plant

3.3 Extension to inter-company Plant

We have two companies PA10 & PP10 with plant assignment shown as below

Picture : Our Car Business Organization Structure

Now we have extend our material to the PP10 plant which is assigned to the different company code PP10.

To extend the material Start MM01

  • Enter material as “66”
  • Enter “Copy from.. Material as “66”

Press Enter

System will copy Material type and industry sector from master record as shown in the below screenshot

Picture : Material Extensions to PP10 Plant

Enter source and destination organization structures

Picture : Source/Destination Org Structures

You will be presented the “Sales : sales org. 1” screen

Enter Delivering Plant “PP10- PPELC Fremont Pl”

Also Electrical plant is tax exempt so select Tax classification as “0-Exempt”

Picture : Sales : sales org. 1 screen

Press enter and you will be presented “Sales : sales org. 2” screen

We are not changing anything on the “Sales : sales org. 2” screen so just press enter and system will present “Sales : General/Plant” screen

Change loading group to “PP10-Manual Load”

Picture : “Sales : General/Plant” screen
  • –> We are not changing anything on the above screen so just press enter and system will present “Intl Trade : Export” screen.
  • –> We are not changing anything on the “Intl Trade : Export” screen so just press enter and system will present “Sales text” screen.
  • –> We are not changing anything on the “Sales text” screen so click on “Purchasing” scree.
  • –> We are not changing anything on the “Purchasing” screen so just press enter and system will present “Intl Trade : Import” screen.
  • –> We are not changing anything on the above screen so just press enter and system will present “Purchase order text” screen
  • –> We are not changing anything on the “Purchase order text” screen, so click on “MRP 1” screen
  • –> We are not changing anything on the MRP 1 screen so just press enter and system will present “MRP 2” screen
  • –> We are not changing anything on the MRP 2 screen so just press enter and system will present “MRP 3” screen
  • –> We are not changing anything on the above screen so just press enter and system will present “MRP 4” screen
  • –> We are not changing anything on the above screen so just press enter and system will present “Advance Planning” screen .
  • –> We are not changing anything on the “Advance Planning” screen, so just press enter and system will present “Forecasting” screen
  • –> We are not changing anything on the above screen so just press enter and system will present “Plant data / Stor. 1” screen.
  • –> We are not changing anything on the above screen so just press enter and system will present “Plant data / Stor. 2” screen.
  • –> We are not changing anything on the above screen, so just press enter and system will present “Quality Management” screen.
  • –> We are not changing anything on the “Quality Management” screen, so just press enter and system will present “Accounting 1” screen.
In the above screen Price is showing as 15.69 USD per price for this material in PA10 Plant
Let,s assume that this material costs 20 USD in PP10 plant due to cost of living difference , overheads etc.
Picture : Price update in plant “PP10”

After changing the price, press enter and system will present “Accounting 2” screen

We are not changing anything on the “Accounting 2” screen, so just press enter and system will ask to save.

Material is now extended to PP10 Plant.

Picture : Material is now extended to PP10 Plant

4. Creating the material for S4 HANA EWM

We have seen the material creation for the S4 or ECC part in the above sections of the post.

Now we will create the material to use in EWM. We will review the material creation for both S4 HANA embedded as well as decentralized EWM on S4 HANA options

We will first review the difference between creation of material in embedded & decentralized EWM

--> Please note that in order to be able to distribute the delivery to the EWM system, the material given in Purchase Order/Inbound Delivery should be created for a storage location which is connected to a EWM warehouse. Check the below posts for detail

--> Configure SAP S4 HANA Material Management Organization Structure in 5 Minutes-Create Storage Location

--> Configure SAP S4 HANA Logistics Execution Organization Structure in 5 Minutes-Assign Warehouse Number


--> Storage location in the Purchase Order & subsequent to Inbound delivery flows from the "Storage Location for EP" field of "MRP2" view of the material master. Please check the detail HERE

4.1 Material Creation Difference-Embedded Vs Decentralized EWM

Before understanding the difference, we need to understand that whenever we create the material, it is first created in SCM (i.e., APO stack)

We can display the material in “/SAPAPO/MAT1”. Here all fields are replicated from S4/EWM and get overwritten with update in S4/EWM

Now once material is present in SCM/APO, we can then extend (create) this material for our Warehouse. We use “/SCWM/MAT1” for this

--> Creating the material in SCM/APO is like creating the material globally in EWM instance (logically in case of Embedded EWM & Separate sever in case of decentralized EWM).

--> Second level is to create/extend this material in our Warehouse. It is mandatory to have the material in SCM/APO (step above) to be able to create material for our Warehouse.

4.1 Creating Material for Embedded S4 HANA EWM

As explained above we will first create the material in SCM/APO.

We will create material “Battery “

4.1.1 Material Creation in SCM/APO

We create the material first same as we create in S4/ECC normally.

This material creation is already explained in the step 2, so we have created this material offline.

Picture: Material Creation in ECC/S4

In case of Embedded EWM, as soon as we create this material in S4/ECC through MM01, it is available in SCM/APO

Run /SAPAPO/MAT1.

Input material number & choose “Global Data” radio button.

Picture: Material in SCM/APO..1
Picture: Material in SCM/APO….2

4.1.2 Material Creation in Warehouse

Since we have already fulfilled the prerequisite of material creation in warehouse (Material is present now in SCM/APO as shown in section 4.1.1), We can now create this material in our warehouse.

Run /SCWM/MAT1

Picture: Creation of Material in WH

Please check the below post for configuration of “Party Entitled to Dispose”

How to Integrate SAP EWM Warehouse in 7 Easy Steps

Give the required data in “warehouse data” & “ST. Type Data” view

Picture: WH Product Maintenance..1

input “Put away Control indicator” & “Removal Control Indicator”

Picture: WH Product Maintenance.…2

in “ST.Type Data”, input Storage type & storage section indicator

Picture: WH Product Maintenance….3

4.2 Creating Material for Decentralized EWM on S4 HANA.

To create the material in decentralized EWM, we use ALE/IDOC technique.

--> Since decentralized EWM is a separate server so there is a sender system (S4 HANA) and a receiver system (EWM) involved in Creation of a Material for Decentralized EWM on S4 HANA.

--> Please note that SAP ERP/S4 is always the sender system, and decentralized EWM. is always the receiver system.

4.2.1 Material Creation in SCM/APO

As explained material needs to be created first at global level in SCM/APO of the decentralized EWM server.

This is done through ALE/IDOC.

We will review here the full process of material creation.

Note: We will not explain the process of ALE set up as nothing special in it. It is just a general ALE set up which is used normally in SAP

4.2.1.1 Creating Reduced Message Types in ERP System

We will see the reduced message type MATMAS in detail in a separate post.

5. Creating the material for Specific Business Process

If there is a specific business process needs to be determined for a material (specially in outbound/inbound delivery), then this is decided through field “Gen. item cat. grp” on “Sales: sales org 2” view of the material.

5.1 General Purpose Material

For a normal business process. the value of this field is given as “NORM” as used in the above section of the post.

Picture: “Gen Item Cat.grp” of General-purpose material

5.2 Specific Purpose Material

When there is a special business process to be used, the value of the field “Gen. item cat. grp” is different.

For example

--> Some Example of "Gen. item cat. grp" value for specific business process

       NLAG --> "Non-stock material"
       ERLA -->	Structure/Mat. Above
       ERLB --> Structure/Mat. Above
       LEER -->	Empties
       LEIH	--> Returnable Packaging
       VERP--> Packaging

5.2.1 “Gen. item cat. grp” for Spare Parts Specific Business Purpose

We have used general item category for our material 700007106 which is specifically created as spare part for spare part specific purpose.

We used “YSPR” for this field for the spare parts

Picture: Gen. item cat. grp YSPR for spare parts material
--> The above field is used to To determine different line item category "YSPR" for the spare parts materials from the the standard line item category "YELN", we have to input different "item category" in the material master of spare parts materials. Please check the below link to see this in detail

Configure SAP S4 HANA Sales Documents in 10 Minutes-Item Category Determination in Special Process Inbound Delivery

5.2.2 “Gen. item cat. grp” for Third Party Sales

We use Item category Group as “BANS” for the third party sales process. The rest of the material creation process will same as HAWA as given HERE

Picture: Material Creation for Third Party Sales

5.2.3 “Gen. item cat. grp” for Third Party Individual PO

We use Item category Group as “BANC” for the third party sales process. The rest of the material creation process will same as HAWA

Picture: “Gen. item cat. grp” for Third Part Individual PO

5.2.4 “Gen. item cat. grp” for Third Party Subcontracting

We use Item category Group as “BADS” for the third party sales process. The rest of the material creation process will same as HAWA

Picture: Gen. item cat. grp” for Third Party Subcontracting

6. Creation of Finished Goods for Production Order (FERT)

Here we will create a finished good material to use in our production order

Step 1

Go to MM01 and enter below on the Create Material (initial screen)

  • Material Code – “Internally Generated”
  • Material Type -FERT
  • Industry Sector – M Mechanical Engineering

Press Enter

Step 2

Select the views to be created (Presented from the material type config OMS2). Enter organization structure in which material is to be created

  • Plant -PA10 (PPIC Chicago Plant)
  • Sales Org -PA10 (IC Car Sales Organization)
  • Distribution Channel – PA (Car Dealer

Press Enter

Step 3

On “Basic Data 1” view

  • Enter Description – “Finished Car Model D
  • Enter BUOM – EA
  • Enter Division – PC (Petrol Car)
  • Enter Material Group – PA10 (IC Car Parts Light)
  • Gross Weight – 2000 KG
  • Net Weight – 1900 KG

Step 4

On Sales : Sales Org. 1 view

  • Enter Delivering Plant -PA10
  • Enter Tax Classification -1 (Taxable)

Step 5

On Sales : Sales Org. 2 view

  • Enter General Item Category – NORM
  • Enter Item Category Group – NORM
  • Acct Assmt Grp Mat. – PA (Products)

Step 6

On Sales : General/Plant view

  • Enter Availability Check -KP (No Check)
  • Enter Batch Management -Selected
  • Enter Batch management(Plant) – Selected
  • Enter Transportation Group – PA10 (Normal Transport)
  • Enter Loading Group -PA10 (Manual Load)

Step 7

On MRP 2 view

  • Enter “Prod. Stor. location -PP1B (This will be the production supply SLOC from where material for production will be supplied)
  • Enter “Storage loc. for EP” as -PP1A -Std. SLOC, (This will be defaulted in PO and flows to the subsequent Inbound Delivery).

    Please note that if we want this material to be handled in EWM, then we need to select a Storage location, connected with EWM warehouse in the field “Storage loc. for EP”.

Step 8

On Plant Data / Stor. 1 view

Enter Storage Condition as P1 (IM Managed stock) – Based on this we can configure different picking SLOC , based on if SLOC is IM managed, WM managed or EWM

Step 9

Accounting 1 View

  • Enter Valuation Class as 7920 -Finished Products
  • ML Active checkbox – should be already selected and greyed out. (If this is not selected then stop here and check ML activation through below given link to the corresponding post).
  • Enter price control “V”/”S” and price as 50000 USD.

7. Creation of SFG for Production Order (HALB)

Here we will create a semi-finished good (Assembly) material to use in our production order

Step 1

Go to MM01 and enter below on the Create Material (initial screen)

  • Material Code – “Internally Generated”
  • Material Type -HALB
  • Industry Sector – M Mechanical Engineering

Press Enter

Step 2

Select the views to be created (Presented from the material type config OMS2). Enter organization structure in which material is to be created

  • Plant -PA10 (PPIC Chicago Plant)
  • Sales Org -PA10 (IC Car Sales Organization)
  • Distribution Channel – PA (Car Dealer

Press Enter

Step 3

On “Basic Data 1” view

  • Enter Description – “Chassis Model D
  • Enter BUOM – EA
  • Enter Division – PC (Petrol Car)
  • Enter Material Group – PA10 (IC Car Parts Light)
  • Gross Weight – 600 KG
  • Net Weight – 550 KG

Step 4

On Sales : Sales Org. 1 view

  • Enter Delivering Plant -PA10
  • Enter Tax Classification -0 (Exempt)

Step 5

On Sales : Sales Org. 2 view

  • Enter General Item Category – NORM
  • Enter Item Category Group – NORM
  • Acct Assmt Grp Mat. – PA (Products)

Step 6

On Sales : General/Plant view

  • Enter Availability Check -KP (No Check)
  • Enter Batch Management -Selected
  • Enter Batch management(Plant) – Selected
  • Enter Transportation Group – PA10 (Normal Transport)
  • Enter Loading Group -PA10 (Manual Load)

Step 7

On MRP 2 view

  • Enter “Prod. Stor. location -PP1B (This will be the production supply SLOC from where material for production will be supplied)
  • Enter “Storage loc. for EP” as -PP1A -Std. SLOC, (This will be defaulted in PO and flows to the subsequent Inbound Delivery).

    Please note that if we want this material to be handled in EWM, then we need to select a Storage location, connected with EWM warehouse in the field “Storage loc. for EP”.

Step 8

On Plant Data / Stor. 1 view

Enter Storage Condition as P1 (IM Managed stock) – Based on this we can configure different picking SLOC , based on if SLOC is IM managed, WM managed or EWM

Step 9

Accounting 1 View

  • Enter Valuation Class as 7900 -Semi finished products
  • ML Active checkbox – should be already selected and greyed out. (If this is not selected then stop here and check ML activation through below given link to the corresponding post).
  • Enter price control “V”/”S” and price as 9999 USD.

8. Creation of Raw Material for Production Order (ROH)

Here we will create a RAW material (Component) to use in our production order

Step 1

Go to MM01 and enter below on the Create Material (initial screen)

  • Material Code – “Internally Generated”
  • Material Type -ROH
  • Industry Sector – M Mechanical Engineering

Press Enter

Step 2

Select the views to be created (Presented from the material type config OMS2). Enter organization structure in which material is to be created

  • Plant -PA10 (PPIC Chicago Plant)
  • Sales Org -PA10 (IC Car Sales Organization)
  • Distribution Channel – PA (Car Dealer

Press Enter

Step 3

On “Basic Data 1” view

  • Enter Description – “Tail Lights
  • Enter BUOM – KG
  • Enter Division – PC (Petrol Car)
  • Enter Material Group – PA10 (IC Car Parts Light)
  • Gross Weight – 5 KG
  • Net Weight – 4 KG

Step 4

On Sales : Sales Org. 1 view

  • Enter Delivering Plant -PA10
  • Enter Tax Classification -1 (Taxable)

Step 5

On Sales : Sales Org. 2 view

  • Enter General Item Category – NORM
  • Enter Item Category Group – NORM
  • Acct Assmt Grp Mat. – PA (Products)

Step 6

On Sales : General/Plant view

  • Enter Availability Check -KP (No Check)
  • Enter Batch Management -Selected
  • Enter Batch management(Plant) – Selected
  • Enter Transportation Group – PA10 (Normal Transport)
  • Enter Loading Group -PA10 (Manual Load)

Step 7

On MRP 2 view

  • Enter “Prod. Stor. location -PP1B (This will be the production supply SLOC from where material for production will be supplied)
  • Enter “Storage loc. for EP” as -PP1A -Std. SLOC, (This will be defaulted in PO and flows to the subsequent Inbound Delivery).

    Please note that if we want this material to be handled in EWM, then we need to select a Storage location, connected with EWM warehouse in the field “Storage loc. for EP”.

Step 8

On Plant Data / Stor. 1 view

Enter Storage Condition as P1 (IM Managed stock) – Based on this we can configure different picking SLOC , based on if SLOC is IM managed, WM managed or EWM

Step 9

Accounting 1 View

  • Enter Valuation Class as 3000 -RAW Products
  • ML Active checkbox – should be already selected and greyed out. (If this is not selected then stop here and check ML activation through below given link to the corresponding post).
  • Enter price control “V”/”S” and price as 50 USD.

Note:

Please see below post to check how the FG, SFG & Raw Material created above are used in the BOM and subsequently in the production order

How to Configure Base PP Cycle in 5 Minutes

We have created the below FG, SFG & Raw materials

Assembly (Semi Finished)-Chassis Model D (Material 500000023)

  1. Component-Tail Lights (Material-500000007)
  2. Component-Boot Insulation (Material-500000008)

Assembly (Semi Finished)-Car Boot Model D (Material 500000021)

  1. Assembly (Semi Finished)-Chassis Model D (Material-500000023)
  2. Component-Rear Tires (Material no.-500000018)

Finished Product (Car model D, Material-500000027)

  1. Component-Electric Wires (Material-500000019)
  2. Assembly (Semi Finished)-Car Boot Model D (Material-500000021)
  3. Component-Petrol (Material-500000026)
  4. Component-Engine Assembled (Material-500000009)

Now we will activate QM view for the component Tail lights.

9. Creation of QM view for QM-MM Interface

Since component Tail Lights (Material-500000007) is purchased from the vendor so we need to inspect it at the time of goods receipt

We need to assign inspection type “01” in material master QM view

Go to MM01 and enter material 500000007, select QM view and input plant PA10

Picture: QM view Creation for inspection Type “01”

As soon as we select the inspection type “01” in QM view of material master, the fields selected in the configuration will be activated by default

Please see the below post for detail

How to Configure & Test QM in Procurement-Define Default Values for Inspection Type

9.2 QM In Procurement Active Checkbox

If we set this indicator then “QM in procurement” is activated for all the plants pertaining to a client.

--> If we activate QM in procurement indicator in the material master record (Which is at the client level), we must also input "Quality Procurement Key" at the plant level for quality management in procurement.

9.2 QM Control Key

This key determines all the conditions which are valid for quality management in procurement.

To configure the QM procurement key , follow the below path

SPRO –> Quality Management –> QM in Logistics –> QM in Procurement –> Define Control Keys for QM in Procurement

We have configured the below key for our materials

Picture: QM Control Key Configuration

In the previous post, we have activated Material Ledger in 5 Easy Steps. Click on the above link to read in detail.

In the next Post we will load GL master. GL accounts will be required to create/configure further process like BP, MM-FI Integration etc. Click on the above link to read in detail.

The post 2 Minutes Guide to Create your First Material in S4 HANA appeared first on Ultimate SAP Guides | S4 HANA Logistics Modules.

Master SAP S/4HANA: 5 Essential Steps to Activate Material Ledger and Boost Financial Accuracy

Home » MM

In the world of SAP S/4HANA, the Material Ledger (ML) is no longer a luxury or an optional sub-module—it is a mandatory requirement for material valuation. While the “mandatory” label often causes concern for logistics and finance teams, activating ML doesn’t have to be a technical nightmare. When executed correctly, the Material Ledger serves as the backbone for multi-currency functionality and real-time inventory valuation across different accounting standards (like IFRS or Local GAAP).

The following guide provides a strategic roadmap to move your valuation areas from a “Red” status to a “Green” productive state, ensuring your financial data is accurate and compliant.

5 Easy Steps to Material Ledger Activation

Step 1: Assign Currency Types to Material Ledger Type (T-Code: OMX2)

To record inventory values across legal, group, and profit center valuations, you must configure the currency types associated with your Material Ledger. This allows for multi-currency reporting and valuation views that are critical for global enterprises

Picture: Multiple Currencies in Material Ledger
--> We have to configure & activate Material Ledger as it is mandatory in SAP s4 HANA

--> We want to configure & activate material Ledger with minimum possible configuration

--> So we will activate our Material Ledger with only 1 currency "Company Code currency" to keep it simple

Please follow the below path for this configuration.

Picture : Path to Assign Currency Types to Material Ledger Type
Picture: ML Type & Assigned currencies

Senior Consultant’s Tip: For your initial S/4HANA activation, using Material Ledger Type “9000” with only “Company Code currency” (10) is a Best Practice for Lean Implementations. This setup minimizes complexity by generating only one view in the material master, which is often sufficient for mid-sized organizations or those not yet utilizing complex parallel valuation.

Select material ledger type “9000” and click on “Define individual characteristics”

Picture: Currency Assigned to the ML type “9000”

Step 2: Assign Material Ledger Type to Valuation Area (T-Code: OMX3)

This step acts as the mapping phase, where you tell the SAP system which specific plants (valuation areas) will track material costs under the rules defined in Step 1.

In this configuration, assign Material Ledger type “9000” to your valuation areas (e.g., PA10, PA20, and PP10).

Important Warning: After this assignment, you will notice the valuation area status is Red. Do not be alarmed; this is the expected status. It will remain red until you complete the Production Start-up in Step 4.

Please follow the below path for this configuration.

Picture : Path to Assign Material Ledger Type 9000 to Valuation Area

and assign our chosen material ledger type “9000” to all our valuation areas (PA10, PA20 & PP10)

Picture : Assign our chosen Material Ledger Type 9000 to our Valuation Areas

Step 3: Activate Valuation Areas for Material Ledger (T-Code: OMX1)

Transaction OMX1 is the “On Switch” for the Material Ledger in your plants. Beyond just turning it on, this is where you define how the system determines material prices.

You must choose between two Price Determination levels:

1. Transaction-Based (2): Materials are valued at either moving average price (V) or standard price (S). Moving average price is calculated only for informational purposes.

2. Single/Multi-level (3): This is the prerequisite for Actual Costing. It calculates a periodic unit price for closed periods. Single-level rolls variances into ending inventory, while Multi-level rolls variances from lower-level components (Raw Materials) up to higher-level products (Finished Goods).

Strategic Directive: For your initial S/4HANA activation, I recommend Option 2 (Transaction-Based) to maintain a streamlined logistics profile. However, if your finance team requires the elimination of manual month-end variance allocations and needs true Actual Costing, Option 3 is the standard choice.

Please follow the below path for this configuration.

Picture : Path to Activate Valuation Areas for Material Ledger

Select “ML Act.” check box and Price determination level as option 2 “Transaction-Based Price Determination”

Picture : Activate Valuation Areas for Material Ledger

Note

The value of price determination flows from this config to the material master as shown in the below screenshot.

Picture: Price Determination values from config to the Material Master

Step 4: Production Start-up of Material Ledger (T-Code: CKMSTART)

This is the final execution step. Running CKMSTART converts your valuation areas into a productive state, allowing SAP to begin recording actual costs, multi-currency values, and parallel accounting.

Once you execute this for a specific plant (such as PA10), the system will trigger the “Plant is now productive” indicator. It is only at this point that the status in transaction OMX3 will finally turn from Red to Green.

Lets first activate this for our PA10 valuation Area (Plant)

Picture : Production Start-up of Material Ledger for Valuation Area PA10

All green log informing PA10 is now productive with Material Ledger.

Picture : Successful Production Start up of Material Ledger for Valuation Area PA10

Valuation area PA20 & PP10 is made productive with ML through similar way

Step 5: Troubleshooting Common Activation Errors

Technical hurdles are common during ML activation. Here is how to resolve the most frequent errors encountered in the field:

Error 1 -Company Code is not set up for Material Management (M3152)

When we tried PP10 to make productive with ML, below error message is encountered

Picture : Error M3152


To resolve this error , We need to set-up Company code PP10 for Material Management through T-code OMSY

Picture : OMSY for PP10 Company Code to Resolve Error M3152


Now PP10 is initiated for MM periods from the current month .

Please note we need to open posting period starting of every month through MMPV. This step was already done for PA10 company code hence no error for Plants PA10 & PA20

Now re-try to make PP10 plant productive with ML

PP10 plant is Successfully productive now

Picture : Successful Production Start up of Material Ledger for Valuation Area PP10

Error 2 -Material Ledger Currencies were changed (C+039)

How to resolve error C+039 ‘Material ledger currencies were changed’

To resolve this error run the transaction code CKM9 and check Company Code/Controlling area currency as per screenshot given below

Picture : Checking of Currencies

This currency should be aligned with the currency in SCC4

Note : For Example

Company Code Currency : USD

Currency in SCC4 : EUR

in this case in OKKP, select group currency 30 and currency as EUR

Please note that these currencies selection should not be changed after ML activation (CKMSTART). If changed then Error Material Ledger Currencies were changed (C+039) will come. if this happens then revert to the original currencies selection after deactivation of ML>

Error 3- ML Active checkbox is not selected in Material Master Accounting View.

  • To resolve this first deactivate the ML through running report SAPRCKMJX in SE38
  • Now go to OMS2, select your material type and click on “Quantity/value updating”
  • Now select the “Quantity updating” & “value updating” check box for your valuation area (plant) & save.
  • Now Set the Plant production for ML again through t-code CKMSTART
  • Check in MM03- ML active checkbox should be now selected.

Error 4- ML currencies are not integrated in FI for valuation area (Error FML_CUST033)

To resolve the error we will follow 3-Part Remedial Sequence

Phase 1 (Controlling Area Setup): 

To resolve this error, Configure the controlling area as given below for our Co-Area PPIN and linked it to Company codes. Please note that currencies should be aligned for material ledger & Controlling area

Picture : Configuration of PPIN Controlling Area
Phase 2 (Component Activation)

In SPRO (Maintain Controlling Area), ensure “CCtr Std. Hierarchy” is created. Set all components to “Not Active” to maintain a lean logistics scenario.

SPRO –> Controlling –> General Controlling –> Organization –> Maintain Controlling Area

Picture : Maintain Controlling Area

“CCtr Std.Hierarchy” is mandatory. Just give name as “PPIN” and save.

System will prompt for creation of “PPIN” “CCtr Std.Hierarchy”. Click on “yes”

Picture : Prompt for creation of “PPIN” “CCtr Std.Hierarchy”

Click on “Activate components/control indicators”

Picture : Activate components/control indicators

Since our focus is not on controlling right now so choose all components as not active to have minimum restrictions/work in our logistics scenarios.

Picture : Choose Components as “Not Active”

We have already assigned our company codes “PA10” & “PA20” to our controlling area “PPIN”

Now run the CKMSTART again for our valuation area and Error FML_CUST033 -ML currencies are not integrated in FI for valuation area should not come.

if you are still getting this error then we need to configure the company code currency

Phase 3 (Ledger Integration)

Use transaction SB22 to check for the presence of your company code. If missing, navigate to FINSC_LEDGER, select Ledger “0L,” and ensure the company code settings are fully maintained.

Check the presence of your company code in transaction SB22

Picture : Check your Company Code Presence.

If your company code is not present then run T-code “FINSC_LEDGER”

Select line with ledger “0L” and click on “Company code Settings for the Ledger”

Picture : Company code Settings for the Ledger-1

Insert your company codes

Picture : Company code Settings for the Ledger-2

Now this error will be 100% resolved.

Error 5- Error C+380 with CKMSTART

The error message C+380 happens if the plant has an inconsistent entry in table T001W.

Cause: Inconsistency in plant/valuation area assignment.

Resolution: Use T-Code OX18 to delete the plant-to-company code assignment, save, and then re-assign the plant.

Expert FAQ: High-Value Technical Queries

Is SAP S/4HANA Material Ledger mandatory?

Yes. In SAP S/4HANA Finance, the Material Ledger is the mandatory engine for all material valuations. You cannot perform inventory management without it.

What is the difference between Transaction-based and Multi-level price determination? 

Transaction-based (Option 2) values materials at standard or moving average prices for day-to-day operations. Multi-level (Option 3) is used for Actual Costing, which calculates the Periodic Unit Price by rolling variances from raw materials to finished goods at month-end.

How do I fix the ‘Plant is not productive’ error in SAP S/4HANA Material Ledger?

This error occurs when Step 4 has not been completed. You must run transaction CKMSTART for the valuation area to set the productive indicator and move the status from Red to Green.

Video Tutorial

To get the most value from this topic, we recommend reading this full blog post along with watching the embedded YouTube video below.

The post provides structured insights and practical examples, while the video offers a visual walkthrough to reinforce key concepts. Together, they deliver a complete learning experience for SAP professionals.

Video: How to Activate SAP S/4HANA Material Ledger in 5 Steps + Common Error Resolutions

Conclusion

Transitioning your valuation areas from Red to Green is more than just a configuration checkbox—it is a significant milestone for inventory transparency and financial accuracy. By following these five steps, you ensure that your S/4HANA system is architected for multi-currency reporting and advanced valuation requirements.

Are you ready to move beyond basic activation? Now that your Material Ledger is active, you can leverage Actual Costing for deep profitability analysis. To eliminate manual entry errors and speed up your deployment, I highly recommend using the Configuration Accelerator Workbooks for Efficiency

Note

Check Post FI Organization Structure in 5 Minutes to familiarize yourself with S4 HANA FI Organization Structure

Check Post SD Organization Structure in 5 Minutes to familiarize yourself with S4 HANA SD Organization Structure

Check Post MM Organization Structure in 5 Minutes to familiarize yourself with S4 HANA MM Organization Structure

The prerequisites to Material Ledger activation are successful configuration of minimum required FI, SD & MM organization structure. Click on the above link to read in detail.

We have completed Minimum Required organization Structure & activated Material Ledger (Mandatory for S4 HANA). Now we can configure and create our first material. Click on the above link for more detail.


Image Courtesy : Education vector created by freepik – www.freepik.com

The post Master SAP S/4HANA: 5 Essential Steps to Activate Material Ledger and Boost Financial Accuracy appeared first on Ultimate SAP Guides | S4 HANA Logistics Modules.

Before yesterdayUltimate SAP MM Guides by SAP Logistics Expert

SAP S/4HANA Material Ledger: Features, Benefits, and Real Business Scenarios

Home » MM

In today’s competitive business environment, organizations need real-time cost transparency, accurate inventory valuation, and streamlined financial reporting to stay ahead. This is exactly where the SAP S/4HANA Material Ledger comes into play.

As a powerful tool for multi-currency valuation, profit analysis, and integrated accounting, it helps businesses gain deeper insights into their production and sales costs while ensuring compliance with global standards.

In this post, we’ll explore the key features, major benefits, and real-world business scenarios of SAP S/4HANA Material Ledger in simple, easy-to-understand language so that both finance professionals and business leaders can maximize its potential.

Note:

To get the most value from this topic, we recommend reading this full blog post and watching the embedded YouTube video below.

The post provides structured insights and practical examples, while the video offers a visual walkthrough to reinforce key concepts. Together, they deliver a complete learning experience for SAP professionals

Video: SAP S4HANA Material Ledger Features, Benefits, and Real Business Scenarios

1) Why Material Ledger Activation is mandatory in S4 HANA.

In today’s complex global business landscape, companies frequently operate across multiple countries—each governed by its own financial, tax, and legal regulations. As a result, organizations must manage parallel valuations, where the same material or inventory must be valued differently based on varying accounting principles, such as International Financial Reporting Standards (IFRS) and Local GAAP. For example, a business may use standard price valuation for IFRS while applying moving average valuation for local compliance—all for the same material.

Moreover, multi-currency valuation becomes equally essential when transactions occur in one currency, reports are generated in another, and statutory accounting is required in a third. A global enterprise might procure materials in USD, manage operations in EUR, and report in the local currency of its subsidiaries. This complexity requires a robust solution to handle real-time, accurate, and compliant multi-currency valuations.

Parallel Valuation, Multi-Currency, and Material Ledger Are Essential in today’s Global Business Operations.

The Material Ledger is the basis of actual costing. It enables material inventories to be valuated in multiple currencies and allows the use of different Valuation approaches.

Let’s understand this in simple terms.

2) How to Understand Material Ledger in SAP S/4HANA.

To understand the material ledger , we need to understand the Sub-Ledger, General Ledger (GL), Trial Balance & Balance sheet.

2.1) What is Sub-Ledger

To understand the material ledger, we need to first understand the Sub-Ledger.

--> In order to understand Sub-Ledger, we need to first Understand the Basics of SAP Financial Accounting: General Ledger, Trial Balance & Balance Sheet.

2.1.1) General Ledger (GL)

In simple terms, the General Ledger (GL) is the main financial record of a company. It keeps track of all money coming in and going out, recorded as debits and credits. This is the backbone of any company’s financial accounting system in SAP S/4HANA.

2.1.2) Trial Balance

To make sure everything adds up correctly, companies use something called a Trial Balance—which is just a report showing the closing balances of all General Ledger accounts on a specific date. If the totals match, it confirms that the books are accurate.

2.1.3) Balance Sheet

The Balance Sheet then uses this data to show the financial health of the business at that point in time—listing what the company owns (assets) and owes (liabilities).

2.2) Concept of Sub-Ledger

Once you understand these core financial concepts, the next step is to explore the Sub-Ledger, which sits just below the General Ledger.

Sub-ledgers track detailed transactions for specific areas like customers, vendors, or assets. These transactions are posted either directly or through automated journal entries from integrated modules like SAP FICO, MM, or SD.

Material Ledger/Actual Costing is a Sub-Ledger like AP, AR, Fixed Assets

Picture: Material Ledger is a Sub-Ledger

3) Functionality of Material Ledger

Below are the main functionalities of material ledger.

  • Inventory Valuation/revaluation
  • Visibility of Price changes
  • Updating Standard Cost with Actual Prices (optional)
  • Periodic Unit price.
--> In simple terms, the Material Ledger in SAP S/4HANA is a tool that records all transactions related to materials—whether it's purchasing, receiving goods, price changes, or consumption during production. 

--> Material Ledger keeps track of how much materials cost and how they are used, while also supporting multiple currencies and different valuation methods (like standard price or actual cost).

3.1) Actual Costing

Actual costings means inventories are valued at Actual Cost based on the Actual Costing Runs.

Here inventories are valuated at actual cost means Materials are valued at Standard Price which is then adjusted to reflect the difference between the preliminary price and cost.

In Material Master accounting tab, the value of the field “Price determination” determines the actual costing.

Picture: Price Determination in Material Master

Since our material is having price determination as 2 (Transaction based) as shown in the above screenshot, the price difference gets posted to FI and will not participate in inventory valuation at actual cost.

--> Looking at the material as shown in the above screenshot, for our car business Material Ledger is active but actual costing is inactive 

Picture: Material Ledger Functionalities & their usage for our car business

3.2) Multiple Currencies & Valuations

The Material Ledger is a powerful functionality in SAP S/4HANA that enables parallel valuation of inventory in multiple currencies and accounting principles.

--> Material Ledger allows businesses to record, manage, and report material movements and inventory values across different valuation views (legal, group, and profit center)

--> Material Ledger supports up to three currencies for each material document.

For example : In the below screenshot a material is shown to have price in three currencies

Picture: Material Price in three currencies due to Material Ledger Activation

If a transaction is posted in CNY, we can see the FI document in all the three currencies.

In the below picture, it is shown how Material Ledger makes possible multiple currencies along with multiple valuations.

Picture: Multiple Currencies along with Multiple Valuations

With Material Ledger, organizations gain real-time visibility into inventory costs, currency fluctuations, and financial impacts—ensuring transparent and compliant financial reporting across all jurisdictions.

In the below section, we present real-world business scenarios that illustrate the practical relevance of the three valuation views available in the SAP S/4HANA material master.

These views—legal, group, and profit center—enable organizations to assess material values from different financial perspectives. The Material Ledger supports up to three currencies per material document to ensure accurate valuation across multiple reporting requirements, such as local statutory compliance, group-level consolidation, and internal profitability analysis.

This multi-currency capability helps businesses maintain financial transparency and consistency across global operations

4) Real Business Scenarios

Imagine we have a multinational business which operates in Canada, Singapore & USA. This business has a company & Plant each in Singapore & America and Headquarters in Canada.

  • This business sends semifinished materials from Singapore company to USA company on an intercompany price which include a small profit margin for SG company. USA company does further operation and sells the finish materials to the customers in USA.

4.1) Business Scenario 1 – Legal Valuation

This scenario involves legal reporting. Company A sells to company B in selling price of 120 Singapore Dollar with Company A cost of 100 Singapore Dollar. It means Company A profit is 20 Singapore Dollar.  So business wish – while doing legal reporting in each country, system should automatically prepare the report as per the local country rules & regulation and as per the local currency. In the above example – while reporting this transaction in the USA legal reporting, system should report inventory cost in USA company as equivalent of 120 Singapore Dollar converting into US Dollar.

Statutory reporting in local currency. Required for tax and legal
compliance.

Picture: Legal Valuation in a Transaction

4.2) Business Scenario 2 – Group Valuation

When semi-finished goods are sent from SG to US the transaction is booked in Singapore company in the currency Singapore Dollar and simultaneously the inventory received in the US plant (including profit margin of SG company in currency SINGAPORE DOLLAR) should be converted from the Singapore Dollar to the US DOLLAR and then booked in the currency US DOLLAR.

This business has below wish

  • Group valuation should be prepared automatically as per rules & regulations. For example -While doing the group valuation, the internal profit margin of 20 Singapore Dollar should be eliminated. This is to ensure that the group’s consolidated financials reflect only external profits.
  • Since group headquarters is in Canada, so while doing group reporting, company is using currency CANADIAN DOLLAR. So, it is a natural wish that all the transactions happening in the different countries/between the different countries, should be converted to CANADIAN DOLLAR on a predefined mutually agreed currency conversion base.

Consolidated reporting across company codes. Eliminates internal
profits to ensures that the group’s consolidated financials reflect only external profits

Picture: Group Valuation in a Transaction

4.3) Business Scenario 3 – Profit Center Valuation

This scenario involves profit centre accountings in the respective company. Company A sells to company B at a negotiated selling price of 110 Singapore Dollar with Company A cost of 100 Singapore Dollar. It means Company A Manufacturing Profit Centre books profit of 10 Singapore Dollar.

Similarly, Company “B” Sales profit center books profit of Sales Price (in US DOLLAR) to customer minus US DOLLAR equivalent of 110 SINGAPORE DOLLAR.

Internal transfer pricing and profitability analysis between business
units.

Material Ledger makes it possible with simultaneously posting of all the transactions into different currencies relevant for each valuation.

Now that you have a solid understanding of SAP S/4HANA Material Ledger—its key features, benefits, and practical business scenarios—it’s time to move forward with activation. In the next post, we will guide you through the minimal configuration required to enable Material Ledger in your S/4HANA system. Refer to the post below for a clear, step-by-step activation process in just five easy stages, along with common errors and their root causes to help you avoid potential pitfalls.

How to activate Material Ledger in S4HANA in 5 Easy Steps

The post SAP S/4HANA Material Ledger: Features, Benefits, and Real Business Scenarios appeared first on Ultimate SAP Guides | S4 HANA Logistics Modules.

By: admin
10 September 2025 at 20:29

Mastering SAP Stock Transport Orders (STO)

Home » MM

Efficient stock movement is critical for seamless supply chain operations, and Stock Transport Orders (STO) in SAP play a key role in ensuring smooth intercompany and plant-to-plant transfers. This makes Mastering Stock Transport Orders (STO) in SAP along with it’s Process, Configuration & Best Practices are even more desired.

Whether we are managing internal stock transfers, intercompany logistics, or cross-plant replenishment, a well-configured STO process can reduce costs, improve inventory visibility, and streamline procurement workflows.

In this post, we will explore mastering end-to-end Stock Transport Orders (STO) in SAP S/4HANA and SAP ECC., it’s Process, key Configuration steps & Best Practices.

1. Stock Transfer in SAP

As we have already described in the below post there are two types of stock transfer in SAP.

  • Stock Transfer with MIGO (Without STO, Delivery & Billing)
  • Stock Transfer With Stock Transport Order, Purchase Order (STO/PO)
Picture: Stock Transfer in SAP

Please see the below post to check the “Stock Transfer with MIGO (Without STO, Delivery & Billing)”

STO in SAP: The Best Guide with All Scenarios Explained

Here in the post , we will see the below part in detail

Picture: Stock Transfer With Stock Transport Order, Purchase Order (STO/PO)

2. Stock Transfer With Stock Transport Order/Purchase Order (STO/PO)

Stock Transport Orders (STO) in SAP play a crucial role in inventory management, procurement, and intercompany logistics. Whether you’re transferring stock between plants, company codes, or warehouses, understanding the different types of STO orders is essential for optimizing supply chain efficiency and cost control.

There are total 3 types of the Stock Transfer With Stock Transport Order, Purchase Order (STO/PO)

  • Stock Transfer with STO but without Delivery & Billing
  • Stock Transfer with STO & Delivery but Without Billing
  • Stock Transfer with STO, Delivery & Billing
Picture: Types of Stock Transfer With Stock Transport Order, Purchase Order (STO/PO)

We will look into all the three method of stock transfer with STO/PO one by one in detail

2.1 Stock Transfer with STO but without Delivery & Billing

This type of STO is used when transferring stock between two plants within the same company code. It ensures better inventory tracking and valuation compared to a standard transfer posting.

Below is the pictorial representation of this type of STO

Picture: Stock Transfer with STO but without Delivery & Billing

2.1.1 Key Features

To simplify the process for internal stock transfers, businesses may choose to use STO without delivery and billing,

–> STO is a specialized purchase order used for stock movement between two plants, allowing the receiving plant to place an order for stock from the supplying plant.

–> STO enables smooth inventory management and tracks the movement of stock.

–> STO without delivery is used when there is no need to track the logistical steps involved in physically shipping the goods.
 
–> STO without delivery reduces the administrative workload associated with generating and managing delivery documentation.

–> Stock’s value between the plants is accounted via internal material valuation rather than through external invoicing or billing.

–> Uses a purchase order (PO) document type UB.

--> Stock Transfer with STO but without Delivery & Billing can not be executed in 1-step i.e.2-steps only.

--> If any of the supplier plant or customer plant belongs to the different company code then STO process becomes intercompany STO process.

--> If supplier plant & customer plant belongs to the same company code then STO process becomes intra-company STO process.

--> This process uses movement type 351

2.1.2 Advantage of Using STO Without Delivery & Billing

A manufacturing company transfers raw materials from Plant A (Production Plant) to Plant B (Distribution Center) under the same company code.

Below are the main Advantage of Using STO Without Delivery & Billing

  • Efficiency in Stock Movements: By skipping the delivery and billing steps, stock transfers are more quickly, especially for frequent internal movements.
  • Simplified Documentation: Reducing extensive documentation such as billing and delivery notes helps in streamlining internal operations and save time.
  • Cost Reduction: Delivery and billing elimination in intra-company transfers reduces administrative and logistical costs.
  • Ideal for Intra-company Movements: STO Without Delivery & Billing is best suited for the organizations that frequently move stock between plants without needing to generate financial documents between company codes.

2.1.3 Business Scenarios of STO without Delivery & Billing

Below are the main business Scenarios of the STO without Delivery & Billing

  • Plant-to-Plant Transfers: Stock movement for production needs or inventory balancing can be done using STO without delivery or billing.
  • Distribution Center Replenishment: Companies with multiple storage locations can use Stock Transfer with STO but without Delivery & Billing to replenish stock without the need for complex documentation

2.1.4 Configuration & Testing of STO without Delivery & Billing

Please see the below post for the details of configuration & testing of STO without Delivery & Billing

SAP Stock Transport Order Without Delivery: Process, Configuration & Guide

2.2 Stock Transport Order with Delivery (STO with SD Delivery Process)

This STO type is used when stock transfers require a delivery document generated via SAP SD (Sales & Distribution Module). This is common when warehouse teams handle goods movement through outbound deliveries.

This setup is particularly useful for intra-company transfers where financial transactions are not required

Please see the below picture to see the pictorial representation of this stock transfer method

Picture: Stock Transport Order with Delivery (STO with SD Delivery Process)

2.2.1 Key Features of Stock Transport Order with Delivery but Without Billing

  • STO with delivery uses delivery document to track the logistics of stock movement.
  • The delivery is essential to monitor goods physically leaving one plant and being received by another.
  • Since this process is usually used in intra-company STO process, billing is not required to allow for smoother internal movements of stock without generating invoices or financial documents.
  • In the case of “Stock Transfer with STO & Delivery but Without Billing”, the cost and inventory valuation are adjusted internally, without the need for billing documentation.
  • “Stock Transfer with STO & Delivery but Without Billing” can include shipping cost determination

2.2.2 Business Scenario for Stock Transport Order with Delivery but Without Billing

Below are the main Business Scenarios for Stock Transport Order with Delivery but Without Billing

  • Internal Plant-to-Plant Transfers: The scenario of regularly move stock between plants within the same company code like Distribution Center, production center etc. , STO with delivery but no billing simplifies this move.
  • Replenishing Inventory Between Storage Locations: Stock movements is easily managed without billing complexity with delivery tracking for the distribution centers or warehouses under the same legal entity.

2.2.3 Advantage of Stock Transport Order with Delivery but Without Billing

Below are the main advantage of using STO & Delivery Without Billing

  • Efficiency in Intra-company Stock Movements: Stock Transfer using STO & Delivery Without Billing Eliminates the billing step which reduces complexity and speeds up the stock transfer.
  • Simplified Documentation: In this process business can focus on tracking deliveries and managing inventory as there is no need to generate financial documents.
  • Cost Control: Elimination of billing process saves administrative and financial costs.
  • Enhanced Inventory Tracking: This process uses delivery. Delivery documents allows to maintain a clear record of stock movements without the need for complex financial reconciliation.

2.2.4 Configuration & Testing of STO with Delivery but Without Billing

Please see the below post for the details of configuration & testing of STO without Delivery & Billing

SAP Stock Transport Order with Delivery: Setup, Execution & Key Insights

2.2.5 Special Scenario

We have configured a Special Scenario for Stock Transfer with STO/PO – STO with delivery – Configuring 1-step & 2-step between the same plants

Please see the details of this scenario in the below post

Maximize SAP Efficiency: Configure 1-Step STO with Delivery Alongside 2-Step STO Between the Same Plants

2.3 Inter-Company STO with Delivery & Billing

Intercompany STO is used when transferring stock between plants in different company codes. It requires a more complex process as it involves intercompany billing and affects financial accounting entries.

Please see below the pictorial representation of this method of stock transfer

Picture: Inter-Company STO with Delivery & Billing

2.3.1 Key Features

  • Uses a purchase order (PO) document type NB
  • Requires billing document
  • Includes intercompany invoice posting
  • Can involve profit center accounting

2.3.2 Business Scenario

A company transfers finished goods from Plant X (Company Code 1000) to Plant Y (Company Code 2000), where Company Code 1000 issues an invoice to Company Code 2000 for the stock transfer.

2.3.3 Configuration & testing of Intercompany Stock Transport Order (Inter-Company STO)

Please see the below post for the details of configuration & testing of SAP Intercompany STO Process with Delivery & Billing

How to Configure SAP Intercompany STO Process with Delivery & Billing

Image by upklyak on Freepik

The post Mastering SAP Stock Transport Orders (STO) appeared first on Ultimate SAP Guides | S4 HANA Logistics Modules.

By: admin
3 April 2025 at 11:53

Stock Transfer in SAP: The Best Guide with All Scenarios Explained

Home » MM

Stock transfer in SAP play a crucial role in effective inventory management by enabling the seamless movement of goods between storage locations, plants, or even company codes.

Whether we are transferring stock within the same plant, across different plants, or between different organizational units, SAP stock transfer solutions like 1-step and 2-step transfers, offers flexible and robust solutions to manage these transactions efficiently.

1. Stock Transfer in SAP: All Scenarios at a Glance

SAP provides multiple stock transfer methods, including one-step and two-step transfers, stock transport orders (STO), and intercompany transfers, each catering to specific business needs.

Understanding these processes helps businesses optimize supply chain operations, reduce costs, and ensure compliance.

Stock transfer in SAP can be classified into two types from a broader prospective. These can be further divided into several other types.

Please see below this in pictorial form

Picture: Stock Transfer in SAP: All Scenarios at a Glance

1.1 Stock Transfer with MIGO (Without STO, Delivery & Billing)

This is the simplest form of stock transfer in SAP.

In this scenario, no stock transfer order or purchase order is created.

Stock transfer is directly initiated in MIGO without any predecessor document like STO or PO.

This stock transfer process can be further bifurcated into two

  • Stock Transfer between plants of same company code
  • Stock Transfer between plants of Different company codes

Both the above two types can be executed in 1-step or 2-step process.

We will look into these in detail in the later section

Please see below these types of stock transfer in pictorial form.

Picture: Stock Transfer with MIGO (Without STO, Delivery & Billing)

These types of stock transfers offer a more simplified method, primarily suited for intra-company movements or specific organizational needs

--> This stock transfer method optimize the logistics processes and eliminate some administrative overheads.

--> This method of stock transfer refers to directly moving materials between storage locations or plants without creating a purchase order or transport order.

--> This is often beneficial in cases of internal transfers where financial and logistical documentation requirements are minimal.

1.1.1 Advantages of Stock Transfer with MIGO

Below are the advantages of Stock Transfer with MIGO i.e. without STO, Delivery & Billing

a) Cost Efficiency:

Stock Transfer without STO, Delivery & Billing eliminates administrative costs associated with creating and managing transport orders and deliveries.

b) Speed

Stock Transfer without STO, Delivery & Billing accelerates the stock movement process by avoiding complex & long order creation steps.

c) Simplified Process

Stock Transfer without STO, Delivery & Billing is Ideal for companies with frequent internal stock movement. It reduces paperwork and processing time.

1.1.2 Business Scenarios of Stock Transfer with MIGO

Below are the possible business scenarios of Stock Transfer with MIGO i.e. without STO, Delivery & Billing

a) Internal Stock Rebalancing

Stock Transfer without STO, Delivery & Billing comes handy, When warehouses or plants need to balance inventory across locations.

b) Emergency Stock Transfer

Stock Transfer without STO, Delivery & Billing caters well where Immediate stock movement required for production needs without the need for extensive documentation.

c) Supply Chain Improvement

Since this process optimize stock transfers without using stock transport orders, businesses can streamline operations, reduce overhead costs, and improve supply chain responsiveness.

Before looking into execution of stock transfer we will check what is inter-company stock transfer & intra-company Stock Transfer

1.1.3 Inter-Company & Intra-Company Stock Transfer

A large company having plants in different locations needs to move the material between it’s plants. For example We have two plants on our car business PA10 & PA20.

Plant PA10 produces engines and plant PA20 assembles the car using the engines produced in plant PA10. So to transfer the engines from the plant PA10 to PA20 we will use STO (Stock Transport Order) in SAP

--> Now in the above example if plants PA10 & PA20 belongs to same company code (No need of having separate legal accounts etc.) then it will be an example of intracompany STO.

--> If Plant PA10 & PA20 belongs to different company code (to have separate legal accounts etc.) then it will be an example of intercompany STO.

For our car business we have two companies and three plants as shown in the below picture

Picture : Our Car Business STO Scenarios
  • The STO between plants PA10 & PA20 (Both belongs to Company Code PA10) will be a intra-company STO).
  • The STO between plants PA10/PA20 (Both belongs to Company Code PA10) & PP10 (Belongs to company code PP10) will be a intercompany STO).

1.1.4 Execution of Stock Transfer with MIGO

There are further 4 scenarios related to the Stock Transfer without STO, Delivery & Billing

  • One Step Stock Transfer Between Plants of same Company Code
  • Two Step Stock Transfer Between Plants of same Company Code
  • One Step Stock Transfer Between Plants of different Company Code
  • Two Step Stock Transfer Between Plants of Different Company Codes
a) One Step Stock Transfer Between Plants of same Company Code

In One Step Stock Transfer Between Plants stock is issued from the issuing plant & received in receiving plant in 1 step.

This process uses movement type 301

Start MIGO and choose transaction as “A08 – Transfer Posting” & movement type as “301”

input source plant as “PA10” & destination plant as “PA20”. Both these plants belongs to the same company code.

Picture: One Step Stock Transfer Between Plants of same Company Code

Check & post. Material document & FI documents are posted.

Note: Please check the below posts to see the configuration of organization structure i.e. company codes, plants etc.

Configure SAP Finance Organization Structure in 5 Minutes

Configure SAP S4 HANA Material Management Organization Structure in 5 Minutes

b) Two Step Stock Transfer Between Plants of same Company Code

In two Step Stock Transfer Between Plants stock is issued from the issuing plant & received in receiving plant in 2 steps.

As the name suggests , this stock transfer is executed in the two steps.

First step removes the stock from the sending plant and post the material into transit.

The second steps place the stock in the receiving plant stock.

We will see the details of both these steps one by one

b1) First Step- Removal of the Stock from the Sending plant

This process uses movement type 303 (Transfer posting plant to plant – remove from storage).

Start MIGO and choose transaction as “A08 – Transfer Posting” & movement type as “303”

Picture: First Step- Removal of the Stock from the Sending plant

check and post. Material document number 4900000218 is posted.

b2) Second Step- Receipt of the stock into the Receiving Plant

This process uses movement type 305 (Transfer posting plant to plant – place in storage).

Start MIGO and choose transaction as “A10 – Place in Storage” again material document “4900000218” created in first step.

Picture: Second Step- Receipt of the stock into the Receiving Plant
--> In the second Step of Receipt of the stock into the Receiving Plant, no accounting document is posted.

c) One Step Stock Transfer Between Plants of different Company Code

Here stock is transferred In One Step between sending plant & receiving plant which belongs to the different company codes.

This process uses movement type 301 same as One Step Stock Transfer Between Plants of same Company Code

Start MIGO and choose transaction as “A08 – Transfer Posting” & movement type as “301”

input source plant as “PA10” & destination plant as “PP10”. Both these plants belongs to the different company codes.

Picture: One Step Stock Transfer Between Plants of different Company Codes

System is throwing clearing accounts error

Picture: Company Code Clearing Error

Check & post. Material document & FI documents are posted.

to maintain the clearing account start OBYA

Picture: Maintain Clearing account

Now maintain the clearing account as below

  • Debit -116014100 (PPIN-Clearing Account for Asset Acquisition)
  • Credit- 770030000 (PPIN-Clearing Account Asset Disposals)
Picture: Clearing Accounts between PA10 & PP10

Transaction is posted successfully. Material document & FI document is created

FI document posted in the sending company code

Picture: FI document posted in the sending company code

FI document posted in the Receiving company code

Picture: FI document posted in the Receiving company code
d) Two Step Stock Transfer Between Plants of Different Company Codes

In two Step Stock Transfer Between Plants of different company codes, stock is issued from the issuing plant & received in receiving plant in two step.

As the name suggests , this stock transfer is executed in the two steps.

First step removes the stock from the sending plant from the first company code and post the material into transit.

The second steps place the stock in the receiving plant stock of another company code.

We will see the details of both these steps.

d1) First Step- Removal of the Stock from the Sending plant

This process uses movement type 303 (Transfer posting plant to plant – remove from storage).

Start MIGO and choose transaction as “A08 – Transfer Posting” & movement type as “303”

Picture: First Step- Removal of the Stock from the Sending plant From Different Company Code

check and post. Material document number 4900000218 is posted.

--> Accounting entries for the two step stock transfer will be exactly same as one step stock transfer.
d2) Second Step- Receipt of the stock into the Receiving Plant

This process uses movement type 305 (Transfer posting plant to plant – place in storage).

Start MIGO and choose transaction as “A10 – Place in Storage” against the material document generated in the first step.

Picture: Second Step- Receipt of the stock into the Receiving Plant of Different Company Code

--> No accounting document is posted in the second Step of the receipt of the stock into the Receiving Plant, 

1.2 Stock Transfer With Stock Transport Order/Purchase Order (STO/PO)

Here stock transfer process starts with a document i.e. stock transport order, which is a kind of purchase order.

There are several types of Stock Transfer With Stock Transport Order/Purchase Order (STO/PO)

All types of Stock Transfer With Stock Transport Order/Purchase Order (STO/PO) is given below in pictorial form

Picture: Stock Transfer With Stock Transport Order/Purchase Order (STO/PO)

Please continue with the below post for all the step by step details of Stock Transfer With Stock Transport Order/Purchase Order (STO/PO).

Mastering Stock Transport Orders (STO)

The post Stock Transfer in SAP: The Best Guide with All Scenarios Explained appeared first on Ultimate SAP Guides | S4 HANA Logistics Modules.

By: admin
27 March 2025 at 07:38

SAP Consignment: Configuration Guide and Process Overview

Home » MM

Here in this post we will configure SAP consignment & explain the consignment process in detail.

1. What is Consignment

Consignment is a business arrangement where vendor left the goods in the possession of an authorized third party to sell.

Consignment involves a consignor, who is the owner of the goods and provides items to a third party (who is called consignee) to sell on their behalf. 

The consignor retains ownership of the goods until they are sold

2. SAP Consignment Process

If we transform the consignment process from the business language to the SAP language, below will be the salient point of the SAP consignment process

  • In the SAP Consignment process, suppliers delivers the goods at the buyer location, but retains ownership until goods are consumed.
  • Since ownership is retained by the suppliers at the time of goods delivery, so no financial obligation of the buyer for the goods supply into their premises by seller.
  • Buyers take the ownership of the goods when goods is removed for consumption.
  • Since in the vendor consignment process we (our car company) is buyer so if we want to withdraw the vendor consignment stock, there are subsequent two processess
    • Transfer the goods from the consignment stock to our own stock through MIGO/411K. This is the step when ownership of the goods is transferred and we are financially liable to pay the supplier for the goods.
    • Now the goods are issued further to process , for example- issue to cost center (201) or issue to production order (261) etc.

3. Configuration of Consignment Process

We will configure the consignment process in SAP. Lets first see what are the steps involved in the configuration of SAP consignment process.

How to configure SAP Consignment Process in 5 Steps

  1. Step 1: Create Consignment Info records

    Info Category is “Consignment” & Tax code is mandatory

  2. Step 2: Create Consignment Purchase Order

    With Item Category “K”

  3. Step 3: Goods Receipt of the PO

    GR will be posted to Non-Valuated Vendor consignment stock owned by Supplier

  4. Step 4: Transfer Posting from Consignment Stock to Own Stock

    Financial Posting based on the price given in the info-record

  5. Step 5: Financial settlement of the withdrawn parts

    Special Process “Evaluated Receipt Settlement” will be followed

3.1 Consignment Info record Creation

Since stock is owned by supplier so there is no connection between consignment stock and the purchase order

Hence the info record is the only master data from where process get the valuation

Start T-Code ME11

Input Supplier, Material, Purchasing Organization & Plant. Select the category as “Consignment”

Picture: Consignment Info-Record Creation

Input the tax code & Price negotiated with supplier.

Save & purchasing info record is created.

3.2 Consignment Purchase Order Creation

Now we will create Consignment Purchase Order.

To create Consignment PO, have to use item category as “K”

--> Item category defines how the procurement of a material or service item is controlled.

--> The item category determines whether below are mandatory or admissible for an item:
• Material number
• Additional account assignment
• Inventory management in the SAP system
• Goods receipt
• Invoice receipt

Let’s see the characteristics of Item Category “K”

Follow the below Path

SPRO –> Materials Management –> Purchasing –> Define External Representation of Item Categories

Select “K” and click on details

Consignment PO is created

Note : Please check the below post to check the creation of BP vendor used in the consignment Purchase order

Creation of BP Vendor for Vendor Consignment

3.3 Goods Receipt of the Consignment PO

Now we will GR of consignment PO by MIGO

GR done and as described above , no financial postings are done at GR

Picture: Consignment PO GR

3.4 Consignment Stock

As described after GR, Non-Valuated Vendor consignment stock owned by Supplier is generated.

Check the stock in MMBE

Picture: Vendor Consignment Stock

3.5 Stock Transfer to Own

Now to use the stock we need to first transfer the stock to our own stock through 411K.

Once we execute this , The Ultimate Guide to Master SAP MM-FI Integration

--> We can directly issue the stock production order or cost center, if we know the details and ready to use the stock. Thus we can eliminate the step of transferring the stock from consignment stock to own stock

We have received the OBYC error

Please check the below post to resolve this error

The Ultimate Guide to Master SAP MM-FI Integration –  Scenario 4 :Transfer from Consignment Stock to Own

3.5.1 FI Document Generated

As stated above, FI document is not generated

Picture: FI Document generated in consignment stock to own Stock

3.5.2 Transfer Posting of stock

Stock is now available in the ownership of our company

Before this transfer stock was under a special stock category “K” i.e. “Consignment Stock”, check HERE

3.6 Consignment Invoice

Consignment invoice is done through a special process called ERS i.e. “Evaluated Receipt Settlement” instead of normal invoking through MIRO

Please check the below post for the details

How to Configure Logistics Invoice Verification in SAP S4 HANA – Invoicing for Consignment (ERS)

This completes the consignment Process.

Image by vectorjuice on Freepik

The post SAP Consignment: Configuration Guide and Process Overview appeared first on Ultimate SAP Guides | S4 HANA Logistics Modules.

By: admin
29 August 2024 at 15:03

The Ultimate Guide to Master SAP MM-FI Integration

Home » MM

SAP MM deals with the procurement of material & services.

Mastering MM-FI integration is crucial in SAP financial control. Mastering MM-FI integration helps to ensure that financial statements accurately reflect the true cost of materials and inventory.

With this Ultimate Guide to Master SAP MM-FI Integration, we will help businesses to make informed decisions about procurement, production, and overall financial health.

Note: This post is solely for automatic determination of GL in MM (OBYC). To check the configuration of SAP MM-FI integration other than the OBYC, please see the below post

Ultimate guide to configure S4 HANA MM-FI Integration

--> When we procure material or services, we need to pay to the supplier of material or services. 

--> to pay to supplier correctly & timely it is very crucial to record the amount to be paid correctly & on time.


--> In simple terms, MM-FI Integration orchestrates the posting of values in tandem with different quantity movements.

SAP MM FI integration does this crucial work of keeping the correct & on time record of amount to be paid to the suppliers.

1. How MM-FI Integration Works

MM FI integration keeps records of values on the GL (General Ledgers)

Before we go into the detail , we need to first examine what are the expectations from the SAP MM FI integration in order to pay suppliers correctly & on-time.

1.1 Expectations & Solutions from MM-FI integration

Below are the typical characteristics of the business which should be taken care by MM FI integration.

1.1.1 Keep Record as Material Moves

in an organization, material moves due to several reasons. For example-

  • Receipt of the material from external vendor
  • Receipt of the material from production
  • Issue of the material for production
  • Scrapping of the materials

MM FI integration should capture this movement & record the values on GLs in real time as soon as material moves.

Below are the Elements used by SAP to fulfill this requirements

a) Movement Type

A movement type is a three digit/character identification key for a
goods movement. for example – 101 for Goods receipt, 201 for goods issue against cost center , 261 is goods issue against order etc.

b) Value String

Value string is assigned to each relevant movement type in inventory management. Value strings contain keys for relevant posting transaction such as BSX, WRX etc. For Example – movement type 101 contains the value string WE01

c) Transaction/Event keys

Transaction event key is to determine different GL for different business transactions. For example- BSX is used fort stock posting & BSV for change in stock value.

1.1.2 Keep Record for Materials having Different business Characteristics

Organizations has different type of materials like -Raw materials which are used as input for production process.

Semifinished materials might be produced in a production process which can be further consumed to produce final finishes product

MM FI integration should record the values on GLs according to the characteristics of the materials. For example – values for the Raw materials should be captured on the different GL account compare to the semi finished materials for the goods receipt against production order.

or value of the scrapping of the raw material should be captured on different GL account compare to the scrapping of the finished material.

Below are the Elements used by SAP to fulfill this requirements

a) Valuation Class

Valuation class if like further extension of material types.

For example – Material Type – RAW can have two valuation classes as 3100 – Raw material Domestic & 3110 Raw material Imported.

b) Account Modifier / Account Grouping Code

Account Modifier or Account Grouping Code is a three-character code used to differentiate the offsetting accounts

For example- Event is goods issue . But this goods issue can be for goods issue to a production order or for a scrapping etc.

So Account modifier or account grouping code is used for different scenarios like goods issue, scrapping, physical inventory to assign different accounts (for example, consumption account, scrapping etc.)

Another example

Business wants to post price differences to difference accounts in case of goods receipts for purchase orders compare to goods receipts for production orders.

--> Account grouping is used only for offsetting entries, consignment liabilities, and price differences.

1.1.3 Post Values as per the Org Structure

The two main organization structure elements in FI & MM are Company code & Plant.

Below elements are used by FI MM integration to post correct values here.

a) Valuation Area

Materials are valuated at plant level or at company code level.

  • If valuation is at plant level, then valuation area is plant.
  • If valuation is at company code level, then valuation area is company code.

Hint : Generally Valuation area should be plant otherwise it will be difficult to control the costing of the product.

b) Valuation Area Grouping

Valuation grouping code is used to determine the GL code for more than one valuation areas similar or different.

Our Car business has three plants -PA10, PA20 & PP10 (Valuation Area is plant).

Though PA10 & PA20 plants belongs to different company code compare to PP10, but they use the same chart of account.

We want to post transactions for these plants to the same accounts so we will group these three valuation areas under a single valuation grouping code.

We will group together all our three valuation areas. We will group our valuation areas (plants) PA10, PA20 & PP10 to 0001

This will avoid to configure account determination separately for all plants as shown below

Below is the path to group the valuation areas

SPRO –> IMG –> Materials Management –> Valuation and Account Assignment –> Account Determination –> Account Determination Without Wizard –> Group Together Valuation Areas

Picture: Valuation Area Grouping

2. Configure SAP MM FI Integration

Now we are ready to configure the automatic account determination (SAP MM FI integration) by using the elements explained above

  • Material Movement
    • Movement Type
    • Value String
    • Transaction/Event keys
  • Different Material Type
    • Valuation Class
    • Account Modifier / Account Grouping Code
  • Organization Structure
    • Valuation Grouping Code

To configure start transaction “OBYC”

Please note that for each business scenario we will explain

  • Transaction/event keys associated with the business scenario.
  • Account Modifier/Account grouping code (if relevant).
  • GL used (click against each scenario to check the GL creation in detail).
  • We have already configured Valuation grouping code as “0001”. Please click HERE to see the details

3. MM FI Integration Configuration for Different Business Scenarios

Now we will configure FI-MM integration (Automatic account determination) for different business scenarios

3.1 Scenario 1 :Goods Receipt Against Standard Purchase Order

Below are the values of the five elements to configure the FI MM Integration (automatic account determination) for the different events which happens as a result of Goods receipt against purchase order.

3.1.1 Increase in Inventory Value

The first event is – inventory value is increased by the value of the goods purchased. Increase in Inventory Value is posted on the GL accounts through Key BSX. This increase is value is captured & post as shown below.

a) For Raw Material (ROH)

Since the inventory value is increasing so it will be a debit (Dr) transaction

  • Transaction Key – “BSX”
  • Valuation Class – “3000”
  • Account Modifier/Grouping Code – Not Applicable
  • Valuation Grouping Code – “PPIN”
  • Posting on General Ledger – “113100000” (PPIN-Inventory – Raw Material). Click HERE for detail.
b) For Trading Material (HAWA)

Since the inventory value is increasing so it will be a debit (Dr) transaction

  • Transaction Key – “BSX”
  • Valuation Class – “3100”
  • Account Modifier/Grouping Code – Not Applicable
  • Valuation Grouping Code – “PPIN”
  • Posting on General Ledger – “113600000” (PPIN-Inventory – Trading Goods). Click HERE for detail.
c) For Semi-Finished Material (HALB)

Since the inventory value is increasing so it will be a debit (Dr) transaction

  • Transaction Key – “BSX”
  • Valuation Class – “7900”
  • Account Modifier/Grouping Code – Not Applicable
  • Valuation Grouping Code – “PPIN”
  • Posting on General Ledger – “113300000” (PPIN-Inventory – Semi-Finished Goods). Click HERE for detail.
d) For Finished Material (FERT)

Since the inventory value is increasing so it will be a debit (Dr) transaction

  • Transaction Key – “BSX”
  • Valuation Class – “7920”
  • Account Modifier/Grouping Code – Not Applicable
  • Valuation Grouping Code – “PPIN”
  • Posting on General Ledger – “113400000” (PPIN-Inventory – Finished Goods). Click HERE for detail.
e) FI MM Integration Configuration for Increase in Inventory Value

Start OBYC and select Transaction as “BSX”.

Input Chart of Account as “PPIN”

Now configure as per the values given above

Picture : FI MM Integration Configuration for BSX

Since Valuation Modifier 0001 is a grouping of our all three plants (Valuation area PA10, PA20 & PP10) so this configuration is completed for all the three plants.

Note

Please click HERE to check the creation of GL account 113600000

3.1.2 GR/IR Posting

In accounting if there is a Positive (+ve) entry then there has to be a negative (-ve) entry to clear it in further transaction.

Here since increase in stock value was a +ve entry , so -ve entry will be on GR/IR account

3.1.2.1 FI MM Integration Configuration for GR/IR Postings.

WRX is the accounting key to post on GR/IR

WRX is maintained at client level . It means it is same GL for all valuation class, valuation grouping code etc.

  • Transaction Key – “WRX”
  • Valuation Class – Not Applicable (but we can use)
  • Account Modifier/Grouping Code – Not Applicable
  • Valuation Grouping Code – “PPIN”
  • Posting on General Ledger – “221120000” (PPIN-Goods receipt/Invoice Receipt). Click HERE for detail
Picture : FI MM Integration Configuration for WRX

3.1.3 Price Difference Posting

How Price difference is posted

  • For materials with price control indicator as ‘V’, while posting invoices, the difference will go to Price Difference A/c if the stock is not there.
  • For materials with price control indicator ‘S’, while making GR (either against Purchase Order or otherwise), the difference between the PO price and the standard price will go to Price Difference.
  • Production Order variances also gets posted to Price Difference A/c, with offset to COGM A/c.
--> We have created two Price variance (Difference) accounts

552041000 - PPIN-LOSS PRICE VARIANCE
552541000 - PPIN-GAIN PRICE VARIANCE
3.1.3.1 FI MM Integration Configuration for Price Difference.

For price difference we work with & without account modifier

Below are the rule for OBYC settings for PRD

  • Account modifier is not used for Goods & Invoice receipts against Purchase Orders
  • PRF for GR against Product Order & Order Settlement
  • PRA for Goods Issues
  • PRU for transfer postings.

Please see below the OBYC configuration screenshot for our car business

Picture: Price Difference Automatic Posting Configuration

3.1.4 Freight Posting

If we use delivery cost in the PO price schema then we need to post the fright charges to the relevant GL accounts.

System will search the GL account corresponding to the posting key which is used against freight condition type.

Here system is searching GL account for Key FR1 because in our pricing schema we have used key FR1 for condition “FRC1”. And in PO we have used condition “FRC1″for freight charges. Please check in detail HERE

Please check the pricing schema from the link to the post given below

Ultimate Guide to MM Pricing in 5 Easy Steps

3.1.4 FI MM Integration Configuration for Freight Charges.

We will use GL 221730000-PPIN-Freight Clearing Account (MM)

Please click HERE to check the creation of GL account 221730000 step by step

Picture : Configuration of FR1 Posting key

3.1.5 Scenario 1: Testing

Now we will test for the FI-MM integration configuration as done above for scenario 1

3.1.6 PO Price Detail

We have posted goods receipt for a PO of Finish Material number 12 (Finished Car Model D)

Below is the detail Price break up of the 10 EA in PO

Base Price (from Info Record) =99900 USD
Surcharge (Manually Entered) =9909 USD
--------------------
Net Value (Base for Taxes) = 109890 USD
---------------------
A/P Sales Tax 1 Inv. 6.000 % = 6593.40 USD
A/P Sales Tax 2 Inv. 3.000 % = 3296.70 USD
A/P Sales Tax 3 Inv. 1.000 % = 1098.90 USD
--------------------
Total Tax = 10989 USD
--------------------
Net Value (Including Taxes) = 120879 USD
--------------------
Freight (Manually Entered) = 1000 USD
_______________________________________________
Actual Price = 121879 USD
_______________________________________________

3.1.7 Posting on the GL in FI Document

After GR system has posted FI document as shown below

Picture: Various GL Postings in FI Document
3.1.7.1 Analysis of FI Document GL Postings
  • Amount posted on the inventory is exactly same as material value in material master due to standard valuation
  • The difference in the total value (minus freight) and material value is posted on the Price variance loss account as explained HERE
  • Freight amount is posted to a separate Freight clearing account as explained HERE

3.2 Scenario 2: Initial Stock Load

Below are the values of the five elements to configure the FI MM Integration (automatic account determination) for initial stock load.

3.2.1 Increase in Inventory Value

Due to stock load inventory value will be increased. This increase is value is captured through transaction key “BSX” & post same as shown above in goods receipt against purchase order.

Click HERE to go to the relevant section

3.2.2 Offsetting entry to increase in Inventory Value

GBB is the accounting key for “Offsetting entry for inventory posting”. Further as explained previously account modifiers are used to tell the system against which account the offsetting entry to inventory should be accounted. Some example are -VAX: for goods issues for sales orders, VBR: for internal goods issues (for example, for cost center), VNG: for scrapping/destruction etc.

a) For Raw Material (ROH)
  • Transaction Key – “GBB”
  • Valuation Class – “3000”
  • Account Modifier/Grouping Code – “BSA”
  • Valuation Grouping Code – “PPIN”
  • Posting on General Ledger – “339911000” (PPIN-Inventory – Initial Entry of Raw Material Balances). Click HERE for detail
b) For Trading goods (HAWA)
  • Transaction Key – “GBB”
  • Valuation Class – “3100”
  • Account Modifier/Grouping Code – “BSA”
  • Valuation Grouping Code – “PPIN”
  • Posting on General Ledger – “339912000” (PPIN-Inventory – Initial Entry SF & Finish Goods Balances). Click HERE for detail
c) For Raw Material (HALB)
  • Transaction Key – “GBB”
  • Valuation Class – “7900”
  • Account Modifier/Grouping Code – “BSA”
  • Valuation Grouping Code – “PPIN”
  • Posting on General Ledger – “339912000” (PPIN-Inventory – Initial Entry SF & Finish Goods Balances). Click HERE for detail
d) For Finished Material (FERT)
  • Transaction Key – “GBB”
  • Valuation Class – “7920”
  • Account Modifier/Grouping Code – “BSA”
  • Valuation Grouping Code – “PPIN”
  • Posting on General Ledger – “339912000” (PPIN-Inventory – Initial Entry SF & Finish Goods Balances). Click HERE for detail
e) FI MM Integration Configuration for Initial Stock Load

As usual start OBYC. Select the account key GBB

Picture: OBYC for initial inventory load…1

3.3 Scenario 3 :Goods Issue Against Sales Order

When goods are issues against sales order, inventory is decreased and offsetting entry is posted against COGS (Cost of goods sold)

3.3.1 Decrease in Inventory

Due to goods issue, inventory value will be decreased. This is captured through transaction key “BSX” & post same as shown above in goods receipt against purchase order. The only difference is now it is credit (-ve) against earlier debit (+ve) in goods receipt.

Click HERE to go to the relevant section

3.3.2 Offsetting entry to decrease in Inventory Value

GBB is the accounting key for “Offsetting entry for inventory posting”. Further as explained previously account modifiers are used to tell the system against which account the offsetting entry to inventory should be accounted.

Here account modifier will be VAX: for goods issues for sales orders.

a) For Raw Material (ROH)
  • Transaction Key – “GBB”
  • Valuation Class – “3000”
  • Account Modifier/Grouping Code – “VAX”
  • Valuation Grouping Code – “PPIN”
  • Posting on General Ledger – “550100000” (PPIN-Cost of Goods Sold Raw Material). Click HERE for detail
b) For Trading Material (HAWA)
  • Transaction Key – “GBB”
  • Valuation Class – “3100”
  • Account Modifier/Grouping Code – “VAX”
  • Valuation Grouping Code – “PPIN”
  • Posting on General Ledger – “550200000” (PPIN-Cost of Goods Sold Trading Material). Click HERE for detail
c) For Semi-Finished Material (HALB)
  • Transaction Key – “GBB”
  • Valuation Class – “7900”
  • Account Modifier/Grouping Code – “VAX”
  • Valuation Grouping Code – “PPIN”
  • Posting on General Ledger – “550300000” (PPIN-Cost of Goods Sold Semi-Finished Material). Click HERE for detail
d) For Finished Material (FERT)
  • Transaction Key – “GBB”
  • Valuation Class – “7920”
  • Account Modifier/Grouping Code – “VAX”
  • Valuation Grouping Code – “PPIN”
  • Posting on General Ledger – “550300000” (PPIN-Cost of Goods Sold Finished Material). Click HERE for detail
e) FI MM Integration Configuration for Sales Order Goods Issue

3.4 Scenario 4 :Transfer from Consignment Stock to Own

When we transfer the consignment stock, a financial document is generated and we are financially liable to pay the supplier for the goods.

To determine the GL accounts for this scenario we need to configure the OBYC for transaction key “KON”

Picture: Posting of “KON” Key

3.5 Scenario 5: Subcontracting Purchasing FI Integration

Subcontracting Process is a Special Procurement Process where a company outsources certain Manufacturing Processes to produce Sami fished or finished material to a Subcontracting Vendor.

Please check the below post for detail subcontracting process configuration & Testing

a) GBB+VBO

VBO is used to post GL for consumption of Stock material to vendor (543) – Receiving of material from subcontractor RM consumption

We have configured GL 551900000 (PPIN-Consumption – Subcontracting, w/o CE) for all the material types (Valuation Class 3000 for Raw Materials, 3100 for Trading goods, 7900 for Semifinished Goods & 7920 for Finished Goods

Configure GBB+VBO as per below

Picture: OBYC Configuration for GBB+VBO

b) BSV

This key is used to configure Change in stock account – Subcontracting

We have configured GL 550200000 (PPIN-Cost of Goods Sold (Trade w/o Cost Element)

Picture: OBYC Configuration for BSV

c) FRL

Accounting key FRL is used to post outside Processing Charges – subcontracting charges GL account

We have configured GL 665008500 (PPIN-Subcontracting Services)

Picture: Configuration of FRL key

3.6 Scenario 6 : Expense/Revenue from Material in Stock Transfer

we are transferring stock from one plant (PA10) to another (PA20). The material is valued at 1000 USD in PA10 while 1010 USD in plant PA20.

a) AUM

Material will be transfer with the valuation of sending plant . The difference in the price will be recorded in the separate account

We have configured as per below

  • GL 552011000 (PPIN-Loss Inventory Transfer (Raw & Trade) for loss in transfer of Valuation Class 3000 (Raw Materials) & 3100 (Trading Goods)
  • GL 552511000 (PPIN-Gain Inventory Transfer (Raw & Trade) for gain in transfer of Valuation Class 3000 for Raw Materials & 3100 (Trading Goods)
  • GL 552013000 (PPIN-Loss Inventory Transfer (SF & Finish Goods) for loss in transfer of Valuation Class 7900 (Semi-Finished) & 7920 (Finished Goods)
  • GL 552513000 (PPIN-Gain Inventory Transfer (SF & Finish Goods) for gain in transfer of Valuation Class 3000 (Raw Materials) & 3100 (Trading Goods)
Picture; OBYC Config for AUM Transaction Key

Image by pikisuperstar on Freepik

The post The Ultimate Guide to Master SAP MM-FI Integration appeared first on Ultimate SAP Guides | S4 HANA Logistics Modules.

By: admin
28 August 2024 at 11:41

All About Purchase Orders in SAP MM

Home » MM

A Purchase Order (PO) in SAP MM (Materials Management) is one of the most crucial documents in procurement and supply chain management, ensuring seamless transactions between buyers and vendors.

In today’s fast-paced business environment, optimizing purchase order processing can lead to cost savings, improved vendor relationships, and streamlined supply chain operations.

This guide will cover everything you need to know about SAP MM purchase orders, including PO creation, types, approval workflows, integration with accounts payable (AP), and best practices for automation.

Whether you’re an SAP consultant, procurement manager, or business analyst, understanding purchase orders in SAP MM can help enhance procurement efficiency, reduce maverick spending, and improve inventory management.

Additionally, we’ll explore how automating POs in SAP MM can reduce errors, ensure compliance, and optimize cash flow—key factors that drive enterprise profitability and cost optimization.

1. Why Purchase Orders Matter for Businesses

  • For companies leveraging SAP ERP, a well-defined purchase order process is essential for:
  • Reducing procurement costs through better vendor negotiations
  • Avoiding duplicate purchases and ensuring accurate invoice matching
  • Ensuring compliance with contract terms and supplier agreements
  • Enhancing cash flow management through optimized payment terms

With SAP S/4HANA, businesses can further improve their procurement automation, invoice reconciliation, and supplier collaboration—making it easier to manage direct and indirect procurement processes effectively.

Purchase Order is a part of Procure to Pay (P2P) cycle of SAP

Procure to Pay (P2P) cycle starts from Purchase Requisition (PR) and finish with payment to the vendor.

Below are the components of P2P Cycle

Purchase Requisition --> Purchase Order --> Good Receipt --> Invoice Receipt --> Vendor Payment

We will start with configuration of Purchase Order in this post.

Also we will have a look on different types of Purchase Orders, their goods receipt as well as respective invoice receipt.

2. What is Purchase Order in SAP

Purchase order in sap is a type of legal contract which binds the supplier to supply the described materials or services & purchaser to pay after receiving the described materials or services.

So purchase order should contain

  • A Vendor/Supplier.
  • Purchase Organization structure like -Who is the contact (Purchasing group/Purchasing organization etc).
  • Material details.
  • Delivery date.
  • Quantity
  • Price
  • Delivery cost
  • Taxes.
  • Delivery address

2.1 Different Purchasing Scenarios in SAP

There are different types of purchase orders in SAP.

  • Scenario 1: Standard Purchase Order
  • Scenario 2: Consignment Purchase Order
  • Scenario 3: Third Party Purchasing
  • Scenario 4: Stock Transport Order (STO)
  • Scenario 5: Subcontracting Purchase Order

3. Scenario 1: Standard Purchase Order

Standard purchase order specifies the materials being procured, their quantity, agreed price and delivery date.

Standard PO does not has and type of special purchasing like subcontracting or consignment purchasing where purchaser is not charged till they withdraw the materials for actual consumption.

Configuration of standard purchase order

3.1 Define Document Types for Standard Purchase Orders

Purchase Orders are managed as document types in SAP

Document types decides a lot of factors.

For our car business, we will use standard document type “NB” for standard purchase orders

SPRO –> Materials Management –> Purchasing –> Purchase Order –> Define Document Types for Purchase Orders

Picture : NB Document Type

Select “NB” and click on “Allowed Item Categories”

3.2 Item Category

Item category defines how the procurement of a material or service item is controlled.

For example – Item category determines the field selection or determines whether a goods receipt or invoice receipt is to follow.

There are below item categories available

  • Standard
  • Consignment
  • Subcontracting
  • Third-party
  • Stock transfer
  • Service
  • Material unknown
  • Material group
  • Text

Examples

Some Examples of Item category control
--> "Standard" Item Category requires goods receipts and invoice receipts.
--> In "Consignment" item category, invoice receipts are not allowed.
--> For item category "Subcontracting", components to be provided are presented on a screen.

We have selected three item categories which are allowed with our standard purchase order document type “NB”

Picture : Allowed Item Categories

Note : Item Categories can not be configured. These are maintained by SAP, therefore we cannot change them. However, we can change the “External Representation” of PO item categories in IMG.

3.3 Confirmations

Confirmations represents the notification from the vendor to the purchaser regarding the status of a purchase order.

Confirmation covers all types of communications sent by a vendor (external supplier) to the purchaser.

A vendor confirmation

  • Can be an order acknowledgment,
  • Can be a loading or transport confirmation
  • Can be a shipping notification.

Confirmations enable the purchaser to plan more exactly due to receipt of up-to-date information the expected delivery. from the vendor.

3.3.1 Define External Confirmation Categories

Extenal confirmation categories are sent by the vendor through EDI etc.

Example of confirmation categories sent by vendor

  • AB-Order Acknowledgment
  • CH-PO change
  • GW-Rough GR
  • LA-Inbound Delivery

3.3.2 Define Internal Confirmation Categories

In this step, an external confirmation category is assigned to each internal confirmation category.

This assignment is required for system to be able to recognize which confirmation category represents order acknowledgments and which one represents shipping notifications.

This is configured as per below screenshot

SPRO –> Materials Management –> Purchasing –> Confirmations –> Define Internal Confirmation Categories

Picture : Define Internal Confirmation Categories

Please note the different delivery types

3.3.2.1 YEL – Inbound Delivery Customized for PPL

So if the vendor is sending confirmation of type “LA” then system will create an inbound delivery of delivery type “YEL”

Note : Please check the inbound delivery type configuration in detail

SAP Delivery Guide: Outbound to Inbound

3.3.3 Set Up Confirmation Control

Confirmation control in the form of Confirmation control key for PO items can be defined with just one confirmation category (e.g. shipping notification) or a confirmation control key covering several confirmation categories (order acknowledgment, loading confirmation, shipping notification).

SPRO –> Materials Management –> Purchasing –> Purchase Order –> Confirmations –> Set Up Confirmation Control

Picture : Set Up Confirmation Control

Now select Confirmation control key “0004” and click on confirmation sequence.

Picture : Conf. control key 0004 configuration
So as per above configuration, if we assign confirmation control key "0004" in our PO item, we must create inbound delivery to do the goods receipt instead of MIGO.

3.4 Create Standard Purchase Order

We will create a standard purchase order now

Start ME21N

3.4.1 PO Header

First fill the PO header fields as shown in the below screenshot

  • Purchasing Document Type – NB (Standard)
  • Vendor-PA01VEN03 (Levine Auto Parts Norwalk).
  • Purch.Org-PA10
  • Purchasing Group -PA
  • Company Code -PA10

Note :

Please click HERE to check the step by step BP vendor creation in detail

Please click below link to check the MM Organization structure used in PO creation- Configure SAP S4 HANA Material Management Organization Structure in 5 Minutes

Picture : PO Header Creation

3.4.2 PO Line Item

Below main fields are available to input in PO line item

  • Item Category – Blank as we are creating standard PO as described above.
  • Material -66
  • Plant -PA10
  • SLOC-PP1A (Defaulted from Material Master)
  • PO Quantity – 1 PC
  • Price – 14 USD/PC (From info record)

Note :

Please click HERE to check the step by step material creation in detail

Picture : PO Line item

3.4.3 PO Line Item Details

There are several tabs giving different details for PO line item.

We can select the line item in drop down for which we are checking the details as shown in the below screenshot

Picture : Selection of PO item in drop-down

Let,s see one by one

3.4.3.1 “Material Data” Tab

Main information in this tab are batch & “Info-update” indicator

Picture : “Material Data” Tab
3.4.3.2 “Quantities/Weight” Tab

In this tab material information related to weight and volume flows from the material master records.

Also system multiplies weight & volume from the material master by the PO quantity to show the total PO weight & volume.

Picture : “Quantities/Weight” Tab
3.4.3.3 “Delivery Schedule” Tab

In this tab , system shows delivery date and related information. for STO this tab shows schedule line type information with committed quantity as per the availability check.

Picture : “Delivery Schedule” Tab
3.4.3.4 “Delivery” Tab

In this tab system shows further information related to delivery like what is the under-delivery or over-delivery tolerance, reminders etc. All these information flows from the purchasing value key.

Picture : “Delivery” Tab

Some very important information is shown in this tab as described below

a) Stoke type

The goods will be receipt in “Unrestricted” or “QI” or “Blocked stock” as per the selection here.

Stock Type  can be manually selected or if configured, flows from the QM view of the material master.
b) Goods Receipt Indicator

This indicator specifies if goods receipt is expected.

GR Indicator comes as active by default based on the Item Category and Account Assignment Category.

--> In case of Standard Item Category w/o Account Assignment Category, GR Indicator comes by default 

--> In case of Account Assigned POs, default settings depends on the configuration of Account Assignment Category
c) Goods Receipt, Non-Valuated

Specifies that the goods receipt for this item is not to be valuated at GR. If selected then valuation for this item will be done at the time of invoicing.

This flows from account assignment category configuration

d) Delivery Completed” Indicator

if this is selected then it means system is not expecting further delivery for this item i.e this item is closed.

3.4.3.5 “Invoice” Tab

This tab has very important information.

Picture : “Invoice” Tab
a) Invoice receipt indicator

This indicator specifies if an invoice receipt is expected for the purchase order item.

If  Invoice receipt indicator is not set, the goods are to be delivered free of charge

This indicator flows from
--> Define External Representation of Item Categories , under Control invoice receipt section.

--> For account assigned PO it will come from account assignment category.
b) Final Invoice Indicator

Indicates that the last invoice from a supplier has been received for an item with no further invoice is expected.

c) GR-Based Invoice Verification Indicator

This Indicator specifies goods-receipt-based invoice verification for a purchase order item or invoice item.

If this indicator is selected, that means invoice for the order item can be entered with reference to a GR document or a delivery number entered at GR.

Setting of GR-Based Invoice Verification Indicator means a separate invoice item is created for each goods receipt. 

That means checking of price and formal accuracy of the invoice is performed at this item level.
d) Tax Code

Here tax code which is unique per country is specified. For each tax code, tax rate is stored and calculation is done.

Note :

Tax code is automatically determined in this PO tab depending upon the configuration done. Similarly system calculate the tax amount too automatically.

Please check the below post for step by step details of MM input tax

How to configure SAP S4 HANA MM Tax in 7 Easy Steps

3.4.3.6 “Conditions” Tab

In this tab system calculates landing cost of the material depending upon the base price, discount/surcharges, tax, delivery cost etc.

Picture : “Conditions” Tab

Please click HERE to see PO Price components in details

3.4.3.7 “Delivery Address” Tab

In this tab, delivery address which is generally plant address is copied from the plant configuration and presented.

Picture : “Delivery Address” Tab
Please note highlighted "Supplier" with "SC Supp" fields in the above screenshot, which can eliminate one step from the subcontracting purchasing cycle. 

If we select this indicator and input subcontracting supplier , then system directly provide the purchased materials to the subcontractor , which can be seen as special stock "O" in the stock reports of the plant.
3.4.3.8 “Confirmations” Tab

Here confirmation control in the form of Confirmation control key for PO items is defined with just one confirmation category (e.g. shipping notification) or a confirmation control key covering several confirmation categories (order acknowledgment, loading confirmation, shipping notification).

As configured earlier, we have assigned confirmation control key “0004” in our PO item.

So we have to create inbound delivery to do the goods receipt instead of MIGO.

Picture : “Confirmations” Tab

PO is created now

Picture : PO is created
3.4.3.9 Expected Error in PO Creation & Resolution
  • Error M8215 -Maintain tolerance limits for tolerance key PE while creating PO. Please click HERE to check how to resolve this error.
  • Error KI102-Control indicators for controlling area PPIN do not exist. Please click HERE to check how to resolve this error.

3.5 Goods Receipt

Since we have assigned confirmation control key to our PO line item , therefor we can not do the goods receipt by MIGO.

We have to create inbound delivery and do the goods receipt based on the inbound delivery.

3.5.1 Inbound delivery creation

To create inbound delivery start VL31N

Picture : Starting of IBD creation
Picture : IBD Creation Next Screen

Please note Item category is determined as “YELN” in the above inbound delivery.

Input the batch number.

Click on Header details and select “Administration” tab. You will note that delivery type is “YEL” as specified in “Confirmation Control Key”

Picture : Inbound Delivery “YEL” Type
Note

--> Please click HERE to check "Receiving Point" determination configuration in Inbound Delivery

--> Please click HERE to check Item category "YELN" determination in Inbound Delivery

save the inbound delivery

Picture : Inbound Delivery is created

3.5.2 Display Inbound Delivery

you can display inbound delivery through VL33N

or alternatively Inbound delivery number is updated in the “Confirmation” tab of the PO line item as shown in the below screenshot

Picture : Inbound delivery in Purchase Order

Double click on the inbound delivery and system will take you to display inbound delivery VL33N.

3.5.3 Good Receipt 1st Step -Inbound Delivery Put-away

Inbound delivery based goods receipt is done in two steps. First step is put away of the goods and second step is Goods Receipt.

Start VL32N & input you delivery number . Press enter

Click on “Stock Placement” tab

Picture : Inbound Delivery put-away

input put-away qty as 1

--> Please note that you need to put-away full delivery quantity in order to be able to do goods receipt.

--> If lesser quantity from delivery quantity is available then change the delivery qty equal to the qty available for put-away.

3.5.4 Good Receipt 2nd Step -Inbound Delivery GR

As soon as inbound delivery put-away quantity is entered , put-away status is changed from “A-For put-away” to “C-Compl. put away”

Picture : Put-away Completion

Now press on “Post Goods Receipt”. Goods Receipt is completed

Picture : GR Completion

Document flow as well as PO history is updated.

Note

With the goods receipt completion, Stock is posted in the inventory with automatic FI postings in the background to the relevant accounts. Please see the below post to check in all the consequences of goods receipt in detail.

Ultimate guide to configure S4 HANA MM-FI Integration

3.6 Invoice Verification

After PO & Good receipt, the next step in P2P cycle is invoice verification

Since invoice receipt indicator is selected in PO (flowing from item category) so invoice is expected for this PO (item).

Picture : “Invoice” Tab
Please check the below post to see the configuration & testing of Invoice verification

How to Configure Logistics Invoice Verification in SAP S4 HANA

4. Scenario 2: Consignment Purchase Order

Consignment is a business arrangement where vendor left the goods in the possession of an authorized third party to sell.

Please check the below post for set by step configuration of consignment purchasing

SAP Consignment: Configuration Guide and Process Overview

5. Scenario 3: Third Party Purchasing

In the third party Order processing , our business outsource the final product to a third party to sell it to customer.

There are two type of third party processess

5.1 Scenario 3.1: Third Party Sales

Upon receiving third party order order from the customer, business passes it to the third party vendor who delivers the goods to the customer, and invoice to our business. Our business bills the customer for the goods supplied.

Picture: SAP Third Party Sales Flow

5.2 Scenario 3.2: Third Party Sale with Individual PO

Third-party with Individual Purchase Order is like Third Party Sales but with a difference. The difference is vendor sends the Finished materials to the Business instead of directly sending to the customer. After that our business sends the FG to the customer and send the invoice to the customer.

In this scenario, vendor does not send the invoice immediately with delivering the goods to customer. We ask vendor to send shipping notification after delivering the goods to customer. When we receive the shipping notification then we do MIGO and basing on MIGO quantity we raise invoice to Customer. Without vendor invoice we cannot raise billing to our customer.

Below is the process flow for SAP Third Party Sales with Individual Purchase Order

Picture: SAP Third Party Sales Process with Individual Purchase Order

Please check the below posts to check both the third party sales process step by step in detail

The Ultimate Guide to SAP Third Party Sales

An Ultimate Guide to SAP Third Party Sales with Individual Purchase Order

6. Scenario 4: Stock Transfer Order (STO)

tock transfer in SAP play a crucial role in effective inventory management by enabling the seamless movement of goods between storage locations, plants, or even company codes.

Whether we are transferring stock within the same plant, across different plants, or between different organizational units, SAP stock transfer solutions like 1-step and 2-step transfers, offers flexible and robust solutions to manage these transactions efficiently.

SAP provides multiple stock transfer methods, including one-step and two-step transfers, stock transport orders (STO), and intercompany transfers, each catering to specific business needs.

Stock transfer in SAP can be classified into two types from a broader prospective. These can be further divided into several other types.

Please see below this in pictorial form

Picture: Stock Transfer in SAP: All Scenarios at a Glance

6.1 Stock Transfer with MIGO (Without STO, Delivery & Billing)

This is the simplest form of stock transfer in SAP.

In this scenario, no stock transfer order or purchase order is created.

Stock transfer is directly initiated in MIGO without any predecessor document like STO or PO.

Please see below these types of stock transfer in pictorial form.

Picture: Stock Transfer with MIGO (Without STO, Delivery & Billing)

6.2 Stock Transfer With Stock Transport Order/Purchase Order (STO/PO)

Here stock transfer process starts with a document i.e. stock transport order, which is a kind of purchase order.

There are several types of Stock Transfer With Stock Transport Order/Purchase Order (STO/PO)

All types of Stock Transfer With Stock Transport Order/Purchase Order (STO/PO) is given below in pictorial form

Picture: Stock Transfer With Stock Transport Order/Purchase Order (STO/PO)

Stock Transfer With Stock Transport Order/Purchase Order (STO/PO) can be further divided into three parts

6.2.1 Stock Transfer with STO but without Delivery & Billing

This type of STO is used when transferring stock between two plants within the same company code. It ensures better inventory tracking and valuation compared to a standard transfer posting.

Below is the pictorial representation of this type of STO

Picture: Stock Transfer with STO but without Delivery & Billing

Please see the below post for the details of configuration & testing of STO without Delivery & Billing

SAP Stock Transport Order Without Delivery: Process, Configuration & Guide

6.2.2 Stock Transport Order with Delivery (STO with SD Delivery Process)

This STO type is used when stock transfers require a delivery document generated via SAP SD (Sales & Distribution Module). This is common when warehouse teams handle goods movement through outbound deliveries.

This setup is particularly useful for intra-company transfers where financial transactions are not required

Please see the below picture to see the pictorial representation of this stock transfer method

Picture: Stock Transport Order with Delivery (STO with SD Delivery Process)

Please see the below post for the details of configuration & testing of STO without Delivery & Billing

SAP Stock Transport Order with Delivery: Setup, Execution & Key Insights

6.2.2.1 Special Scenario

We have configured a Special Scenario for Stock Transfer with STO/PO – STO with delivery – Configuring 1-step & 2-step between the same plants

Please see the details of this scenario in the below post

Maximize SAP Efficiency: Configure 1-Step STO with Delivery Alongside 2-Step STO Between the Same Plants

6.2.3 Inter-Company STO with Delivery & Billing

Intercompany STO is used when transferring stock between plants in different company codes. It requires a more complex process as it involves intercompany billing and affects financial accounting entries.

Please see below the pictorial representation of this method of stock transfer

Picture: Inter-Company STO with Delivery & Billing

Please see the below post for the details of configuration & testing of SAP Intercompany STO Process with Delivery & Billing

How to Configure SAP Intercompany STO Process with Delivery & Billing

Business card photo created by ijeab – www.freepik.com

The post All About Purchase Orders in SAP MM appeared first on Ultimate SAP Guides | S4 HANA Logistics Modules.

By: admin
26 January 2022 at 20:50

How to Configure Logistics Invoice Verification in SAP S4 HANA

Home » MM

Logistics Invoice Verification in SAP S4 HANA is the last step in MM Procure to pay cycle.

In this post

  • We will first see in detail How to Configure Logistics Invoice Verification in SAP S4 HANA .
  • Then we will post the invoice depicting different practical scenarios.
Under Logistics Invoice Verification, we will configure system  required for the following areas

-->Processing invoice receipts for different practical scenarios like with Freight, with Taxes etc.

-->Posting to Financial Accounting for different practical scenarios like with Freight, with Taxes etc.

1. Logistics Invoice Verification Configuration

Below configuration is a minimum required configuration to process the invoice receipts.

Note : If you receive below error while creating PO, this indicates missing logistics invoice configuration.

Picture : Error Due to Missing Logistics Invoice Verification Configuration

We will start now logistic Invoice related Configuration.

Please check the below post for Purchase Oder & Goods Receipt related configuration & process.

All About Purchase Orders in SAP MM

1.1 Tax Treatment in Invoice Reduction

In this step we configure how taxes are to be posted for invoice reduction.

In case of complaint, system creates two accounting documents for invoice reduction. The first document (original document) contains the invoice data sent by the supplier. The second document (complaint document) contains information about the invoice reduction.

  • If the tax reduction is carried out in the complaint document, the taxes in the original document correspond to those in the supplier invoice. The tax amount for the invoice reduction is credited in the complaint document.
  • If the tax reduction is carried out in the original document, the taxes in the original document are reduced by the tax amount for the invoice reduction. In this case, the complaint document does not contain any tax postings.

Below is the setting for our company codes

SPRO –> Materials Management –> Logistics Invoice Verification –> Incoming Invoice –> Tax Treatment in Invoice Reduction

Picture : Tax Treatment in Invoice Reduction

1.2 Maintaining Default Values for Tax Codes

Here we define for each company code which tax code(s) the system suggests when incoming invoices are entered.

Default value is maintained as “I0”

Picture : Tax code Default for PA10 Company Code

Similarly it is maintained for PP10 Company code

Picture : Tax code Default for PP10 Company Code

1.3 Configure How Exchange Rate Differences are Treated

Here we define how exchange rate differences are to be calculated for incoming invoices in foreign currencies.

We can choose either the value of the exchange rate as the calculation method

  • Either at the time of goods receipt
  • Or at the time of the invoice receipt

For our company codes we have chosen at the time of invoice receipt

Picture : Exchange Rate Treatment

1.4 Set Tolerance Limit

In this activity, we specify the tolerance limits for each tolerance key for each company code.

When processing an invoice, the system checks each item for variances between the invoice and the purchase order or goods receipt. The different types of variances are defined in tolerance keys

Picture : Setting of Tolerance Limit

Tolerance limit maintained for the below keys for both the company codes

  • AN Amount for item without order reference
  • AP Amount for item with order reference
  • BD Form small differences automatically
  • BR Percentage OP Un variance (IR before GR)
  • BW Percentage OP Un variance (GR before IR)
  • DQ Exceed amount: quantity variance
  • DW Quantity variance when GR qty = zero
  • KW Var. from condition value
  • PP Price variance
  • PS Price variance: estimated price
  • ST Date variance (value x days)
  • VP Moving average price variance

Picture : Tolerance limit maintained for the PA10 Co.Code
Picture : Tolerance limit maintained for the PP10 Co.Code

1.5 Setting Check for Duplicate Invoices

In this step, we configure if the system is to check for duplicate invoices for each company code upon entering invoices. This check is to prevent incoming invoices being accidentally entered and paid more than once.

The accounting documents are checked first, followed by documents from Logistics Invoice Verification (only invoices that are incorrect, on hold, or parked, or those entered for verification in the background). The system only checks for duplicate invoices if a reference document number is specified upon entering the invoice.

Picture : Path to set Check for Duplicate Invoices

Below settings are made for our PA10 & PP10 Company codes

Picture : Setting Check for Duplicate Invoices

1.6 Setting Configure How Unplanned Delivery Costs Are Posted

Here we specify how the system posts unplanned delivery costs amount the below given two options.

  • Distributed among the individual items in proportion to the item amounts invoiced so far and the item amounts in the current invoice.
    • The amounts determined are added to the respective item amounts.
    • The amounts determined are posted in a separate line for each item.
  • Posted in a separate line to a separate general ledger account. We must enter a specific tax code for the posting. We can define a default value in the Maintain Default Values for Tax Codes activity.

For our company codes, unplanned delivery costs are to be distributed among invoice items

Picture : Path for Unplanned Delivery Cost Distribution

Picture : Unplanned Delivery Cost Distribution Configuration

1.7 Amount authorization for Customers/Vendors in company code

To resolve this issue,

Financial Accounting -> Accounts Receivable and Accounts Payable -> Business Transactions -> Outgoing Payments -> Manual Outgoing Payments -> Define Tolerances (Vendors)

Define tolerance for company code PA10

Financial Accounting -> Accounts Receivable and Accounts Payable -> Business Transactions -> Incoming Payments -> Manual Incoming Payments ->Define Tolerances (Customers)

Logistics Invoice verification settings are completed. Now we will post the invoice in the system for different scenarios

2. Invoice Posting for the Different Scenarios

We will now post invoice fist for main material. As vendor is responsible to collect the A/P sales tax , so at the time of incoming invoice posting in SAP S4 HANA MM module , Vendor Account will be debited cost of material + Applicable A/P Sales tax (MM input Tax). You can Check the post for detail How to configure SAP S4 HANA MM Tax in 7 Easy Steps

2.1 Invoice for Material &Non-Deductible Tax

Go to MIRO and take reference to your PO

Please check the below post for the PO price components

Ultimate guide to configure S4 HANA MM-FI Integration

Base Price (from Info Record)  =14 USD / PC
Surcharge (Manually Entered)  =1.4 USD / PC (10%)
                                --------------------
Net Value (Base for Taxes)        =15.4 USD / PC
                              ---------------------
A/P Sales Tax 1 Inv.	6.000 %	= 0.92 USD
A/P Sales Tax 2 Inv.	3.000 %	= 0.46 USD
A/P Sales Tax 3 Inv.	1.000 %	= 0.15 USD
                              --------------------   
Total Tax                                   = 1.53 USD                                 
                              --------------------
Net Value (Including Taxes)      = 16.93 USD / PC
                              --------------------  
Freight (Manually Entered)       = 1 USD / PC
            _______________________________________________
Actual Price                            = 17.93 USD / PC
            _______________________________________________

Note

As vendor is responsible to collect the A/P sales tax , so at the time of incoming invoice posting in SAP S4 HANA MM module , Vendor Account will be debited cost of material + Applicable A/P Sales tax (MM input Tax).

So as per the above PO price components Material price + Taxes i.e. 16.93 USD should be debited to vendor

Picture : Invoice Posting

If everything is OK then Balance should be in green and 0.00 shown in above screenshot

Click on “Simulate” and system will show the FI Postings.

Picture : Invoice Posting

Post the invoice and PO history will be updated

Picture : PO history update after Material material invoice posting

2.2 Invoice for Planed Distribution Cost

We have entered Planned delivery cost (Freight) in our purchase order. At goods receipt, a provision is posted to a freight or customs clearing account. This account is cleared when the invoice is posted.

Details of planned delivery cost in our PO are given in Ultimate guide to configure S4 HANA MM-FI Integration

From PO

Picture : Planned Delivery Cost in PO

From GR FI document

Picture : Planned Delivery Cost Posting at GR

Now post the invoice for planned delivery cost

Go to MIRO and select Planned delivery cost

Picture : Invoicing of Planned Delivery Cost

Balance is zero & in green. Now click on “Simulate”

Picture : Planned Delivery Cost FI Postings

As soon as we post the invoice PO history is updated once again.

Picture : PO History Update after full invoice (Material+Tax+Planned Delivery Cost)

2.3 Invoicing for Consignment (ERS)

Since for consignment PO, agreed rate is in info record so it can not be different in invoice.

Please check the below post to know the consignment process in detail

SAP Consignment: Configuration Guide and Process Overview

So in the consignment process instead of vendor raising& sending invoices to you, vendor will receive a settlement from us based on the consumption (Withdrawal from the consignment stock)

--> So for the reasons given above, consignment process completes by a special invoicing process called "ERS" i.e. "Evaluated Receipt Settlement" through MRKO instead of invoicing through MIRO

First check with display radio button that all is OK

Picture: Consignment Settlement

Now settle and System will give the document number as well as the message describing “Document Created”

Picture: Consignment Settlement Posting

Check the Financial document created

2.3 Invoicing for Subcontracting

We will post the invoice from subcontracting for their service charges for providing the subcon services

Start MIRO and refer Subcon PO as shown in the below screenshot

Picture: Invoice Posting for Subcon PO

Since balance is zero so all OK and post the invoice

It has created the below finance document

Picture: Subcon invoice posting FI Document

2.4 Invoicing for Third Party Sales

As soon as invoice from the vendor arrives, The invoice verification with reference to purchase order is created. The value and quantity (if GR is done) is proposed by the system.

Picture: Invoice Posting

Below Accounting Document is created

Picture: Accounting document posted

Please check the detail step by step end to end third party process in the below post

The Ultimate Guide to SAP Third Party Sales

2.5 Invoicing for Third Party sales with individual PO

Since in this scenario GR is done as standard PO, so invoice will be done as standard GR.

Picture: Invoice Posting

Below Accounting Document is created

Picture: Accounting document posted

Please check the detail step by step end to end third party sales with individual PO process in the below post

2.6 Invoicing for Inter-Company STO with Billing

In the process of “Inter-Company STO with delivery & Billing”, the billing of the sender plant will be as vendor invoice in the receiving plant.

Picture: Invoicing for Inter-Company STO with Billing

Start MIRO and take reference of the intercompany STO

Picture: Invoice Posting for Inter-Company STO with Billing

Below accounting document will be posted at the time of invoicing

Picture: Accounting Entries for Invoicing for Inter-Company STO with Billing

In the Previous post we have configured MM-FI Integration, which is required to Post the Goods receipt in the system. Please click on the above button to see the details

With this post, we have configured full Procure to Pay cycle. From the next post we will start sales related configuration in details.

Image Courtsey : Templates vector created by freepik – www.freepik.com

The post How to Configure Logistics Invoice Verification in SAP S4 HANA appeared first on Ultimate SAP Guides | S4 HANA Logistics Modules.

By: admin
9 January 2022 at 18:16
❌
❌