HTTP/2: Der Performance-Boost für SAP Analytics Cloud Dashboards Bei langsamen Ladezeiten in SAP Analytics Cloud (SAC) liegt der Fokus meist auf Datenmodellen, Abfragen oder Story-Design. Ein oft unterschätzter Aspekt ist jedoch die Netzwerkschicht – insbesondere das verwendete HTTP-Protokoll. HTTP/2: Mehr als nur ein technisches Detail HTTP/2 ist die moderne Weiterentwicklung von HTTP/1.1 und wurde entwickelt,...
Vergangenes Wochenende fand unser traditionelles Wintermeeting im Hotel Edelweiß in Berchtesgaden statt. In inspirierender alpiner Umgebung haben wir die Zeit genutzt, um uns strategisch neu auszurichten und klare Schwerpunkte für das kommende Jahr zu definieren. Im Mittelpunkt standen dabei aktuelle Entwicklungen rund um die SAP Business Data Cloud: von neuen Architekturansätzen über Integrationsszenarien bis hin...
Data Visualization with FIORI and SAC – Part 2 1. Introduction As stated in the previous Blog “Data Visualization with FIORI and SAC – Part 1”, we created a Fiori Overview Page based on S/4 data from a virtual CDS data model. In this one the analytical overview page will be re-created as SAP Analytics Cloud dashboard, as closely as possible, using the same...
Data Visualization with FIORI and SAC – Part 1 1. Introduction In the SAP landscape, there are very different platforms and ways to visualize data. In the first part of this series, we will create a Fiori Overview Page based on S/4 data from a virtual CDS data model. In the second one this analytical...
Bulgaria is Switching to the Euro – What this Means for SAP BW Introduction Bulgaria will officially adopt the euro on January 1, 2026, a fixed conversion rate at 1 EUR = 1.9558 BGN will apply. That sounds simple, but in SAP BW it affects master data, key figures, currency translation logic, historical reporting, planning, and...
Harnessing Reporting Potential, by Thinking outside of the Box – Part 1/3 SAC Jump & Run Blog series Solving Reporting needs in SAP Analytics Cloud by passing limitations with workaround After years of experience within the area of SAC reporting, I cannot count how often I heard colleagues, business partners, or customers complain about SAC...
In this post we will first check the configuration in details required for material master creation in S4 HANA. We will keep configuration minimum possible & use of SAP standard wherever possible.
1. Material Master related configuration
Below are the main configuration required to create material master
1.1 Material Type
Grouping of similar attribute materials . For example -Raw materials, Semi-finished products, or finished products.
Material type determines
If the material is intended for a specific purpose such as a configurable material or process material.
Material number is assigned internally or externally.
The number range of the material number.
Which screens appear and in what sequence
Procurement of the material -manufactured in-house or procured externally, or both
We will use below SAP standard material type
ERSA Spare Parts
FERT Finished Product
HALB Semifinished Product
HAWA Trading Goods
LEER Empties
LEIH Returnable packaging
ROH Raw materials
VERP Packaging
HAWA Trading Goods
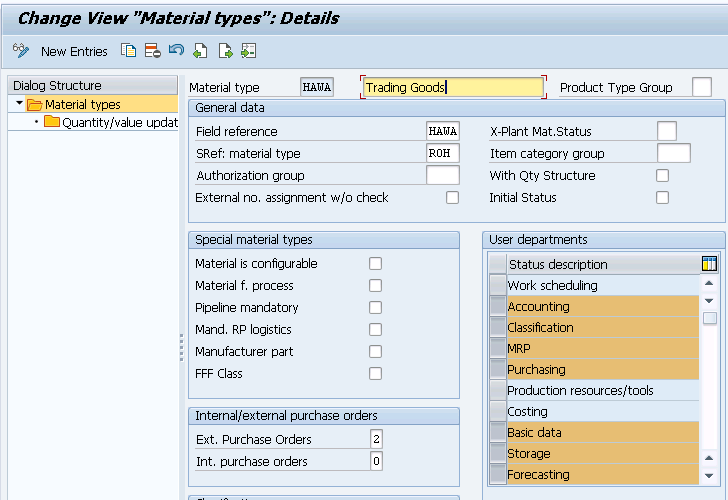
Below is the configuration for let,s say example – Trading Goods (HAWA)
Transaction code – OMS2
Picture : Material Type Configuration
Now click on “Quantity/value updating” & select “QTY Update” & ” Value Update” for your all material type in all your plants (Valuation Area)
So we have selected for our valuation areas PA10, PA20 & PP10
Picture : Qty/value update
1.2 Define Number Ranges for Each Material Type
Here we define the type of number assignment and the number range intervals for material master records. When creating a material master record it is must to assign it a unique number. There are two ways of doing this
1.2.1 Internal number assignment
In this case, a number within the number range interval allowed is assigned by the SAP system. Currently, the maximum length allowed for an internal number is 18.
1.2.2 External number assignment
Here, the user assigns a number within the number range interval allowed. You can define the intervals for external number assignment numerically and alphanumerically. For integration purposes, SAP, currently, allows only the number range length of 18 characters.
Transaction Type ; MMNR
Picture : Number Range Assignment to Material Type
Now let,s create our first material
2. Create your First material in S4 HANA
Here we will create different materials to be used for our car business
2.1 Creation of “Trading Material” -Mat Type “HAWA”
Time needed: 5 minutes
How to Create your first Material in SAP S4 HANA
Go to MM01 and enter below on the Create Material (initial screen)
Material Code – PA0101-01 Material Type -HAWA Industry Sector – M Mechanical Engineering Press enter
Select the views to be created (Presented from the material type config OMS2) Enter organization structure in which material is to be created
Plant -PA10 (PPIC Chicago Plant) Sales Org -PA10 (IC Car Sales Organization) Distribution Channel – PA (Car Dealers) Press enter
On Sales : Sales Org. 2 view
Enter General Item Category – NORM Enter Item Category Group – NORM Acct Assmt Grp Mat. – PA (Products)
Gen Item Category for 3rd party subcon party : for third party subcontracting process, we use general item category as BADS
Through this item category BADS , system determines Item category “RADS” for 3rd Party Subcontracting
Enter Description – “First PA01 Material for Car Dealership” Enter BUOM – PC Enter Division – SR (Spare Parts) Enter Material Group – PA10 (IC Car Parts Light) Gross Weight – 20 KG Net Weight – 18 KG
Material “Packaging Level”
1 “CARTON” of Material “66” = 6 “PC” 1 “PALLET” of Material “66” = 8 “CARTON” 1 “PALLET” of Material “66” = 48 “PC”
On Sales : Sales Org. 1 view
Enter Delivering Plant -PA10 Enter Tax Classification -1 (Taxable)
On Sales : General/Plant view
Enter Availability Check -KP (No Check) – We will configure this and then activate this for another Material Enter Batch Management -Selected Enter Transportation Group – PA10 (Normal Transport) Enter Loading Group -PA10 (Manual Load)
On MRP 2 view
Enter “Storage loc. for EP” as -PP1A -Std. SLOC, This will be defaulted in PO and flows to the subsequent Inbound Delivery, which decides the goods receiving point for the deliveries.
We assign goods receiving points to the inbound deliveries based on the plant and storage locations.
Please note that if we want this material to be handled in EWM, then we need to select a Storage location, connected with EWM warehouse in the field “Storage loc. for EP”.
On MRP 4 view
Click on “Production Versions” button under sub screen “BOM Explosion/ Dependent Requirements”
Input production version here . It is required for BOM determination in subcon PO. Please see below post to see the details
On Plant Data / Stor. 1 view
Enter Storage Condition as P1 (IM Managed stock) – Based on this we can configure different picking SLOC , based on if SLOC is IM managed, WM managed or EWM managed.
On Accounting 1 View
Enter Valuation Class as 3100 -Trading Goods. ML Active checkbox should be already selected and greyed out. If this is not selected then stop here and check ML activation through below given link to the corresponding post Enter price control “V” and price as 13 USD
Save the material and you have created your first material successfully !
HINT
On Step 9 “ML Active” checkbox should be already selected and greyed out. If this is not selected then stop here and check ML activation through the link given below.
2.2 Creation of “Packaging Materials” -Mat Type “VERP”
As per definition provided by SAP- “Packaging materials are intended to enclose or hold together the materials that are to be packed. In other words, the material that is to be packed can be packed into or onto the packaging material. The packaging material can be a load carrier. The most important packaging materials include crates, boxes, containers, wire baskets, and pallets”
Picture 13 : Different Type of Packaging Material (Courtesy SAP Help)
We will create two packaging material
Packaging Material CARTONSTD -CARTON WITH SSCC GENERATION
Packing Material PALLETSTD – PALLET WITH SSCC GENERATION
a) Packaging Material CARTONSTD -CARTON WITH SSCC GENERATION
TCode – MM01, Select Material type as “VERP” – Packaging Material
Picture 14 : Creation of Standard Carton Packaging Material
Packaging material type Standard Carton “SCAR” assigned to packaging material “CARTONSTD”
Picture 15 : Packaging Material type assignment to packaging material
b) Packaging Material PALLETSTD – PALLET WITH SSCC GENERATION
T-Code – MM01, Select Material type as “VERP” – Packaging Material
Picture 16 : Creation of Packaging material & assignment of Packaging Material Type
Note : Please see the below post to see the packaging material type “SCAR” & “SPAL” configuration in detail
There are business cases where we need to extend the materials to other plants.
3.1 Extension to intra-company Plant – Business Case
In order to work with stock transfer/stock transport order , it is mandatory to extend the material in both the plants. This means the material should be available in both receiving & sending plants
We need to extend our materials to our other plants in order to be able to do Stock Transfers & STOs
System will throw an error while transferring the stock or creating the STO , if the material is not extended to receiving plant
Picture: Stock Transfer Error
3.2 Extension to intra-company Plant
As per our organization structure We have two plants PA10 & PA20 assigned to PA10 company code as shown in below picture
Picture : Our Car Business Org. Structure
First we will extend our material to PA20 plant which is assigned to same company code (PA10) as PA10 plant
To extend the material Start MM01
Enter material as “66”
Enter “Copy from.. Material as “66”
Press Enter
System will copy Material type and industry sector from master record as shown in the below screenshot
Picture : Material Extensions
Select all the views
Picture ” Select All the Views
press enter and system will present source & destination organization levels as shown in the below screenshot
Note : Sales Organization PA10 serves for both the plants PA10 & PA20.
Please click HERE for details of assignment of plant to sales organizations.
Press enter and system will automatically select extendable screens one by one.
You will be presented “Classification” screen.
Since we have not configuration yet so just come out from this screen by pressing the “Next Screen” button.
You will be presented the “Sales : sales org. 1” screen
Enter Delivering Plant “PA20-PPIC Boston Part”
Picture : Sales : sales org. 1 screen
Press enter and you will be presented “Sales : sales org. 2” screen
Picture : “Sales : sales org. 2” screen
We are not changing anything on the above screen so just press enter and system will present “Sales : General/Plant” screen
Picture : “Sales : General/Plant” screen
We are not changing anything on the above screen so just press enter and system will present “Intl Trade : Export” screen
Picture : “Intl Trade : Export” screen
We are not changing anything on the above screen so just press enter and system will present “Sales text” screen
Picture : “Sales text” screen
We are not changing anything on the above screen so click on “Purchasing” screen
Picture : “Purchasing” screen
We are not changing anything on the above screen so just press enter and system will present “Intl Trade : Import” screen.
Picture : “Intl Trade : Import” screen.
We are not changing anything on the above screen so just press enter and system will present “Purchase order text” screen
We are not changing anything on the “Purchase order text” screen, so click on “MRP 1” screen
Picture : “MRP 1” screen
We are not changing anything on the above screen so just press enter and system will present “MRP 2” screen
Picture : “MRP 2” screen
We are not changing anything on the above screen so just press enter and system will present “MRP 3” screen
Picture : “MRP 3” screen
We are not changing anything on the above screen so just press enter and system will present “MRP 4” screen
Picture : “MRP 4” screen
We are not changing anything on the above screen so just press enter and system will present “Advance Planning” screen .
We are not changing anything on the “Advance Planning” screen, so just press enter and system will present “Forecasting” screen
Enter Forecast Model as “N-No forecast/external model”
Picture : “Forecasting” screen
We are not changing anything on the above screen so just press enter and system will present “Plant data / Stor. 1” screen
Picture : “Plant data / Stor. 1” screen
We are not changing anything on the above screen so just press enter and system will present “Plant data / Stor. 2” screen
Picture : “Plant data / Stor. 2” screen
We are not changing anything on the above screen, so just press enter and system will present “Quality Management” screen
We are not changing anything on the “Quality Management” screen, so just press enter and system will present “Accounting 1” screen
Picture : “Accounting 1” screen
In the above screen Price is showing as 15.69 USD per price for this material in PA10 Plant
Let,s assume that this material costs 20 USD in PA20 plant due to cost of living difference , overheads etc.
Picture : Price update in plant “PA20”
After changing the price, press enter and system will present “Accounting 2” screen
We are not changing anything on the “Accounting 2” screen, so just press enter and system will ask to save.
Picture : Material Creation is about to complete
Material is now extended to PA20 Plant.
Picture : Material is now extended to PA20 Plant
3.3 Extension to inter-company Plant
We have two companies PA10 & PP10 with plant assignment shown as below
Picture : Our Car Business Organization Structure
Now we have extend our material to the PP10 plant which is assigned to the different company code PP10.
To extend the material Start MM01
Enter material as “66”
Enter “Copy from.. Material as “66”
Press Enter
System will copy Material type and industry sector from master record as shown in the below screenshot
Picture : Material Extensions to PP10 Plant
Enter source and destination organization structures
Picture : Source/Destination Org Structures
You will be presented the “Sales : sales org. 1” screen
Enter Delivering Plant “PP10- PPELC Fremont Pl”
Also Electrical plant is tax exempt so select Tax classification as “0-Exempt”
Picture : Sales : sales org. 1 screen
Press enter and you will be presented “Sales : sales org. 2” screen
We are not changing anything on the “Sales : sales org. 2” screen so just press enter and system will present “Sales : General/Plant” screen
Change loading group to “PP10-Manual Load”
Picture : “Sales : General/Plant” screen
–> We are not changing anything on the above screen so just press enter and system will present “Intl Trade : Export” screen.
–> We are not changing anything on the “Intl Trade : Export” screen so just press enter and system will present “Sales text” screen.
–> We are not changing anything on the “Sales text” screen so click on “Purchasing” scree.
–> We are not changing anything on the “Purchasing” screen so just press enter and system will present “Intl Trade : Import” screen.
–> We are not changing anything on the above screen so just press enter and system will present “Purchase order text” screen
–> We are not changing anything on the “Purchase order text” screen, so click on “MRP 1” screen
–> We are not changing anything on the MRP 1 screen so just press enter and system will present “MRP 2” screen
–> We are not changing anything on the MRP 2 screen so just press enter and system will present “MRP 3” screen
–> We are not changing anything on the above screen so just press enter and system will present “MRP 4” screen
–> We are not changing anything on the above screen so just press enter and system will present “Advance Planning” screen .
–> We are not changing anything on the “Advance Planning” screen, so just press enter and system will present “Forecasting” screen
–> We are not changing anything on the above screen so just press enter and system will present “Plant data / Stor. 1” screen.
–> We are not changing anything on the above screen so just press enter and system will present “Plant data / Stor. 2” screen.
–> We are not changing anything on the above screen, so just press enter and system will present “Quality Management” screen.
–> We are not changing anything on the “Quality Management” screen, so just press enter and system will present “Accounting 1” screen.
In the above screen Price is showing as 15.69 USD per price for this material in PA10 Plant
Let,s assume that this material costs 20 USD in PP10 plant due to cost of living difference , overheads etc.
Picture : Price update in plant “PP10”
After changing the price, press enter and system will present “Accounting 2” screen
We are not changing anything on the “Accounting 2” screen, so just press enter and system will ask to save.
Material is now extended to PP10 Plant.
Picture : Material is now extended to PP10 Plant
4. Creating the material for S4 HANA EWM
We have seen the material creation for the S4 or ECC part in the above sections of the post.
Now we will create the material to use in EWM. We will review the material creation for both S4 HANA embedded as well as decentralized EWM on S4 HANA options
We will first review the difference between creation of material in embedded & decentralized EWM
4.1 Material Creation Difference-Embedded Vs Decentralized EWM
Before understanding the difference, we need to understand that whenever we create the material, it is first created in SCM (i.e., APO stack)
We can display the material in “/SAPAPO/MAT1”. Here all fields are replicated from S4/EWM and get overwritten with update in S4/EWM
Now once material is present in SCM/APO, we can then extend (create) this material for our Warehouse. We use “/SCWM/MAT1” for this
--> Creating the material in SCM/APO is like creating the material globally in EWM instance (logically in case of Embedded EWM & Separate sever in case of decentralized EWM).

--> Second level is to create/extend this material in our Warehouse. It is mandatory to have the material in SCM/APO (step above) to be able to create material for our Warehouse.
4.1 Creating Material for Embedded S4 HANA EWM
As explained above we will first create the material in SCM/APO.
We will create material “Battery “
4.1.1 Material Creation in SCM/APO
We create the material first same as we create in S4/ECC normally.
This material creation is already explained in the step 2, so we have created this material offline.
Picture: Material Creation in ECC/S4
In case of Embedded EWM, as soon as we create this material in S4/ECC through MM01, it is available in SCM/APO
Run /SAPAPO/MAT1.
Input material number & choose “Global Data” radio button.
Picture: Material in SCM/APO..1Picture: Material in SCM/APO….2
4.1.2 Material Creation in Warehouse
Since we have already fulfilled the prerequisite of material creation in warehouse (Material is present now in SCM/APO as shown in section 4.1.1), We can now create this material in our warehouse.
Run /SCWM/MAT1
Picture: Creation of Material in WH
Please check the below post for configuration of “Party Entitled to Dispose”
Give the required data in “warehouse data” & “ST. Type Data” view
Picture: WH Product Maintenance..1
input “Put away Control indicator” & “Removal Control Indicator”
Picture: WH Product Maintenance.…2
in “ST.Type Data”, input Storage type & storage section indicator
Picture: WH Product Maintenance….3
4.2 Creating Material for Decentralized EWM on S4 HANA.
To create the material in decentralized EWM, we use ALE/IDOC technique.
--> Since decentralized EWM is a separate server so there is a sender system (S4 HANA) and a receiver system (EWM) involved in Creation of a Material for Decentralized EWM on S4 HANA.

--> Please note that SAP ERP/S4 is always the sender system, and decentralized EWM. is always the receiver system.
4.2.1 Material Creation in SCM/APO
As explained material needs to be created first at global level in SCM/APO of the decentralized EWM server.
This is done through ALE/IDOC.
We will review here the full process of material creation.
Note: We will not explain the process of ALE set up as nothing special in it. It is just a general ALE set up which is used normally in SAP
4.2.1.1 Creating Reduced Message Types in ERP System
We will see the reduced message type MATMAS in detail in a separate post.
5. Creating the material for Specific Business Process
If there is a specific business process needs to be determined for a material (specially in outbound/inbound delivery), then this is decided through field “Gen. item cat. grp” on “Sales: sales org 2” view of the material.
5.1 General Purpose Material
For a normal business process. the value of this field is given as “NORM” as used in the above section of the post.
Picture: “Gen Item Cat.grp” of General-purpose material
5.2 Specific Purpose Material
When there is a special business process to be used, the value of the field “Gen. item cat. grp” is different.
For example
--> Some Example of "Gen. item cat. grp" value for specific business processNLAG --> "Non-stock material"
ERLA --> Structure/Mat. Above
ERLB --> Structure/Mat. Above
LEER --> Empties
LEIH --> Returnable Packaging
VERP--> Packaging
5.2.1 “Gen. item cat. grp” for Spare Parts Specific Business Purpose
We have used general item category for our material 700007106 which is specifically created as spare part for spare part specific purpose.
We used “YSPR” for this field for the spare parts
Picture: Gen. item cat. grp YSPR for spare parts material
We use Item category Group as “BANS” for the third party sales process. The rest of the material creation process will same as HAWA as given HERE
Picture: Material Creation for Third Party Sales
5.2.3 “Gen. item cat. grp” for Third Party Individual PO
We use Item category Group as “BANC” for the third party sales process. The rest of the material creation process will same as HAWA
Picture: “Gen. item cat. grp” for Third Part Individual PO
5.2.4 “Gen. item cat. grp” for Third Party Subcontracting
We use Item category Group as “BADS” for the third party sales process. The rest of the material creation process will same as HAWA
Picture: Gen. item cat. grp” for Third Party Subcontracting
6. Creation of Finished Goods for Production Order (FERT)
Here we will create a finished good material to use in our production order
Step 1
Go to MM01 and enter below on the Create Material (initial screen)
Material Code – “Internally Generated”
Material Type -FERT
Industry Sector – M Mechanical Engineering
Press Enter
Step 2
Select the views to be created (Presented from the material type config OMS2). Enter organization structure in which material is to be created
Plant -PA10 (PPIC Chicago Plant)
Sales Org -PA10 (IC Car Sales Organization)
Distribution Channel – PA (Car Dealer
Press Enter
Step 3
On “Basic Data 1” view
Enter Description – “Finished Car Model D“
Enter BUOM – EA
Enter Division – PC (Petrol Car)
Enter Material Group – PA10 (IC Car Parts Light)
Gross Weight – 2000 KG
Net Weight – 1900 KG
Step 4
On Sales : Sales Org. 1 view
Enter Delivering Plant -PA10
Enter Tax Classification -1 (Taxable)
Step 5
On Sales : Sales Org. 2 view
Enter General Item Category – NORM
Enter Item Category Group – NORM
Acct Assmt Grp Mat. – PA (Products)
Step 6
On Sales : General/Plant view
Enter Availability Check -KP (No Check)
Enter Batch Management -Selected
Enter Batch management(Plant) – Selected
Enter Transportation Group – PA10 (Normal Transport)
Enter Loading Group -PA10 (Manual Load)
Step 7
On MRP 2 view
Enter “Prod. Stor. location -PP1B (This will be the production supply SLOC from where material for production will be supplied)
Enter “Storage loc. for EP” as -PP1A -Std. SLOC, (This will be defaulted in PO and flows to the subsequent Inbound Delivery).
Please note that if we want this material to be handled in EWM, then we need to select a Storage location, connected with EWM warehouse in the field “Storage loc. for EP”.
Step 8
On Plant Data / Stor. 1 view
Enter Storage Condition as P1 (IM Managed stock) – Based on this we can configure different picking SLOC , based on if SLOC is IM managed, WM managed or EWM
Step 9
Accounting 1 View
Enter Valuation Class as 7920 -Finished Products
ML Active checkbox – should be already selected and greyed out. (If this is not selected then stop here and check ML activation through below given link to the corresponding post).
Enter price control “V”/”S” and price as 50000 USD.
7. Creation of SFG for Production Order (HALB)
Here we will create a semi-finished good (Assembly) material to use in our production order
Step 1
Go to MM01 and enter below on the Create Material (initial screen)
Material Code – “Internally Generated”
Material Type -HALB
Industry Sector – M Mechanical Engineering
Press Enter
Step 2
Select the views to be created (Presented from the material type config OMS2). Enter organization structure in which material is to be created
Plant -PA10 (PPIC Chicago Plant)
Sales Org -PA10 (IC Car Sales Organization)
Distribution Channel – PA (Car Dealer
Press Enter
Step 3
On “Basic Data 1” view
Enter Description – “Chassis Model D“
Enter BUOM – EA
Enter Division – PC (Petrol Car)
Enter Material Group – PA10 (IC Car Parts Light)
Gross Weight – 600 KG
Net Weight – 550 KG
Step 4
On Sales : Sales Org. 1 view
Enter Delivering Plant -PA10
Enter Tax Classification -0 (Exempt)
Step 5
On Sales : Sales Org. 2 view
Enter General Item Category – NORM
Enter Item Category Group – NORM
Acct Assmt Grp Mat. – PA (Products)
Step 6
On Sales : General/Plant view
Enter Availability Check -KP (No Check)
Enter Batch Management -Selected
Enter Batch management(Plant) – Selected
Enter Transportation Group – PA10 (Normal Transport)
Enter Loading Group -PA10 (Manual Load)
Step 7
On MRP 2 view
Enter “Prod. Stor. location -PP1B (This will be the production supply SLOC from where material for production will be supplied)
Enter “Storage loc. for EP” as -PP1A -Std. SLOC, (This will be defaulted in PO and flows to the subsequent Inbound Delivery).
Please note that if we want this material to be handled in EWM, then we need to select a Storage location, connected with EWM warehouse in the field “Storage loc. for EP”.
Step 8
On Plant Data / Stor. 1 view
Enter Storage Condition as P1 (IM Managed stock) – Based on this we can configure different picking SLOC , based on if SLOC is IM managed, WM managed or EWM
Step 9
Accounting 1 View
Enter Valuation Class as 7900 -Semi finished products
ML Active checkbox – should be already selected and greyed out. (If this is not selected then stop here and check ML activation through below given link to the corresponding post).
Enter price control “V”/”S” and price as 9999 USD.
8. Creation of Raw Material for Production Order (ROH)
Here we will create a RAW material (Component) to use in our production order
Step 1
Go to MM01 and enter below on the Create Material (initial screen)
Material Code – “Internally Generated”
Material Type -ROH
Industry Sector – M Mechanical Engineering
Press Enter
Step 2
Select the views to be created (Presented from the material type config OMS2). Enter organization structure in which material is to be created
Plant -PA10 (PPIC Chicago Plant)
Sales Org -PA10 (IC Car Sales Organization)
Distribution Channel – PA (Car Dealer
Press Enter
Step 3
On “Basic Data 1” view
Enter Description – “Tail Lights“
Enter BUOM – KG
Enter Division – PC (Petrol Car)
Enter Material Group – PA10 (IC Car Parts Light)
Gross Weight – 5 KG
Net Weight – 4 KG
Step 4
On Sales : Sales Org. 1 view
Enter Delivering Plant -PA10
Enter Tax Classification -1 (Taxable)
Step 5
On Sales : Sales Org. 2 view
Enter General Item Category – NORM
Enter Item Category Group – NORM
Acct Assmt Grp Mat. – PA (Products)
Step 6
On Sales : General/Plant view
Enter Availability Check -KP (No Check)
Enter Batch Management -Selected
Enter Batch management(Plant) – Selected
Enter Transportation Group – PA10 (Normal Transport)
Enter Loading Group -PA10 (Manual Load)
Step 7
On MRP 2 view
Enter “Prod. Stor. location -PP1B (This will be the production supply SLOC from where material for production will be supplied)
Enter “Storage loc. for EP” as -PP1A -Std. SLOC, (This will be defaulted in PO and flows to the subsequent Inbound Delivery).
Please note that if we want this material to be handled in EWM, then we need to select a Storage location, connected with EWM warehouse in the field “Storage loc. for EP”.
Step 8
On Plant Data / Stor. 1 view
Enter Storage Condition as P1 (IM Managed stock) – Based on this we can configure different picking SLOC , based on if SLOC is IM managed, WM managed or EWM
Step 9
Accounting 1 View
Enter Valuation Class as 3000 -RAW Products
ML Active checkbox – should be already selected and greyed out. (If this is not selected then stop here and check ML activation through below given link to the corresponding post).
Enter price control “V”/”S” and price as 50 USD.
Note:
Please see below post to check how the FG, SFG & Raw Material created above are used in the BOM and subsequently in the production order
If we set this indicator then “QM in procurement” is activated for all the plants pertaining to a client.
--> If we activate QM in procurement indicator in the material master record (Which is at the client level), we must also input "Quality Procurement Key" at the plant level for quality management in procurement.
9.2 QM Control Key
This key determines all the conditions which are valid for quality management in procurement.
To configure the QM procurement key , follow the below path
SPRO –> Quality Management –> QM in Logistics –> QM in Procurement –> Define Control Keys for QM in Procurement
We have configured the below key for our materials
In the next Post we will load GL master. GL accounts will be required to create/configure further process like BP, MM-FI Integration etc. Click on the above link to read in detail.
In the world of SAP S/4HANA, the Material Ledger (ML) is no longer a luxury or an optional sub-module—it is a mandatory requirement for material valuation. While the “mandatory” label often causes concern for logistics and finance teams, activating ML doesn’t have to be a technical nightmare. When executed correctly, the Material Ledger serves as the backbone for multi-currency functionality and real-time inventory valuation across different accounting standards (like IFRS or Local GAAP).
The following guide provides a strategic roadmap to move your valuation areas from a “Red” status to a “Green” productive state, ensuring your financial data is accurate and compliant.
5 Easy Steps to Material Ledger Activation
Step 1: Assign Currency Types to Material Ledger Type (T-Code: OMX2)
To record inventory values across legal, group, and profit center valuations, you must configure the currency types associated with your Material Ledger. This allows for multi-currency reporting and valuation views that are critical for global enterprises
Picture: Multiple Currencies in Material Ledger
--> We have to configure & activate Material Ledger as it is mandatory in SAP s4 HANA

--> We want to configure & activate material Ledger with minimum possible configuration

--> So we will activate our Material Ledger with only 1 currency "Company Code currency" to keep it simple
Please follow the below path for this configuration.
Picture : Path to Assign Currency Types to Material Ledger TypePicture: ML Type & Assigned currencies
Senior Consultant’s Tip: For your initial S/4HANA activation, using Material Ledger Type “9000” with only “Company Code currency” (10) is a Best Practice for Lean Implementations. This setup minimizes complexity by generating only one view in the material master, which is often sufficient for mid-sized organizations or those not yet utilizing complex parallel valuation.
Select material ledger type “9000” and click on “Define individual characteristics”
Picture: Currency Assigned to the ML type “9000”
Step 2: Assign Material Ledger Type to Valuation Area (T-Code: OMX3)
This step acts as the mapping phase, where you tell the SAP system which specific plants (valuation areas) will track material costs under the rules defined in Step 1.
In this configuration, assign Material Ledger type “9000” to your valuation areas (e.g., PA10, PA20, and PP10).
Important Warning: After this assignment, you will notice the valuation area status is Red. Do not be alarmed; this is the expected status. It will remain red until you complete the Production Start-up in Step 4.
Please follow the below path for this configuration.
Picture : Path to Assign Material Ledger Type 9000 to Valuation Area
and assign our chosen material ledger type “9000” to all our valuation areas (PA10, PA20 & PP10)
Picture : Assign our chosen Material Ledger Type 9000 to our Valuation Areas
Step 3: Activate Valuation Areas for Material Ledger (T-Code: OMX1)
Transaction OMX1 is the “On Switch” for the Material Ledger in your plants. Beyond just turning it on, this is where you define how the system determines material prices.
You must choose between two Price Determination levels:
1. Transaction-Based (2): Materials are valued at either moving average price (V) or standard price (S). Moving average price is calculated only for informational purposes.
2. Single/Multi-level (3): This is the prerequisite for Actual Costing. It calculates a periodic unit price for closed periods. Single-level rolls variances into ending inventory, while Multi-level rolls variances from lower-level components (Raw Materials) up to higher-level products (Finished Goods).
Strategic Directive: For your initial S/4HANA activation, I recommend Option 2 (Transaction-Based) to maintain a streamlined logistics profile. However, if your finance team requires the elimination of manual month-end variance allocations and needs true Actual Costing, Option 3 is the standard choice.
Please follow the below path for this configuration.
Picture : Path to Activate Valuation Areas for Material Ledger
Select “ML Act.” check box and Price determination level as option 2 “Transaction-Based Price Determination”
Picture : Activate Valuation Areas for Material Ledger
Note
The value of price determination flows from this config to the material master as shown in the below screenshot.
Picture: Price Determination values from config to the Material Master
Step 4: Production Start-up of Material Ledger (T-Code: CKMSTART)
This is the final execution step. Running CKMSTART converts your valuation areas into a productive state, allowing SAP to begin recording actual costs, multi-currency values, and parallel accounting.
Once you execute this for a specific plant (such as PA10), the system will trigger the “Plant is now productive” indicator. It is only at this point that the status in transaction OMX3 will finally turn from Red to Green.
Lets first activate this for our PA10 valuation Area (Plant)
Picture : Production Start-up of Material Ledger for Valuation Area PA10
All green log informing PA10 is now productive with Material Ledger.
Picture : Successful Production Start up of Material Ledger for Valuation Area PA10
Valuation area PA20 & PP10 is made productive with ML through similar way
Step 5: Troubleshooting Common Activation Errors
Technical hurdles are common during ML activation. Here is how to resolve the most frequent errors encountered in the field:
Error 1 -Company Code is not set up for Material Management (M3152)
When we tried PP10 to make productive with ML, below error message is encountered
Picture : Error M3152
To resolve this error , We need to set-up Company code PP10 for Material Management through T-code OMSY
Picture : OMSY for PP10 Company Code to Resolve Error M3152
Now PP10 is initiated for MM periods from the current month .
Please note we need to open posting period starting of every month through MMPV. This step was already done for PA10 company code hence no error for Plants PA10 & PA20
Now re-try to make PP10 plant productive with ML
PP10 plant is Successfully productive now
Picture : Successful Production Start up of Material Ledger for Valuation Area PP10
Error 2 -Material Ledger Currencies were changed (C+039)
How to resolve error C+039 ‘Material ledger currencies were changed’
To resolve this error run the transaction code CKM9 and check Company Code/Controlling area currency as per screenshot given below
Picture : Checking of Currencies
This currency should be aligned with the currency in SCC4
Note : For Example
Company Code Currency : USD
Currency in SCC4 : EUR
in this case in OKKP, select group currency 30 and currency as EUR
Please note that these currencies selection should not be changed after ML activation (CKMSTART). If changed then Error Material Ledger Currencies were changed (C+039) will come. if this happens then revert to the original currencies selection after deactivation of ML>
Error 3- ML Active checkbox is not selected in Material Master Accounting View.
To resolve this first deactivate the ML through running report SAPRCKMJX in SE38
Now go to OMS2, select your material type and click on “Quantity/value updating”
Now select the “Quantity updating” & “value updating” check box for your valuation area (plant) & save.
Now Set the Plant production for ML again through t-code CKMSTART
Check in MM03- ML active checkbox should be now selected.
Error 4- ML currencies are not integrated in FI for valuation area (Error FML_CUST033)
To resolve the error we will follow 3-Part Remedial Sequence
Phase 1 (Controlling Area Setup):
To resolve this error, Configure the controlling area as given below for our Co-Area PPIN and linked it to Company codes. Please note that currencies should be aligned for material ledger & Controlling area
Picture : Configuration of PPIN Controlling Area
Phase 2 (Component Activation)
In SPRO (Maintain Controlling Area), ensure “CCtr Std. Hierarchy” is created. Set all components to “Not Active” to maintain a lean logistics scenario.
SPRO –> Controlling –> General Controlling –> Organization –> Maintain Controlling Area
Picture : Maintain Controlling Area
“CCtr Std.Hierarchy” is mandatory. Just give name as “PPIN” and save.
System will prompt for creation of “PPIN” “CCtr Std.Hierarchy”. Click on “yes”
Picture : Prompt for creation of “PPIN” “CCtr Std.Hierarchy”
Click on “Activate components/control indicators”
Picture : Activate components/control indicators
Since our focus is not on controlling right now so choose all components as not active to have minimum restrictions/work in our logistics scenarios.
Picture : Choose Components as “Not Active”
We have already assigned our company codes “PA10” & “PA20” to our controlling area “PPIN”
Now run the CKMSTART again for our valuation area and Error FML_CUST033 -ML currencies are not integrated in FI for valuation area should not come.
if you are still getting this error then we need to configure the company code currency
Phase 3 (Ledger Integration)
Use transaction SB22 to check for the presence of your company code. If missing, navigate to FINSC_LEDGER, select Ledger “0L,” and ensure the company code settings are fully maintained.
Check the presence of your company code in transaction SB22
Picture : Check your Company Code Presence.
If your company code is not present then run T-code “FINSC_LEDGER”
Select line with ledger “0L” and click on “Company code Settings for the Ledger”
Picture : Company code Settings for the Ledger-1
Insert your company codes
Picture : Company code Settings for the Ledger-2
Now this error will be 100% resolved.
Error 5- Error C+380 with CKMSTART
The error message C+380 happens if the plant has an inconsistent entry in table T001W.
Cause: Inconsistency in plant/valuation area assignment.
Resolution: Use T-Code OX18 to delete the plant-to-company code assignment, save, and then re-assign the plant.
Expert FAQ: High-Value Technical Queries
Is SAP S/4HANA Material Ledger mandatory?
Yes. In SAP S/4HANA Finance, the Material Ledger is the mandatory engine for all material valuations. You cannot perform inventory management without it.
What is the difference between Transaction-based and Multi-level price determination?
Transaction-based (Option 2) values materials at standard or moving average prices for day-to-day operations. Multi-level (Option 3) is used for Actual Costing, which calculates the Periodic Unit Price by rolling variances from raw materials to finished goods at month-end.
How do I fix the ‘Plant is not productive’ error in SAP S/4HANA Material Ledger?
This error occurs when Step 4 has not been completed. You must run transaction CKMSTART for the valuation area to set the productive indicator and move the status from Red to Green.
Video Tutorial
To get the most value from this topic, we recommend reading this full blog post along with watching the embedded YouTube video below.
The post provides structured insights and practical examples, while the video offers a visual walkthrough to reinforce key concepts. Together, they deliver a complete learning experience for SAP professionals.
Video: How to Activate SAP S/4HANA Material Ledger in 5 Steps + Common Error Resolutions
Conclusion
Transitioning your valuation areas from Red to Green is more than just a configuration checkbox—it is a significant milestone for inventory transparency and financial accuracy. By following these five steps, you ensure that your S/4HANA system is architected for multi-currency reporting and advanced valuation requirements.
Are you ready to move beyond basic activation? Now that your Material Ledger is active, you can leverage Actual Costing for deep profitability analysis. To eliminate manual entry errors and speed up your deployment, I highly recommend using the Configuration Accelerator Workbooks for Efficiency
The prerequisites to Material Ledger activation are successful configuration of minimum required FI, SD & MM organization structure. Click on the above link to read in detail.
We have completed Minimum Required organization Structure & activated Material Ledger (Mandatory for S4 HANA). Now we can configure and create our first material. Click on the above link for more detail.
How to Learn SAP EWM with Best Practices – My 4-step Method
If you’ve ever tried to learn a new SAP EWM process by simply downloading the Best Practices documentation and clicking through the test scripts – you know how it ends. You finish the exercise, feel good for a minute, and then a week later, it’s all gone. The learning didn’t stick. Why? Because simply clicking buttons isn’t learning EWM. I would go that far to say it is a waste of time.
With this blog I will tell you why and I will also share my ideas about how you can avoid making it a waste of time.
I’ll show you my ‘4-step Learning Method’ for learning SAP EWM using the Best Practices in a way that actually sticks. This method comes along with a small e-book and a glossary – I will explain later where you can download the files.
Note that this method is essential for two types of EWM professionals: Obviously the Starters who are just diving into EWM, but also The Seniors who are responsible for mentoring those starters. Cause if you teach you might want to teach in a sustainable way.
Why do click instructions fail?
The mistake that a lot of people make while learning SAP EWM – and this is especially true when you use the Best-Practices as a starting point – is to start with the ‘how’ (the clicks) instead of the ‘why’ (the logistics). It’s like learning to use photoshop without ever having learned about design principles or user experience basics.
The SAP’s Best Practice test scripts are designed for execution, not for learning.
They’re fantastic for proving that a process works in the system or to use it as a prototype for the solution design (will tackle this in my next video btw), but if you go straight into the instructions, you’ll end up with what I call “button-click knowledge.”
Just clicking and thinking you will learn something is subject to fail. It fades quickly, and you’ll struggle to connect the dots when things get more complex.
So, instead of diving headfirst into transactions, we need a learning flow that builds context, base knowledge and orientation before execution.
My 4-step Learning Method
Those 3 are also the base assumptions for what I call the 4-step Learning Method. I repeat one more time:
Context: Execution without context leads to fragile learning. This finding is not new and not invented by myself, but I think for SAP EWM it is true more than anywhere else. I mentioned that already in post [LINK] where I explained how to start with EWM. With this video here I focus on how this idea can be applied to learning EWM with the BPs.
Base knowledge: It is essential to understand the technical base concepts & objects where the thing you are learning is based upon
Orientation: No surprises during the execution – understand the E2E flow on a high level before going into detail
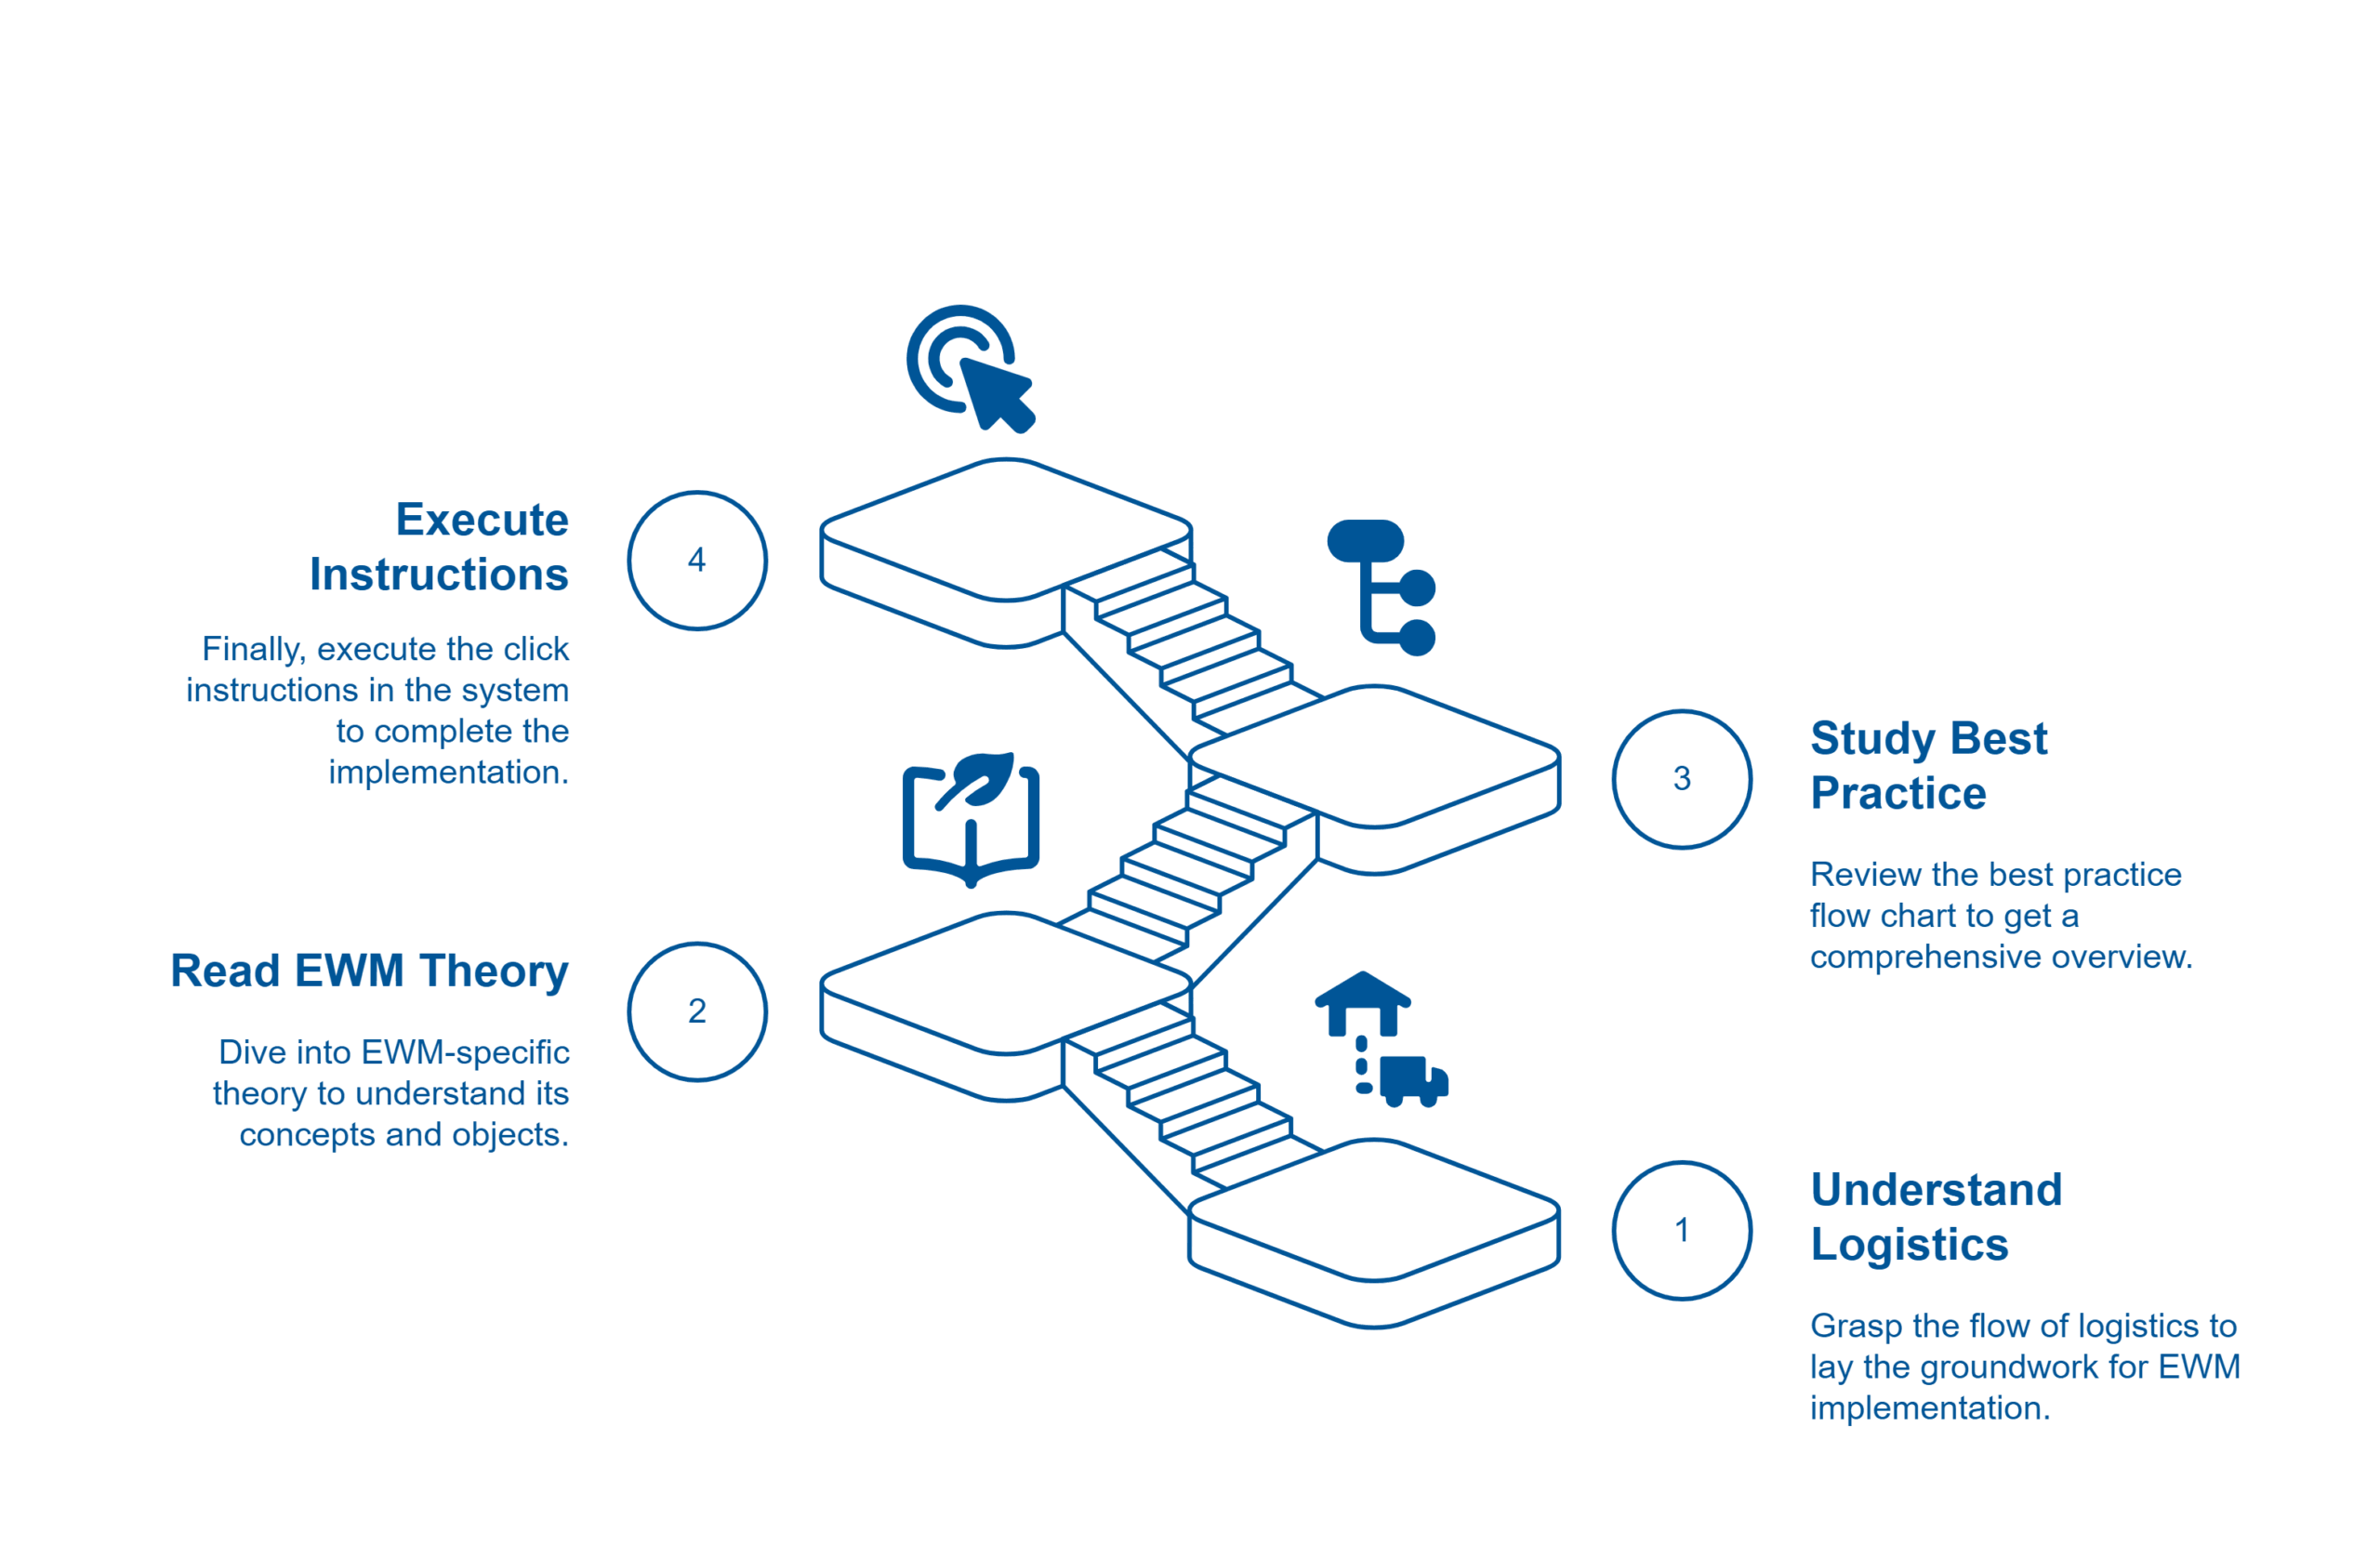
These are the four logical steps, resulting from my base assumptions and forming the 4-step Learning Method:
Understand the (intra)logistics flow first – even just at a high level.
Read the EWM-specific theory to understand its concepts & objects.
Study the Best Practice flow chart to get the birds view (last warm up before the start – going through the trail like a racer before the race).
Go: Finally, execute the click instructions in the system.
Now let’s break each one down.
Step 1: Logistics First
Before you even touch SAP, you must understand the business processes and the intralogistics (real world) material flows
What kind of business process triggers the material flow and which parties are involved?
Where does the truck arrive?
What happens to the physical pallet during each step?
Where is it stored in the warehouse?
I highly recommend studying foundational texts like VDI 3601 – it provides the vendor-neutral, timeless logistics basics. I’ve created a short e-book for you, based on this VDI standard, breaking down the logistics basics and the material flow for every EWM scope item.
Step 2: EWM-specific Theory
Now that you know the real-world process, read the corresponding chapter in your favorite EWM textbook, the official SAP Online Help or simply the EWM Best Practice Glossary that I created for this purpose. This is where you connect the real-world ‘why’ to the SAP ‘what’ – the technical terms, the software concepts (WO, WT, PPF, Queue, Storage process, WPT and so on…). This builds your mental model and ensures that when you see buttons and fields in SAP, you already (at least roughly) know why they exist and what they are used to in the given context.
Step 3: Study the Flow Chart
As the last step before you jump into the system, open the Best Practice flow chart from the SAP Process Navigator for the scope item that you want to tackle (the one with the swim lanes). This is your strategic map. By studying the flow before touching the system, you’ll see the big picture instead of getting lost in screens. This is like the racer going through the track one more time before then focusing on the details of each section during the execution/race.
Step 4: Execute the Click Instructions
Now that you’ve built context in steps 1–3, the clicks will make much more sense. You’ll see why each step exists, not just how to do it. This is what transforms learning from fragile to sticky. (of course at some points you will have to iterate back but you will know where to check, find the details and connect the dots).
By the way –
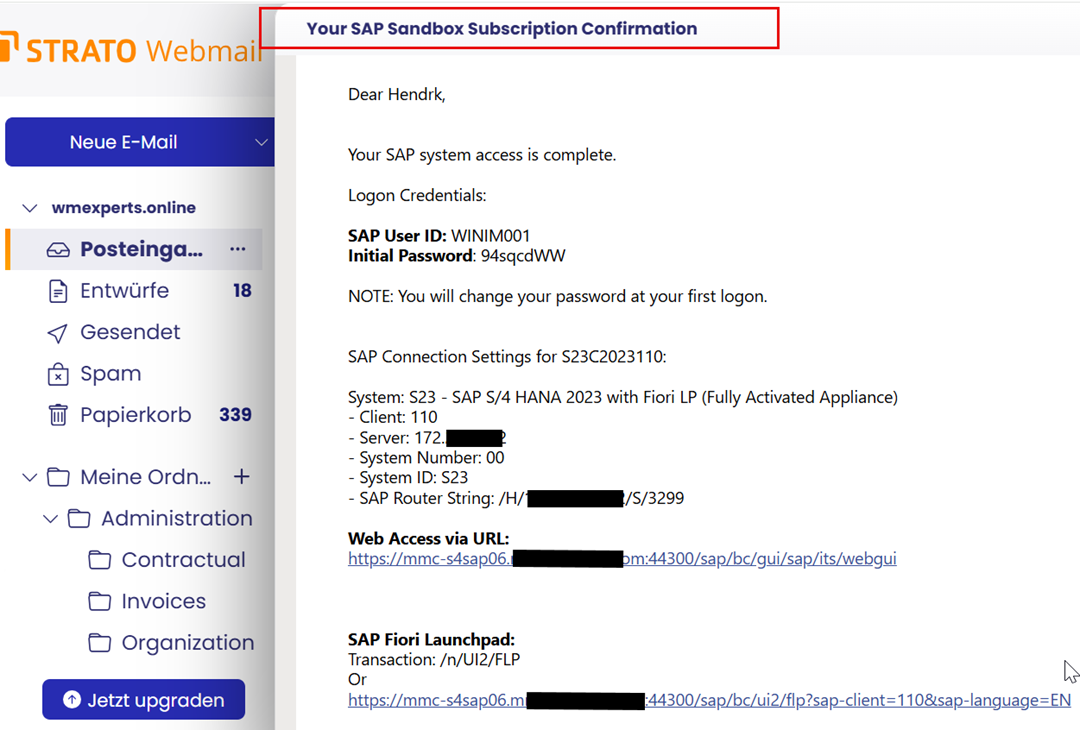
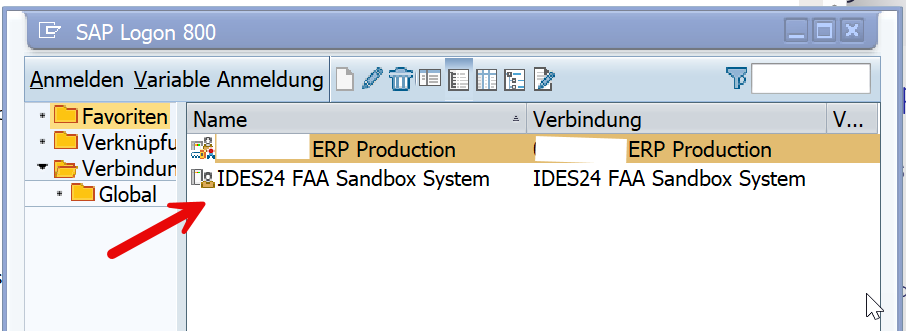
If you would like to work with the best practices but you are missing access to an EWM system with the latest release and pre-installed BPs, I can recommend the offerings from IDES24, which is partnering with my channel here. Visit their website, select the system that you would like to access, receive an e-mail with your credentials and login to your pre-configured system to start learning. You can use discount code WM-IDES24 to get 20% off for your order while supporting my channel/blog at the same time!
Tools & Giveaways
To make the application of this method easy & painless I’m offering a free mini Intralogistics ebook as well as a EWM Best Practice Glossary. The ebook helps you to learn the logistics basics and the glossary holds every EWM specific term you need to understand when clicking through the Best Practices.
You will find a mapping table at the end of the ebook that maps each scope item to one or multiple chapters. The glossary is also structured based on the scope items. This way, you’ll always know what to study before jumping into the system.
Summary
The standard approach is 4→3→2→1. The successful approach is 1→2→3→4: Logistics → Basics Theory → Overview → Execution. Use this 4-step method in the right sequence, and your EWM knowledge will stick.
If you’re a beginner, try it out with your next Best Practice exercise! If you’re a senior consultant, use it to mentor juniors and watch how much faster they grow!
If this helped, please subscribe to my youtube channel or my blog updates (or both :-)) so you do not miss the next video/post!