Here in this post we will configure SAP consignment & explain the consignment process in detail.
1. What is Consignment
Consignment is a business arrangement where vendor left the goods in the possession of an authorized third party to sell.
Consignment involves a consignor, who is the owner of the goods and provides items to a third party (who is called consignee) to sell on their behalf.
The consignor retains ownership of the goods until they are sold
2. SAP Consignment Process
If we transform the consignment process from the business language to the SAP language, below will be the salient point of the SAP consignment process
In the SAP Consignment process, suppliers delivers the goods at the buyer location, but retains ownership until goods are consumed.
Since ownership is retained by the suppliers at the time of goods delivery, so no financial obligation of the buyer for the goods supply into their premises by seller.
Buyers take the ownership of the goods when goods is removed for consumption.
Since in the vendor consignment process we (our car company) is buyer so if we want to withdraw the vendor consignment stock, there are subsequent two processess
Transfer the goods from the consignment stock to our own stock through MIGO/411K. This is the step when ownership of the goods is transferred and we are financially liable to pay the supplier for the goods.
Now the goods are issued further to process , for example- issue to cost center (201) or issue to production order (261) etc.
3. Configuration of Consignment Process
We will configure the consignment process in SAP. Lets first see what are the steps involved in the configuration of SAP consignment process.
How to configure SAP Consignment Process in 5 Steps
Step 1: Create Consignment Info records
Info Category is “Consignment” & Tax code is mandatory
Step 2: Create Consignment Purchase Order
With Item Category “K”
Step 3: Goods Receipt of the PO
GR will be posted to Non-Valuated Vendor consignment stock owned by Supplier
Step 4: Transfer Posting from Consignment Stock to Own Stock
Financial Posting based on the price given in the info-record
Step 5: Financial settlement of the withdrawn parts
Special Process “Evaluated Receipt Settlement” will be followed
3.1 Consignment Info record Creation
Since stock is owned by supplier so there is no connection between consignment stock and the purchase order
Hence the info record is the only master data from where process get the valuation
Start T-Code ME11
Input Supplier, Material, Purchasing Organization & Plant. Select the category as “Consignment”
Picture: Consignment Info-Record Creation
Input the tax code & Price negotiated with supplier.
Save & purchasing info record is created.
3.2 Consignment Purchase Order Creation
Now we will create Consignment Purchase Order.
To create Consignment PO, have to use item category as “K”
--> Item category defines how the procurement of a material or service item is controlled.

--> The item category determines whether below are mandatory or admissible for an item:
      • Material number
      • Additional account assignment
      • Inventory management in the SAP system
      • Goods receipt
      • Invoice receipt
Let’s see the characteristics of Item Category “K”
GR done and as described above , no financial postings are done at GR
Picture: Consignment PO GR
3.4 Consignment Stock
As described after GR, Non-Valuated Vendor consignment stock owned by Supplier is generated.
Check the stock in MMBE
Picture: Vendor Consignment Stock
3.5 Stock Transfer to Own
Now to use the stock we need to first transfer the stock to our own stock through 411K.
Once we execute this , The Ultimate Guide to Master SAP MM-FI Integration
--> We can directly issue the stock production order or cost center, if we know the details and ready to use the stock. Thus we can eliminate the step of transferring the stock from consignment stock to own stock
A Purchase Order (PO) in SAP MM (Materials Management) is one of the most crucial documents in procurement and supply chain management, ensuring seamless transactions between buyers and vendors.
In today’s fast-paced business environment, optimizing purchase order processing can lead to cost savings, improved vendor relationships, and streamlined supply chain operations.
This guide will cover everything you need to know about SAP MM purchase orders, including PO creation, types, approval workflows, integration with accounts payable (AP), and best practices for automation.
Whether you’re an SAP consultant, procurement manager, or business analyst, understanding purchase orders in SAP MM can help enhance procurement efficiency, reduce maverick spending, and improve inventory management.
Additionally, we’ll explore how automating POs in SAP MM can reduce errors, ensure compliance, and optimize cash flow—key factors that drive enterprise profitability and cost optimization.
1. Why Purchase Orders Matter for Businesses
For companies leveraging SAP ERP, a well-defined purchase order process is essential for:
Reducing procurement costs through better vendor negotiations
Avoiding duplicate purchases and ensuring accurate invoice matching
Ensuring compliance with contract terms and supplier agreements
Enhancing cash flow management through optimized payment terms
With SAP S/4HANA, businesses can further improve their procurement automation, invoice reconciliation, and supplier collaboration—making it easier to manage direct and indirect procurement processes effectively.
Purchase Order is a part of Procure to Pay (P2P) cycle of SAP
Procure to Pay (P2P) cycle starts from Purchase Requisition (PR) and finish with payment to the vendor.Below are the components of P2P Cycle
Purchase Requisition --> Purchase Order --> Good Receipt --> Invoice Receipt --> Vendor Payment
We will start with configuration of Purchase Order in this post.
Also we will have a look on different types of Purchase Orders, their goods receipt as well as respective invoice receipt.
2. What is Purchase Order in SAP
Purchase order in sap is a type of legal contract which binds the supplier to supply the described materials or services & purchaser to pay after receiving the described materials or services.
So purchase order should contain
A Vendor/Supplier.
Purchase Organization structure like -Who is the contact (Purchasing group/Purchasing organization etc).
Material details.
Delivery date.
Quantity
Price
Delivery cost
Taxes.
Delivery address
2.1 Different Purchasing Scenarios in SAP
There are different types of purchase orders in SAP.
Scenario 1: Standard Purchase Order
Scenario 2: Consignment Purchase Order
Scenario 3: Third Party Purchasing
Scenario 4: Stock Transport Order (STO)
Scenario 5: Subcontracting Purchase Order
3. Scenario 1: Standard Purchase Order
Standard purchase orderspecifies the materials being procured, their quantity, agreed price and delivery date.
Standard PO does not has and type of special purchasing like subcontracting or consignment purchasing where purchaser is not charged till they withdraw the materials for actual consumption.
Configuration of standard purchase order
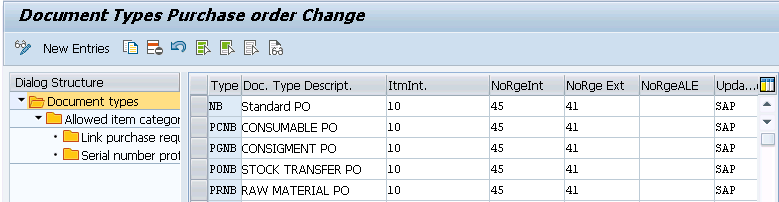
3.1 Define Document Types for Standard Purchase Orders
Purchase Orders are managed as document types in SAP
Document types decides a lot of factors.
For our car business, we will use standard document type “NB” for standard purchase orders
SPRO –> Materials Management –> Purchasing –> Purchase Order –> Define Document Types for Purchase Orders
Picture : NB Document Type
Select “NB” and click on “Allowed Item Categories”
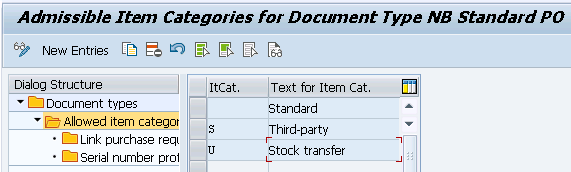
3.2 Item Category
Item category defines how the procurement of a material or service item is controlled.
For example – Item category determines the field selection or determines whether a goods receipt or invoice receipt is to follow.
There are below item categories available
Standard
Consignment
Subcontracting
Third-party
Stock transfer
Service
Material unknown
Material group
Text
Examples
Some Examples of Item category control
--> "Standard" Item Category requires goods receipts and invoice receipts.
--> In "Consignment" item category, invoice receipts are not allowed.
--> For item category "Subcontracting", components to be provided are presented on a screen.
We have selected three item categories which are allowed with our standard purchase order document type “NB”
Picture : Allowed Item Categories
Note : Item Categories can not be configured. These are maintained by SAP, therefore we cannot change them. However, we can change the “External Representation” of PO item categories in IMG.
3.3 Confirmations
Confirmations represents the notification from the vendor to the purchaser regarding the status of a purchase order.
Confirmation covers all types of communications sent by a vendor (external supplier) to the purchaser.
A vendor confirmation
Can be an order acknowledgment,
Can be a loading or transport confirmation
Can be a shipping notification.
Confirmations enable the purchaser to plan more exactly due to receipt of up-to-date information the expected delivery. from the vendor.
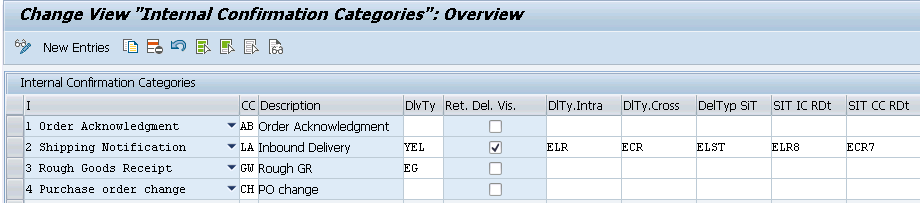
3.3.1 Define External Confirmation Categories
Extenal confirmation categories are sent by the vendor through EDI etc.
Example of confirmation categories sent by vendor
AB-Order Acknowledgment
CH-PO change
GW-Rough GR
LA-Inbound Delivery
3.3.2 Define Internal Confirmation Categories
In this step, an external confirmation category is assigned to each internal confirmation category.
This assignment is required for system to be able to recognize which confirmation category represents order acknowledgments and which one represents shipping notifications.
Confirmation control in the form of Confirmation control key for PO items can be defined with just one confirmation category (e.g. shipping notification) or a confirmation control key covering several confirmation categories (order acknowledgment, loading confirmation, shipping notification).
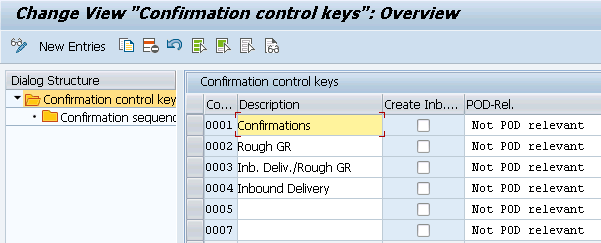
SPRO –> Materials Management –> Purchasing –> Purchase Order –> Confirmations –> Set Up Confirmation Control
Picture : Set Up Confirmation Control
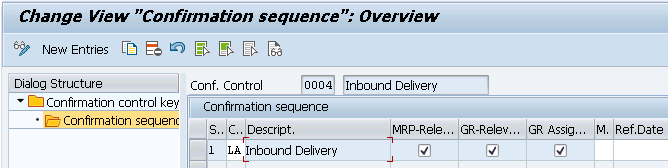
Now select Confirmation control key “0004” and click on confirmation sequence.
Picture : Conf. control key 0004 configuration
So as per above configuration, if we assign confirmation control key "0004" in our PO item, we must create inbound delivery to do the goods receipt instead of MIGO.
3.4 Create Standard Purchase Order
We will create a standard purchase order now
Start ME21N
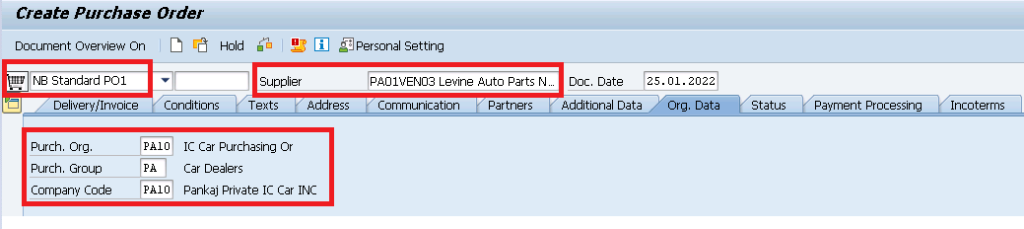
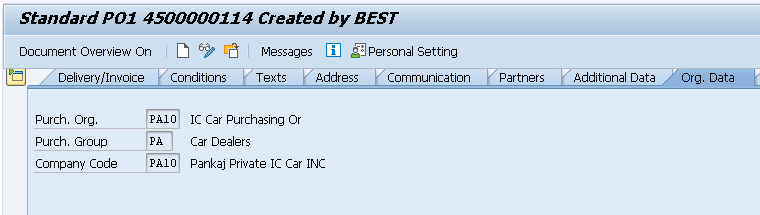
3.4.1 PO Header
First fill the PO header fields as shown in the below screenshot
Purchasing Document Type – NB (Standard)
Vendor-PA01VEN03 (Levine Auto Parts Norwalk).
Purch.Org-PA10
Purchasing Group -PA
Company Code -PA10
Note :
Please click HERE to check the step by step BP vendor creation in detail
Below main fields are available to input in PO line item
Item Category – Blank as we are creating standard PO as described above.
Material -66
Plant -PA10
SLOC-PP1A (Defaulted from Material Master)
PO Quantity – 1 PC
Price – 14 USD/PC (From info record)
Note :
Please click HERE to check the step by step material creation in detail
Picture : PO Line item
3.4.3 PO Line Item Details
There are several tabs giving different details for PO line item.
We can select the line item in drop down for which we are checking the details as shown in the below screenshot
Picture : Selection of PO item in drop-down
Let,s see one by one
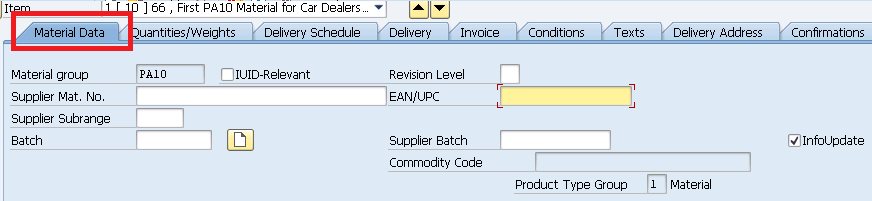
3.4.3.1 “Material Data” Tab
Main information in this tab are batch & “Info-update” indicator
Picture : “Material Data” Tab
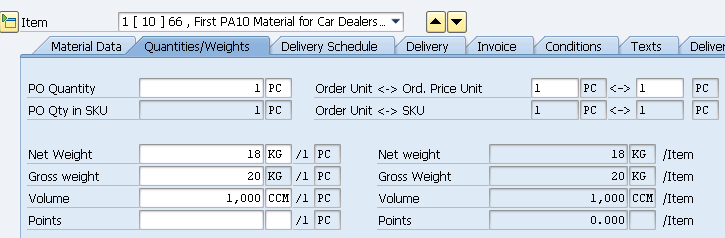
3.4.3.2 “Quantities/Weight” Tab
In this tab material information related to weight and volume flows from the material master records.
Also system multiplies weight & volume from the material master by the PO quantity to show the total PO weight & volume.
Picture : “Quantities/Weight” Tab
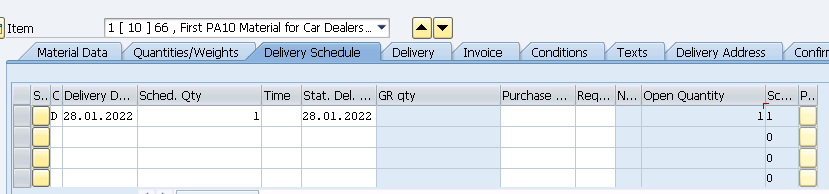
3.4.3.3 “Delivery Schedule” Tab
In this tab , system shows delivery date and related information. for STO this tab shows schedule line type information with committed quantity as per the availability check.
Picture : “Delivery Schedule” Tab
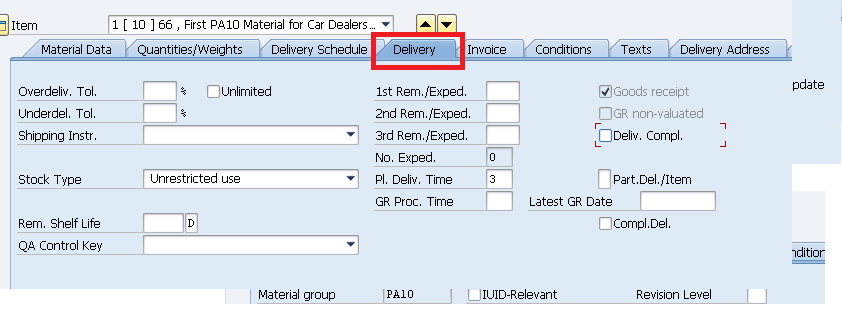
3.4.3.4 “Delivery” Tab
In this tab system shows further information related to delivery like what is the under-delivery or over-delivery tolerance, reminders etc. All these information flows from the purchasing value key.
Picture : “Delivery” Tab
Some very important information is shown in this tab as described below
a) Stoke type
The goods will be receipt in “Unrestricted” or “QI” or “Blocked stock” as per the selection here.
Stock Type can be manually selected or if configured, flows from the QM view of the material master.
b) Goods Receipt Indicator
This indicator specifies if goods receipt is expected.
GR Indicator comes as active by default based on the Item Category and Account Assignment Category.

--> In case of Standard Item Category w/o Account Assignment Category, GR Indicator comes by default

--> In case of Account Assigned POs, default settings depends on the configuration of Account Assignment Category
c) Goods Receipt, Non-Valuated
Specifies that the goods receipt for this item is not to be valuated at GR. If selected then valuation for this item will be done at the time of invoicing.
This flows from account assignment category configuration
d) Delivery Completed” Indicator
if this is selected then it means system is not expecting further delivery for this item i.e this item is closed.
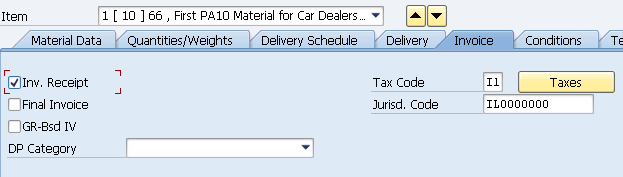
3.4.3.5 “Invoice” Tab
This tab has very important information.
Picture : “Invoice” Tab
a) Invoice receipt indicator
This indicator specifies if an invoice receipt is expected for the purchase order item.
If Invoice receipt indicator is not set, the goods are to be delivered free of chargeThis indicator flows from
--> Define External Representation of Item Categories , under Control invoice receipt section.
--> For account assigned PO it will come from account assignment category.
b) Final Invoice Indicator
Indicates that the last invoice from a supplier has been received for an item with no further invoice is expected.
c) GR-Based Invoice Verification Indicator
This Indicator specifies goods-receipt-based invoice verification for a purchase order item or invoice item.
If this indicator is selected, that means invoice for the order item can be entered with reference to a GR document or a delivery number entered at GR.
Setting of GR-Based Invoice Verification Indicator means a separate invoice item is created for each goods receipt.

That means checking of price and formal accuracy of the invoice is performed at this item level.
d) Tax Code
Here tax code which is unique per country is specified. For each tax code, tax rate is stored and calculation is done.
Note :
Tax code is automatically determined in this PO tab depending upon the configuration done. Similarly system calculate the tax amount too automatically.
Please check the below post for step by step details of MM input tax
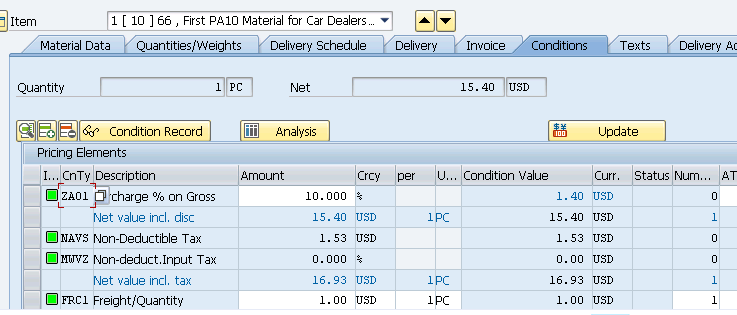
In this tab system calculates landing cost of the material depending upon the base price, discount/surcharges, tax, delivery cost etc.
Picture : “Conditions” Tab
Please click HERE to see PO Price components in details
3.4.3.7 “Delivery Address” Tab
In this tab, delivery address which is generally plant address is copied from the plant configuration and presented.
Picture : “Delivery Address” Tab
Please note highlighted "Supplier" with "SC Supp" fields in the above screenshot, which can eliminate one step from the subcontracting purchasing cycle.

If we select this indicator and input subcontracting supplier , then system directly provide the purchased materials to the subcontractor , which can be seen as special stock "O" in the stock reports of the plant.
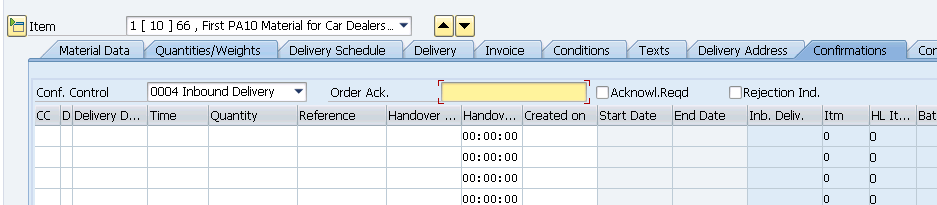
3.4.3.8 “Confirmations” Tab
Here confirmation control in the form of Confirmation control key for PO items is defined with just one confirmation category (e.g. shipping notification) or a confirmation control key covering several confirmation categories (order acknowledgment, loading confirmation, shipping notification).
As configured earlier, we have assigned confirmation control key “0004” in our PO item.
So we have to create inbound delivery to do the goods receipt instead of MIGO.
Picture : “Confirmations” Tab
PO is created now
Picture : PO is created
3.4.3.9 Expected Error in PO Creation & Resolution
Error M8215 -Maintain tolerance limits for tolerance key PE while creating PO. Please click HERE to check how to resolve this error.
Error KI102-Control indicators for controlling area PPIN do not exist. Please click HERE to check how to resolve this error.
3.5 Goods Receipt
Since we have assigned confirmation control key to our PO line item , therefor we can not do the goods receipt by MIGO.
We have to create inbound delivery and do the goods receipt based on the inbound delivery.
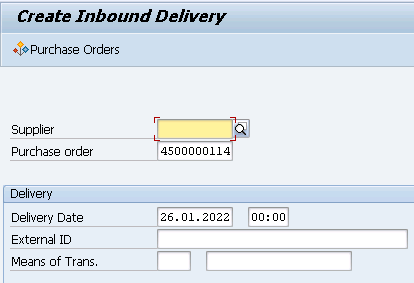
3.5.1 Inbound delivery creation
To create inbound delivery start VL31N
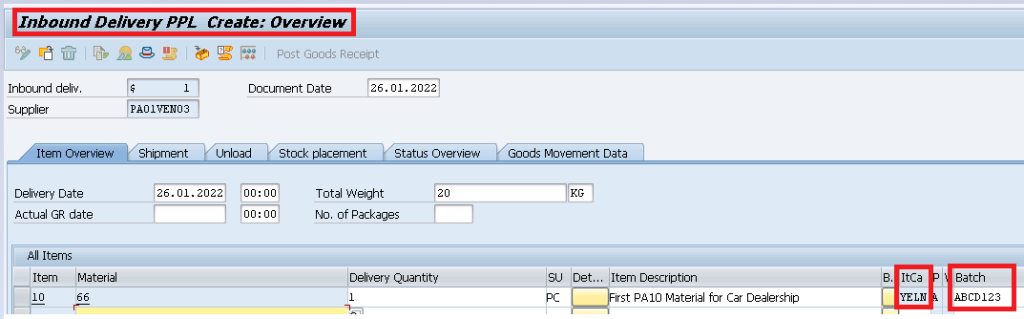
Picture : Starting of IBD creationPicture : IBD Creation Next Screen
Please note Item category is determined as “YELN” in the above inbound delivery.
Input the batch number.
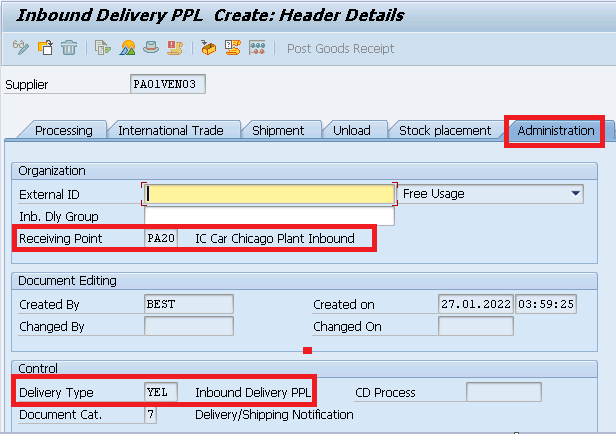
Click on Header details and select “Administration” tab. You will note that delivery type is “YEL” as specified in “Confirmation Control Key”
Picture : Inbound Delivery “YEL” Type
Note
--> Please click HEREto check "Receiving Point" determination configuration in Inbound Delivery
--> Please click HERE to check Item category "YELN" determination in Inbound Delivery
save the inbound delivery
Picture : Inbound Delivery is created
3.5.2 Display Inbound Delivery
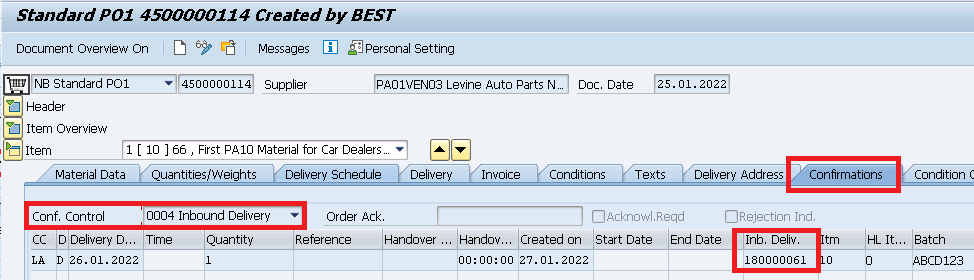
you can display inbound delivery through VL33N
or alternatively Inbound delivery number is updated in the “Confirmation” tab of the PO line item as shown in the below screenshot
Picture : Inbound delivery in Purchase Order
Double click on the inbound delivery and system will take you to display inbound delivery VL33N.
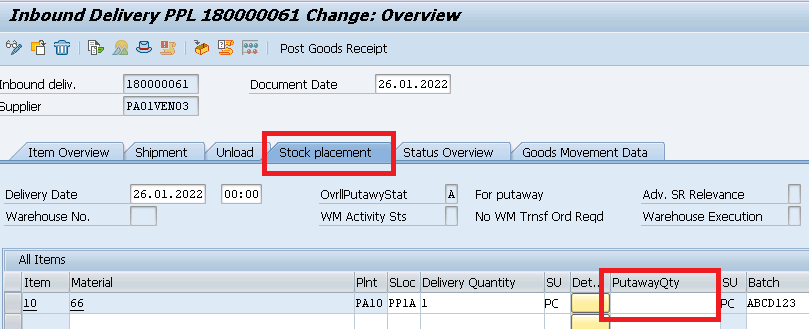
3.5.3 Good Receipt 1st Step -Inbound Delivery Put-away
Inbound delivery based goods receipt is done in two steps. First step is put away of the goods and second step is Goods Receipt.
Start VL32N & input you delivery number . Press enter
Click on “Stock Placement” tab
Picture : Inbound Delivery put-away
input put-away qty as 1
--> Please note that you need to put-away full delivery quantity in order to be able to do goods receipt.

--> If lesser quantity from delivery quantity is available then change the delivery qty equal to the qty available for put-away.
3.5.4 Good Receipt 2nd Step -Inbound Delivery GR
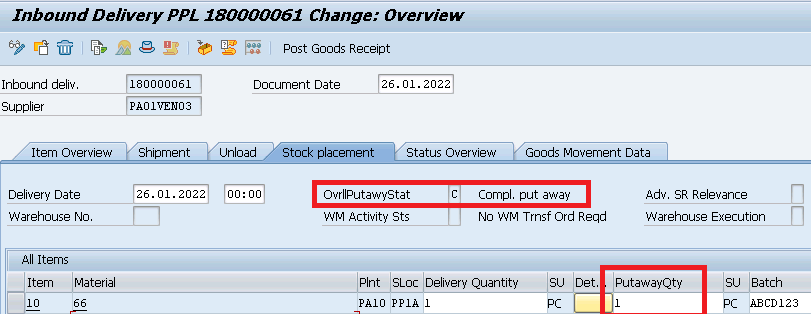
As soon as inbound delivery put-away quantity is entered , put-away status is changed from “A-For put-away” to “C-Compl. put away”
Picture : Put-away Completion
Now press on “Post Goods Receipt”. Goods Receipt is completed
Picture : GR Completion
Document flow as well as PO history is updated.
Note
With the goods receipt completion, Stock is posted in the inventory with automatic FI postings in the background to the relevant accounts. Please see the below post to check in all the consequences of goods receipt in detail.
In the third party Order processing , our business outsource the final product to a third party to sell it to customer.
There are two type of third party processess
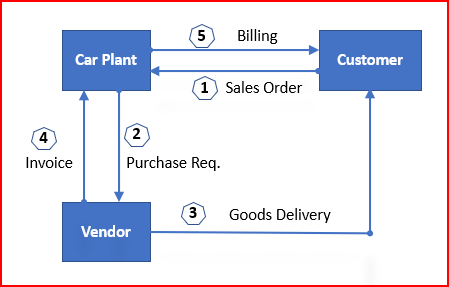
5.1 Scenario 3.1: Third Party Sales
Upon receiving third party order order from the customer, business passes it to the third party vendor who delivers the goods to the customer, and invoice to our business. Our business bills the customer for the goods supplied.
Picture: SAP Third Party Sales Flow
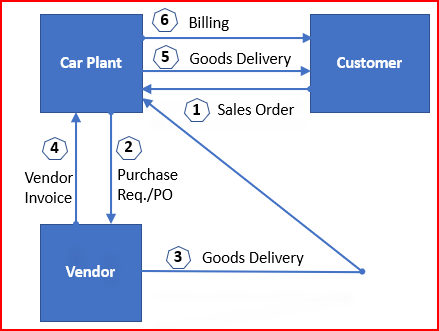
5.2 Scenario 3.2: Third Party Sale with Individual PO
Third-party with Individual Purchase Order is like Third Party Sales but with a difference. The difference is vendor sends the Finished materials to the Business instead of directly sending to the customer. After that our business sends the FG to the customer and send the invoice to the customer.
In this scenario, vendor does not send the invoice immediately with delivering the goods to customer. We ask vendor to send shipping notification after delivering the goods to customer. When we receive the shipping notification then we do MIGO and basing on MIGO quantity we raise invoice to Customer. Without vendor invoice we cannot raise billing to our customer.
Below is the process flow for SAP Third Party Sales with Individual Purchase Order
Picture: SAP Third Party Sales Process with Individual Purchase Order
Please check the below posts to check both the third party sales process step by step in detail
tock transfer in SAP play a crucial role in effective inventory management by enabling the seamless movement of goods between storage locations, plants, or even company codes.
Whether we are transferring stock within the same plant, across different plants, or between different organizational units, SAP stock transfer solutions like 1-step and 2-step transfers, offers flexible and robust solutions to manage these transactions efficiently.
SAP provides multiple stock transfer methods, including one-step and two-step transfers, stock transport orders (STO), and intercompany transfers, each catering to specific business needs.
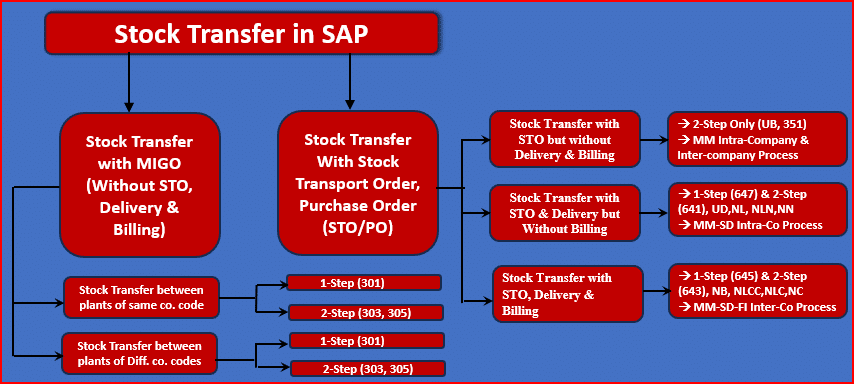
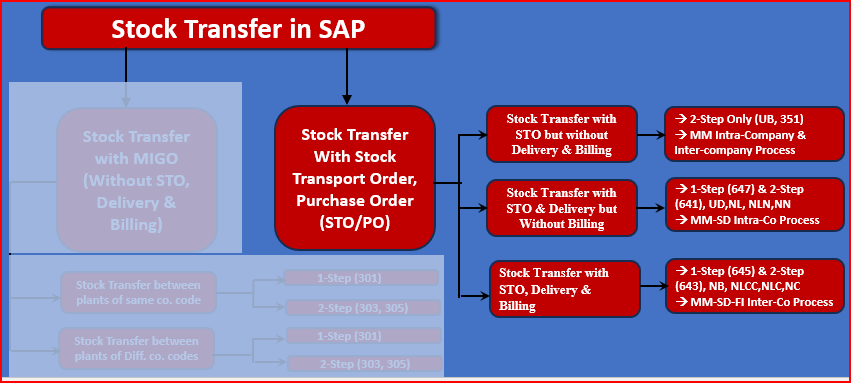
Stock transfer in SAP can be classified into two types from a broader prospective. These can be further divided into several other types.
Please see below this in pictorial form
Picture: Stock Transfer in SAP: All Scenarios at a Glance
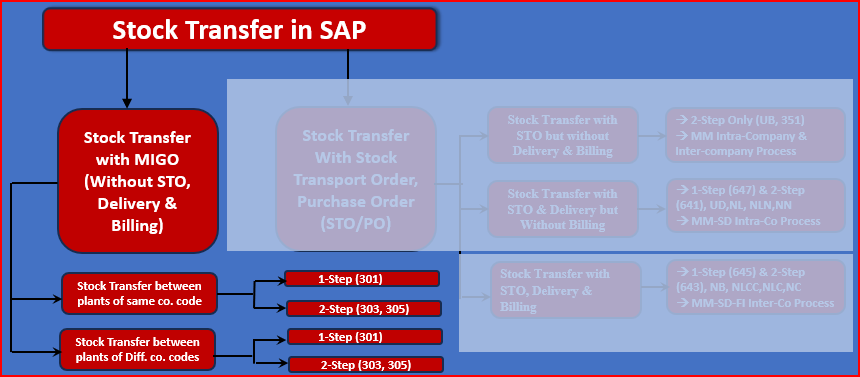
6.1 Stock Transfer with MIGO (Without STO, Delivery & Billing)
This is the simplest form of stock transfer in SAP.
In this scenario, no stock transfer order or purchase order is created.
Stock transfer is directly initiated in MIGO without any predecessor document like STO or PO.
Please see below these types of stock transfer in pictorial form.
Picture: Stock Transfer with MIGO (Without STO, Delivery & Billing)
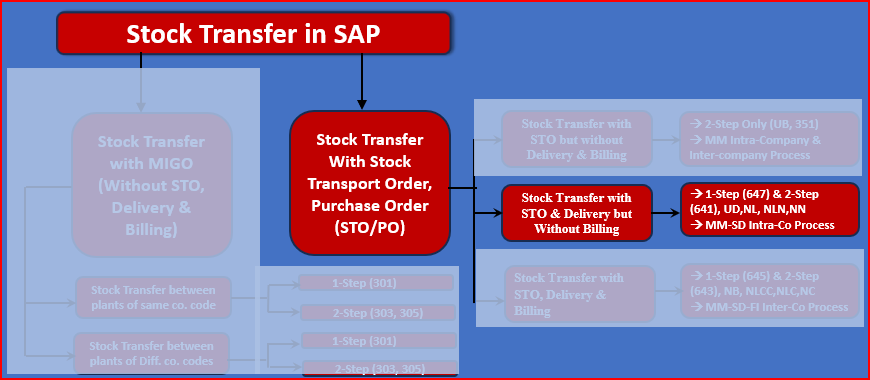
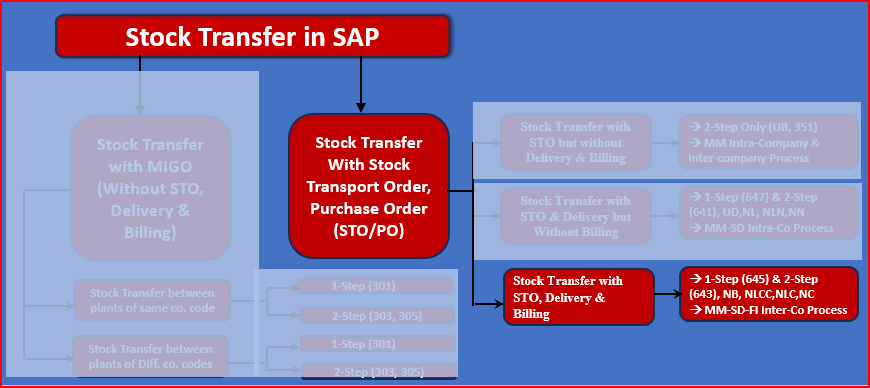
6.2 Stock Transfer With Stock Transport Order/Purchase Order (STO/PO)
Here stock transfer process starts with a document i.e. stock transport order, which is a kind of purchase order.
There are several types of Stock Transfer With Stock Transport Order/Purchase Order (STO/PO)
All types of Stock Transfer With Stock Transport Order/Purchase Order (STO/PO) is given below in pictorial form
Picture: Stock Transfer With Stock Transport Order/Purchase Order (STO/PO)
Stock Transfer With Stock Transport Order/Purchase Order (STO/PO) can be further divided into three parts
6.2.1 Stock Transfer with STO but without Delivery & Billing
This type of STO is used when transferring stock between two plants within the same company code. It ensures better inventory tracking and valuation compared to a standard transfer posting.
Below is the pictorial representation of this type of STO
Picture: Stock Transfer with STO but without Delivery & Billing
Please see the below post for the details of configuration & testing of STO without Delivery & Billing
6.2.2 Stock Transport Order with Delivery (STO with SD Delivery Process)
This STO type is used when stock transfers require a delivery document generated via SAP SD (Sales & Distribution Module). This is common when warehouse teams handle goods movement through outbound deliveries.
This setup is particularly useful for intra-company transfers where financial transactions are not required
Please see the below picture to see the pictorial representation of this stock transfer method
Picture: Stock Transport Order with Delivery (STO with SD Delivery Process)
Please see the below post for the details of configuration & testing of STO without Delivery & Billing
Intercompany STO is used when transferring stock between plants in different company codes. It requires a more complex process as it involves intercompany billing and affects financial accounting entries.
Please see below the pictorial representation of this method of stock transfer
Picture: Inter-Company STO with Delivery & Billing
Please see the below post for the details of configuration & testing of SAP Intercompany STO Process with Delivery & Billing